You can use a multi-select keyboard shortcut to select multiple Tracks or Playlists in your DISCO at once!
Using multi-select in your DISCO
Multi-select in DISCO works the same as it does in iTunes, Finder, and Windows Explorer.
On Mac
- Press and hold the
ShiftorCommandkey and click on a single Track or Playlist. - Continue holding the key and click on additional Tracks and Playlists.
Examples:
Holding Shift
Holding Command

On Windows
- Press and hold the
Controlkey and click on a single Track or Playlist. - Continue holding the key and click on additional Tracks and Playlists.
The Actions menu
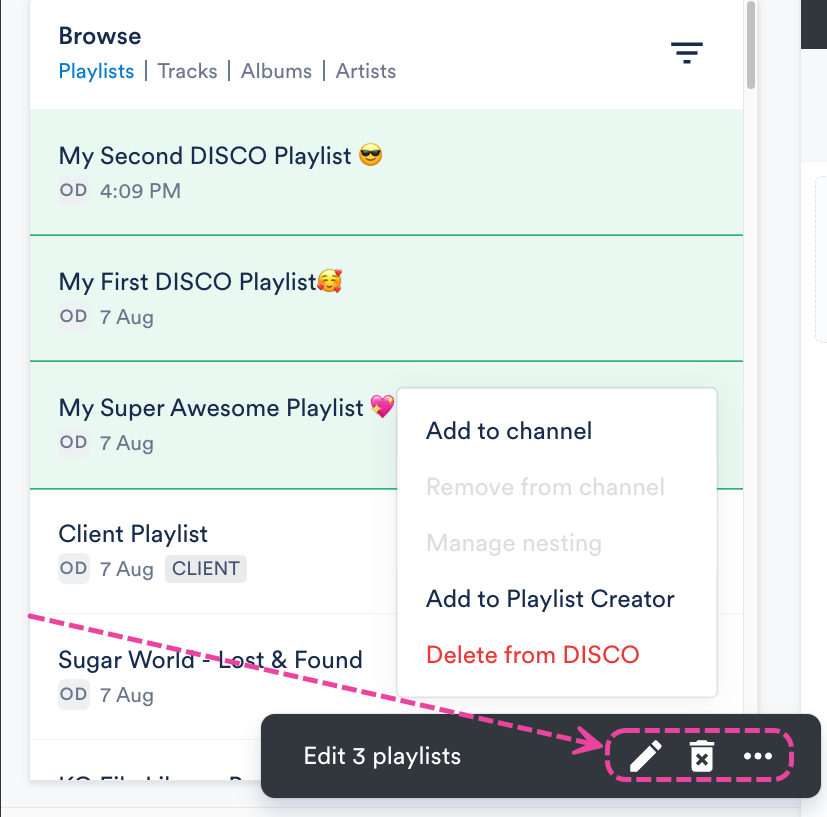
Once you've made your selections, you can drag them to where you'd like, or use the Actions menu at the bottom of the screen to do one of the following:
- Edit the selected Tracks
- Delete the selected Tracks
- Add or remove the selected Tracks to or from a Channel
- Manage nesting for the Tracks
- Add the selected Tracks to the Playlist Creator

To manage duplicate Tracks in your DISCO, you can merge them.
At a glance
Merging will remove duplicates while preserving the place and history of both the Master Track and the duplicate track(s) in any Playlists they were in.
Example:
We merged the duplicate Track "Broken coin (Final Master) 1" into the Master track "Broken coin (Final Master) 2". Before the merge, the duplicate Track was in the Playlist "My First DISCO Playlist", and the Master was in the Playlist "My Super Awesome Playlist". After the merge, the Master Track is now in both Playlists, retaining its original place in "My Super Awesome Playlist", in addition to replacing the duplicate in "My First DISCO Playlist".

Merging your Tracks
- Use multi-select to select all of the Tracks to be merged.
- Click the Merge button (two-pronged arrow icon) in the Edit menu at the bottom of the screen.

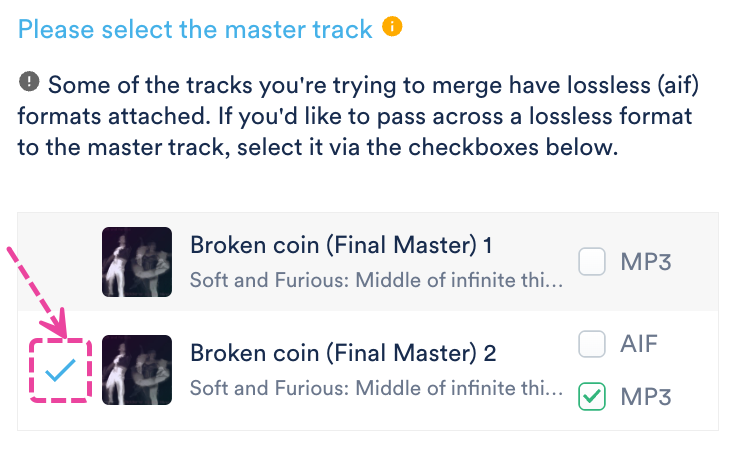
- Select the master track by clicking the white space to the left of the artwork. A checkmark should appear.
- Click the Merge tracks button.
- A confirmation message will appear. If you're sure, click the Let's merge button.
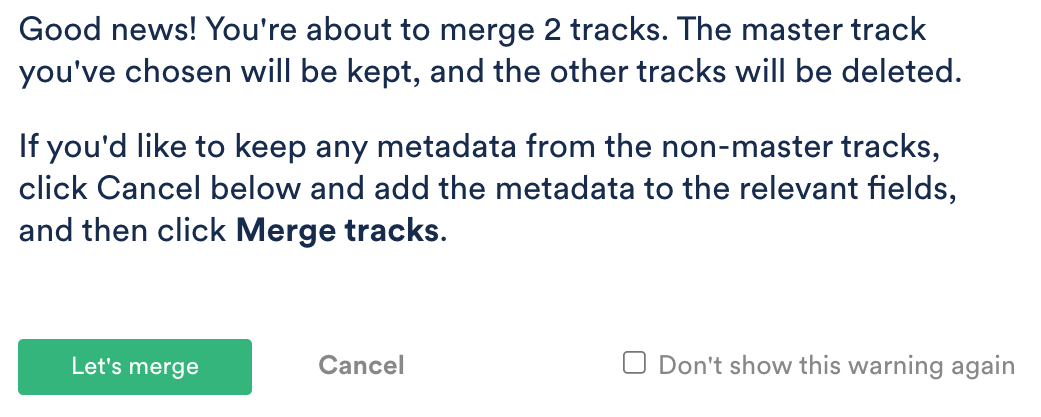


Only one Track will remain after the merge is complete, but it will appear in any Playlists in which the previous duplicates were.
Passing lossless formats (e.g. AIFF, WAV) across Tracks when merging
The Track you select as your Master may not have a lossless format (e.g. AIFF or a WAV), or the lossless format associated with the Master may not be the one you want to use. But, if the duplicate Track you're planning to discard in the merge contains a lossless format, you can pass this version across to the Master.
To do this, check the box next to the format you'd like to keep from the duplicate Track.
Example:
We want "Broken coin (Final Master) 1" to be our Master Track, but it does not have any lossless formats, so we want to keep the AIFF from the duplicate Track "Broken coin (Final Master) 2". Because we have checked the box next to the AIFF version of the duplicate Track, this format will be passed to the Master Track after the merge. In other words, after the merge, the Master Track will contain both the MP3 format from the Master and the AIFF format from the discarded duplicate.
You can add multiple different formats for individual Tracks in your DISCO. We also create copies of some of your Tracks through a process called Transcoding and store them alongside the original file format in an individual Track.
At a glance
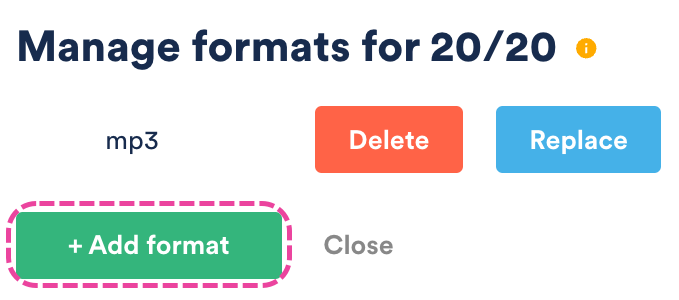
You can manage different file formats for your Tracks using the Manage and selecting the Files and format option.

With this option, you can:
- add additional audio formats of the same track
- remove audio formats from a Track
- replace audio formats within a Track
Transcoding
When you upload an audio file to your DISCO in a common lossless format (e.g. AIFF, WAV, CAF, FLAC), we create an mp3 copy. Likewise, when you a upload video file in a format other than mp4, we create an mp4 copy. This process is called Transcoding.
We transcode these files for a couple of reasons:
- better in-browser playback for your Tracks
- to ensure that there's a format available (mp3) to carry your metadata
We don't delete the original file and you can always make it available for your recipients to download by updating your Playlist Settings to Include original formats.
When you upload a track or video in these formats, you'll see Transcoding... under the track title:

Once the copy is made, it will be paired with the original as an alternate format of the same file and used as the default format for streaming and sending.
Adding audio formats
You can add one lossy (MP3 or M4A) and one lossless (WAV or AIFF) format per track.
- Open the Track menu (⋮) and select Manage, then select Files and formats.

- Click the + Add format button.
- Drag and drop the file, or click to browse your computer.
- A confirmation message will appear. Click the Done button.

Note: If you do not want a new MP3 copy of this track, uncheck this box.
Removing audio formats
If both lossy and lossless formats are present, you'll only be able to delete the lossless version. After the lossless version is deleted, you'll then be able to delete the lossy version.
- Open the Track menu (⋮) and select Manage, then select Files and formats.
- To the right of the format, click the Delete button.

- A warning message will appear. If you are sure, click the Delete button.

Replacing audio formats
- Open the Track menu (⋮) and select Manage, then select Files and formats.
- To the right of the format, click the Replace button.

- Drag and drop the file, or click to browse your computer.
- A confirmation message will appear. Click the Done button.

Note: If you do not want a new MP3 copy of this track, uncheck this box.
WAV + AIFF converter
On our Pro, Artist, Music Supervisor, and Enterprise plans, we have a premium feature that will create an AIFF version of your WAV files, and a WAV version of your AIFF files. These formats will be available to download in your DISCO and on share pages for recipients.
It is important to note that these extra versions won't appear under Manage files and formats, as this view only shows the formats you uploaded and any MP3 copies we've created.
