With our Nesting feature, you can group Versions of Tracks together so they appear under a single Main Track. It's a great way to organize related Tracks in your DISCO!
How does Track Nesting work on DISCO?
Nested Tracks have a badge counter on the Main Track:
Each Track in a nested set has a Version label that appears next to the Track within your DISCO and on Track and Playlist Share URLs and in Catalogs.
The available labels are:
- A cappella - A version of the Track with only vocals and no instrumental accompaniment.
- Clean - A version of the Track that doesn't contain profanity or explicit language.
- Cutdown - A shortened Version of the Track.
- Worktape - A quick, rough recording of a Track; essentially the "demo before the demo."
- Demo - An early recording or draft of a Track to demonstrate the Track's core ideas or receive feedback on.
- Explicit - A version of the Track that does contain profanity or explicit language.
- Instrumental - A Version of the Track without vocals.
- Main - The Main Track that other Tracks are nested under. Each nested set can only have one Main Track.
- Edit - A segment of a Track that has been edited to fit a specific visual clip, or otherwise altered in a particular way for the needs of a project.
- Mix - A version of a Track that may include different levels, effects, or added elements. Referred to as an alternative mix or ‘alt mix’.
- Other - A catch-all category for versions of Tracks that don’t fit into other predefined categories. These can alternative arrangements that are unique or experimental.
- Radio - A version of the Track edited for radio (e.g. shorter, edited to remove explicit content, etc).
- Remix - A version of the Track that has been altered in some way via adding, removing, or otherwise changing part(s) of the Track.
- Stem - Stems are treated differently from other versions. They're designed to store separated parts of your Tracks (like vocals or individual instruments). They aren't shared by default and have their own section under other nested versions. All stems collectively count as one version on the badge counter of the Main Track.
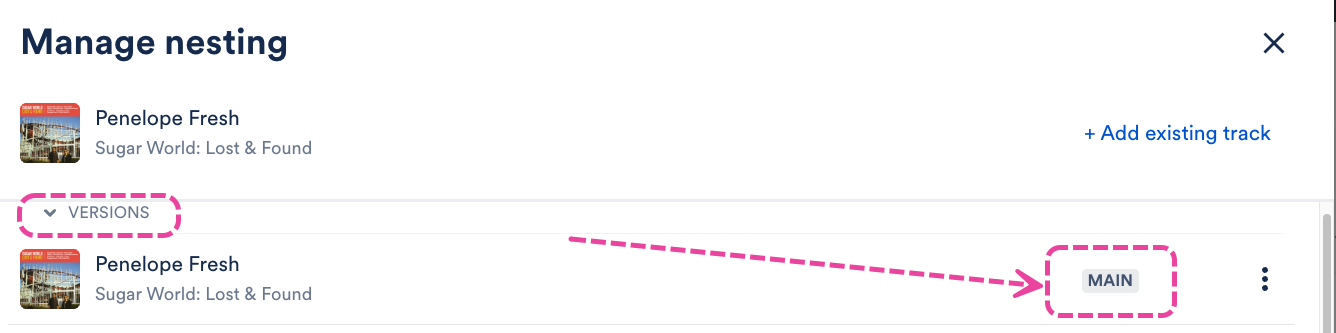
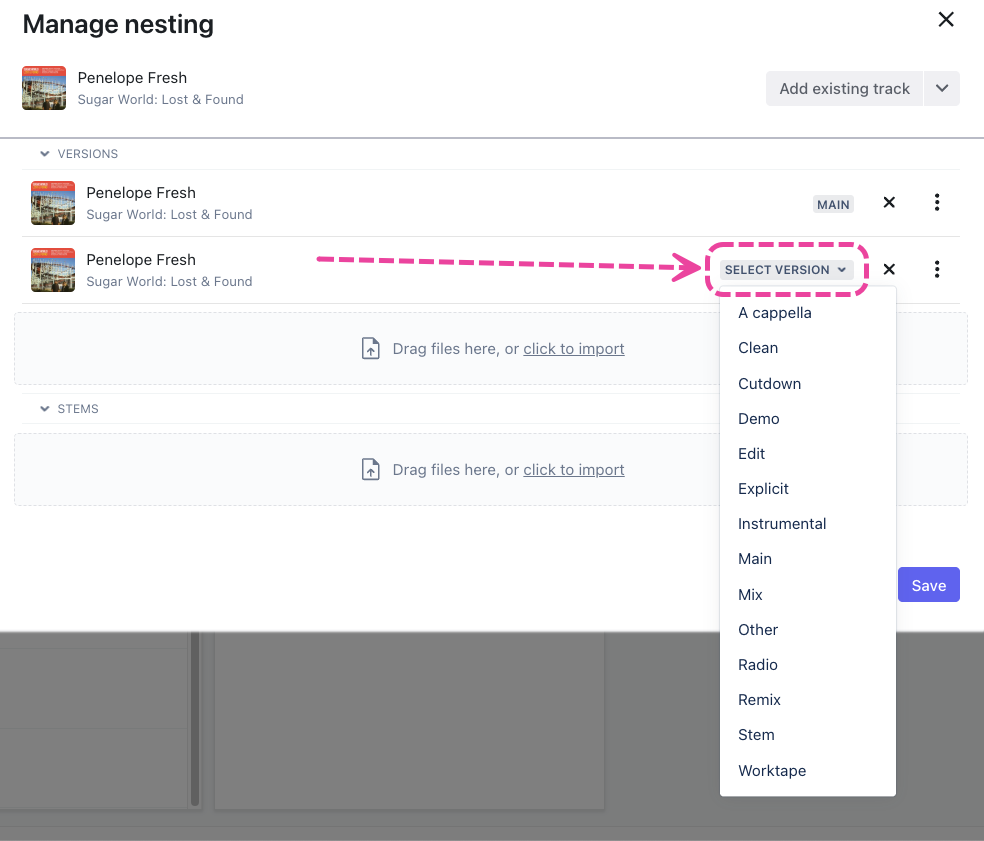
- Open the Track Menu (⋮) on the Track you'd like to be the Main Track.
- Select Manage > Nesting.

- From the Manage nesting page, under Versions, this Track will show as your Main Track.
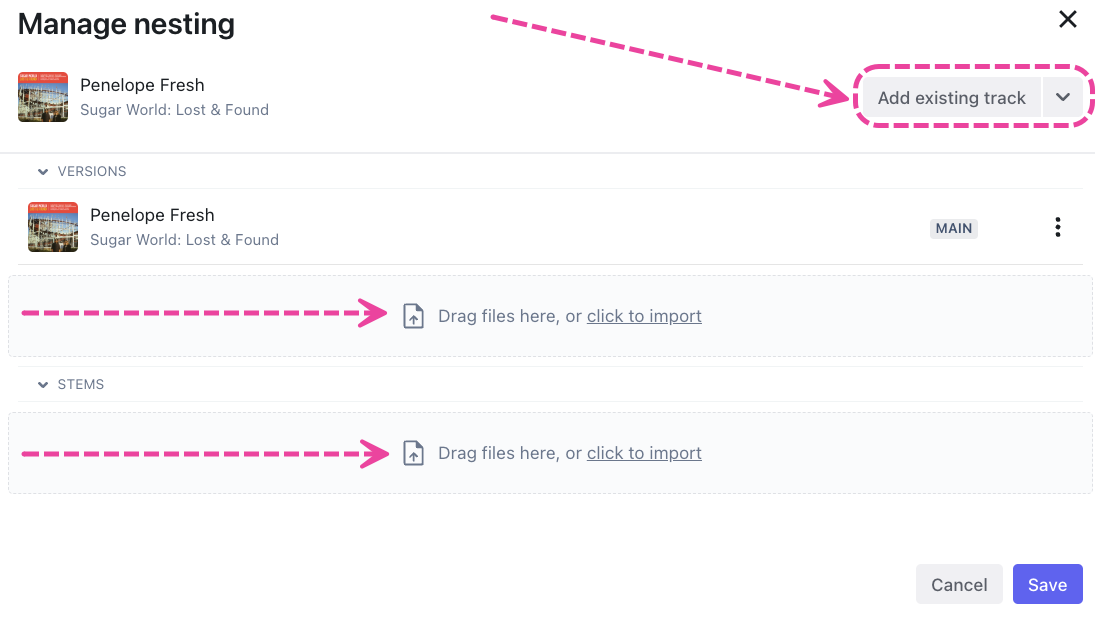
- You can add Versions and Stems by dragging or uploading Tracks, or clicking the Add existing track button.
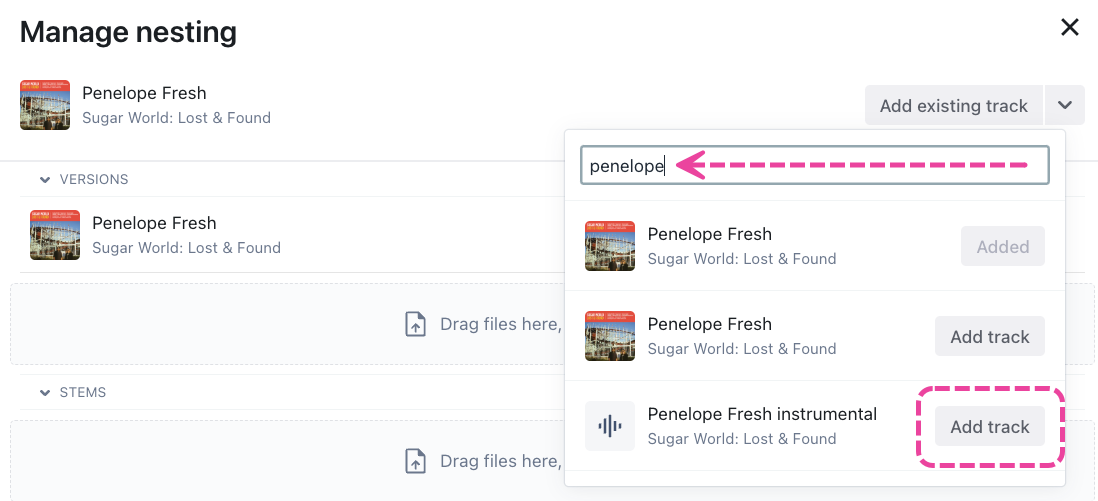
- When adding an existing Track, type to search for the Track and click the Add track button.
- Open the Select Version dropdown and choose a Version label.

- Instrumentals will automatically be labelled INSTRUMENTAL.
- Selecting the STEM label will move the Tracks to the STEMS section.
- Click the Save button.


- Open the Track Menu (⋮) on the Track you'd like to be the Main Track.
- Select Manage > Nesting.
- From the Manage nesting page, click the X next to the Track you wish to remove.
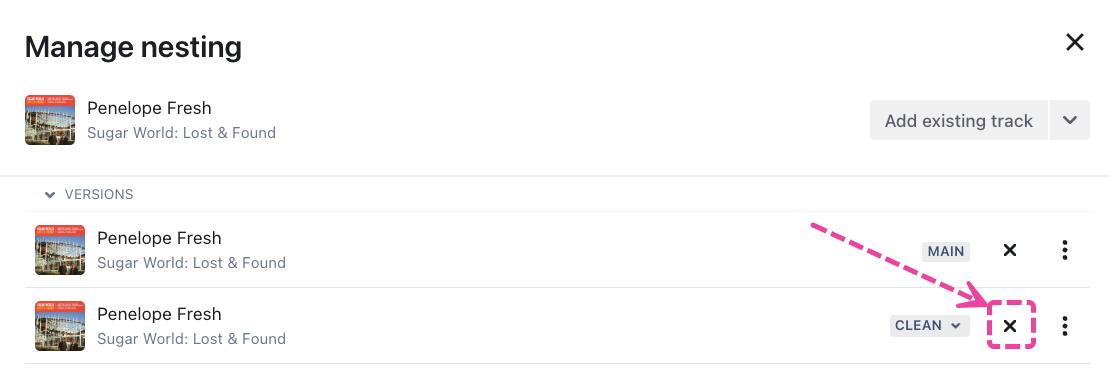
- Click the Save button.

- Open the Track Menu (⋮) on the Track you'd like to be the Main Track.
- Select Manage > Nesting.
- From the Manage nesting page, open the dropdown on the desired Track and choose a new Version label.
- Click the Save button.

If you just created a nested set and the Main Track was already in an existing Playlist, the nested Versions may not be reflected in that Playlist. You can update the Playlist Settings to include these Versions.
Note: By default, all newly created Playlists will have nested versions enabled and stem sharing disabled.
- Open the Playlist menu (⋮) and select Playlist Settings.
- From the Playlist Info tab, under Content Settings, set the Include nested track versions and Share stems toggles to ON.
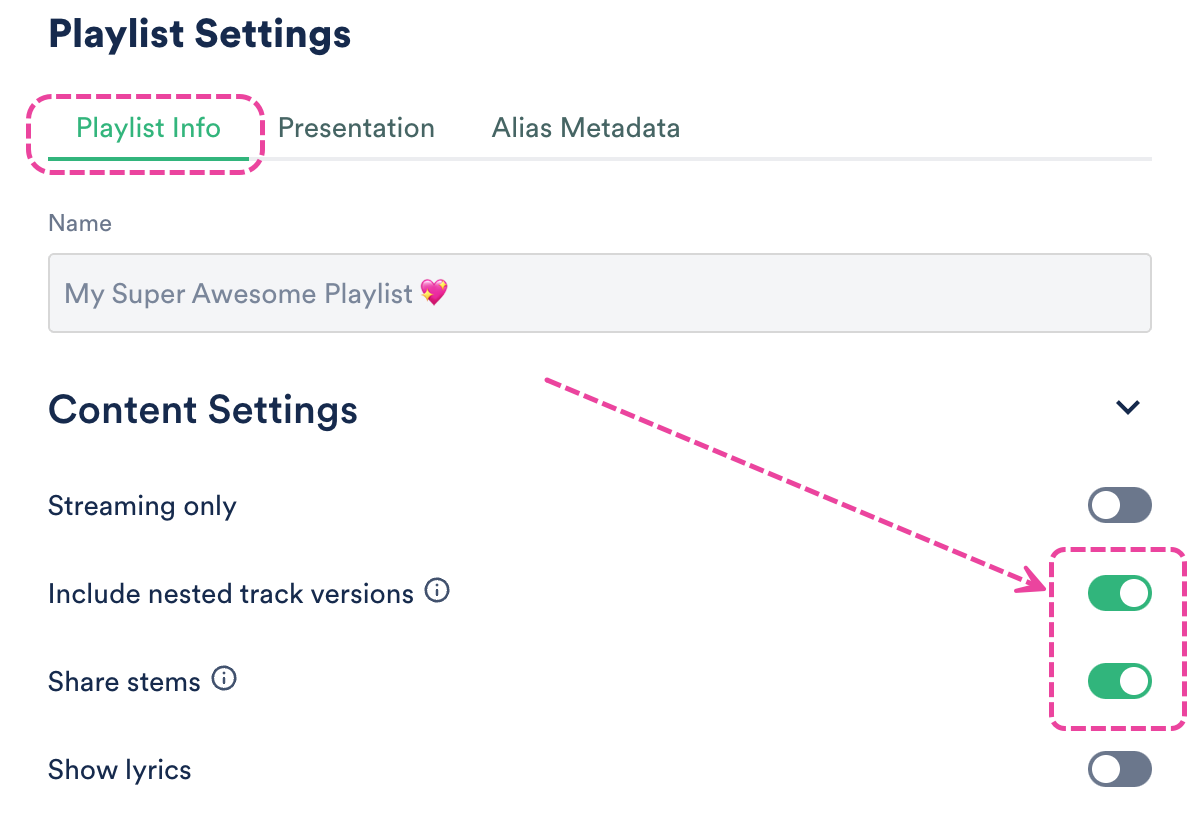
- Click the Save Playlist button.

Each nested Version will count as 1 Track against your quota. You can have a maximum of 20 nested Versions per Main Track.
Stems, however, are counted differently. One set of stems per Main Track will only count as 1 track on your track quota. You can have up to 100 Stems per Main Track.
Note: Stems must have the STEM Version label to be counted as a Stem.
If you are on a DISCO Pro plan, you can export a CSV file of your Track Metadata to manage Track Nesting in bulk (also known as Bulk Nesting)!
At a glance
Bulk Nesting is a four-part process:
- Generating an export in DISCO
- Preparing the file for re-import
- Creating and editing Nested sets
- Re-importing your file
Generating an export in DISCO
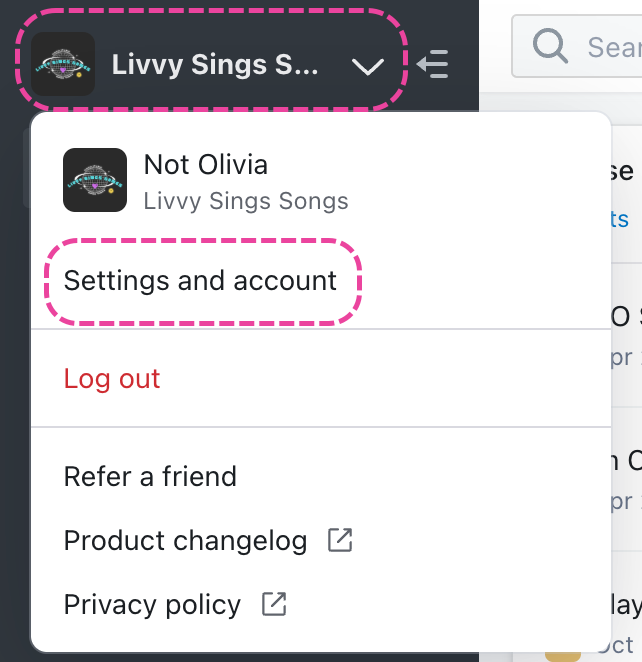
- In the top-left corner of your DISCO, click on your DISCO Business Name to open the menu.
- Select Settings and Account.
- Under Data & Sharing, select Export Nesting CSV, and click the Export button.
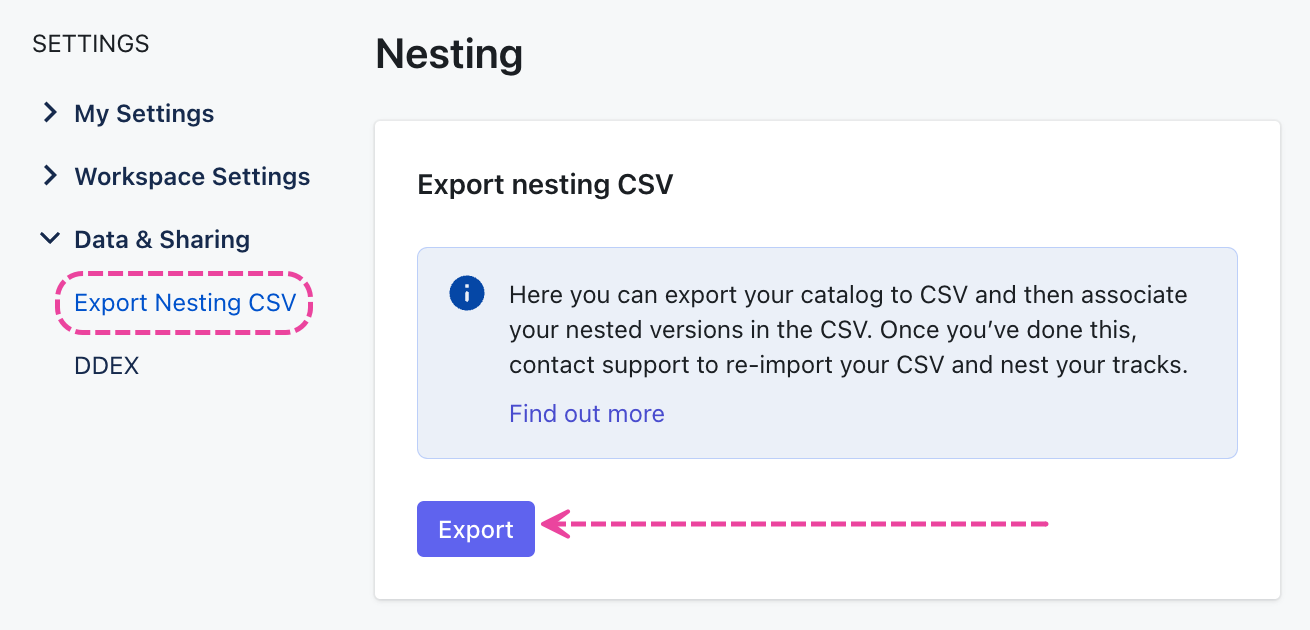
- Depending on the size of your catalog, the export will either be automatically downloaded to your computer or sent to the email address associated with your account.


Preparing the file for re-import
Important: Any edits you make in this file will overwrite the existing data in your DISCO upon re-import.
Once exported, your file will contain columns for each of the DISCO standard metadata fields, any custom fields you may have, and three additional Nesting fields: Main track id, Nesting position, and Version label. To ensure a successful re-import, be sure to review the following information and guidelines:
Required Nesting fields
Track ID
|
Main track id
|
Nesting position
|
Version label
|


✅ Dos and ❌ Don'ts
Do
✅ Keep the required Nesting field columns (with these specific header names) in your file: Track ID, Main track id, Nesting position, Version label.
You may choose to remove any other columns, but these four must remain in your file with these exact names, even if there is no data.
✅ Use only these supported labels in the Version label column: A Cappella, Clean, Cutdown, Demo, Edit, Explicit, Instrumental, Main, Mix, Other, Radio, Remix, Stem, Worktape.
✅ Make sure all Nested Tracks have only one Main track id.

✅ Make sure all Nested Tracks in a Nested set have the same Main track id.

✅ Double-check to make sure all information in the file is correct!
Don't
❌ Add a Main track ID for any Main Tracks.
Instead, you may choose to add the 'Main' Version label (optional).
❌ Have multiple Tracks referencing each other in the Main track id field.
This will cause the import to fail.
❌ Have any Main Tracks also listed as Nested Tracks in other Nested sets (and vice versa).

Creating and editing Nested sets
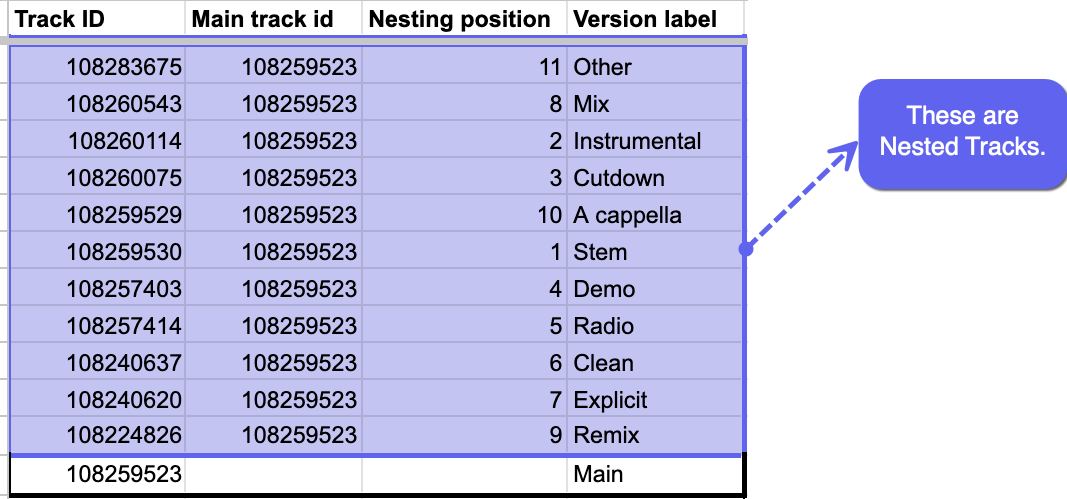
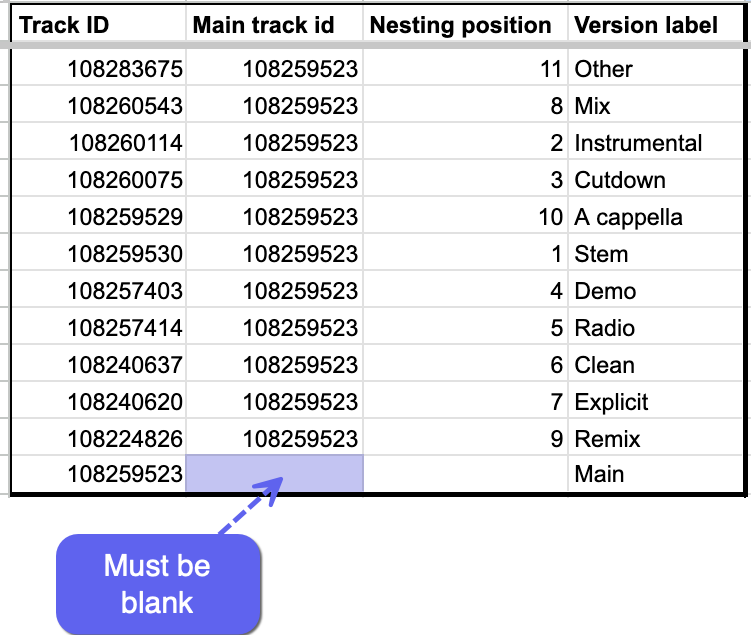
Here is an example of a Nested set:

Nested sets have:
- one Main Track
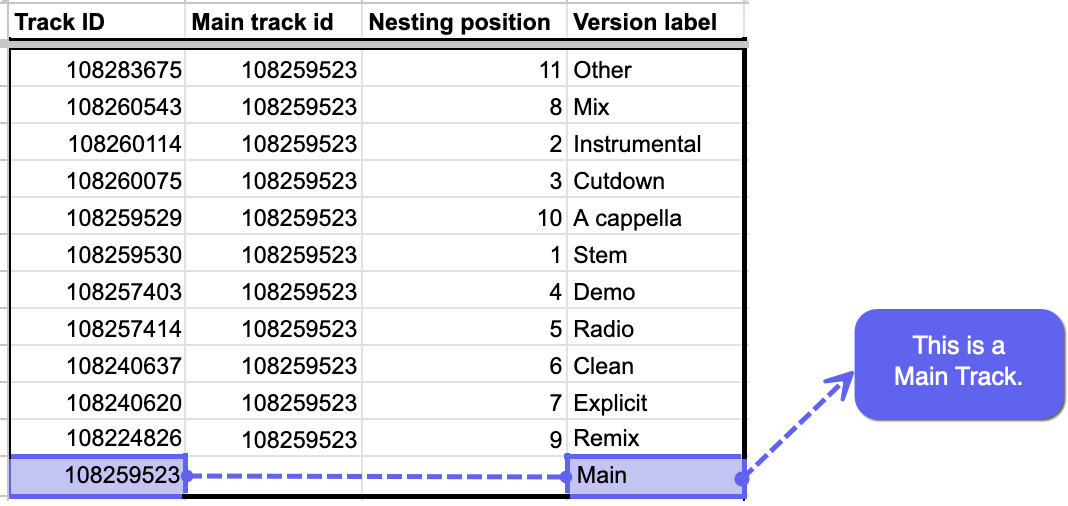
- Nested Tracks


Create a new Nested set
- Determine which will be the Main Track for the set.
Optional: Add the 'Main' Version label for the Main Track.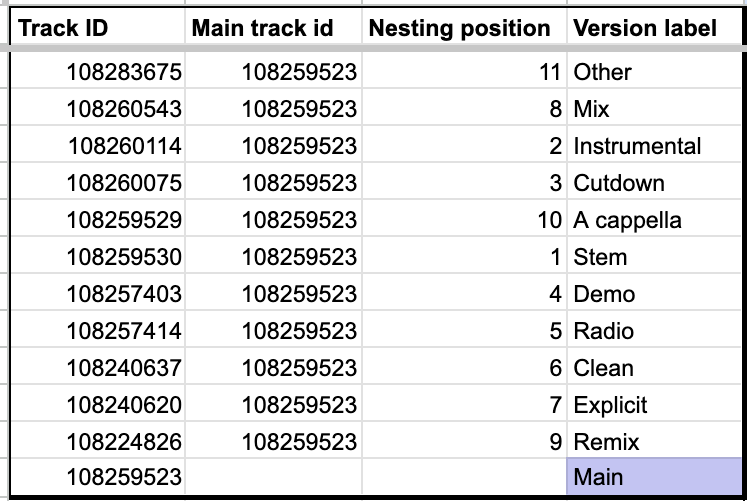
- Copy the Track ID value for the Main Track.

- Paste that same Track ID into the Main track id column for all of the Tracks that you want to become Nested.
- Make sure the Main track id for the Main Track in the set remains blank.
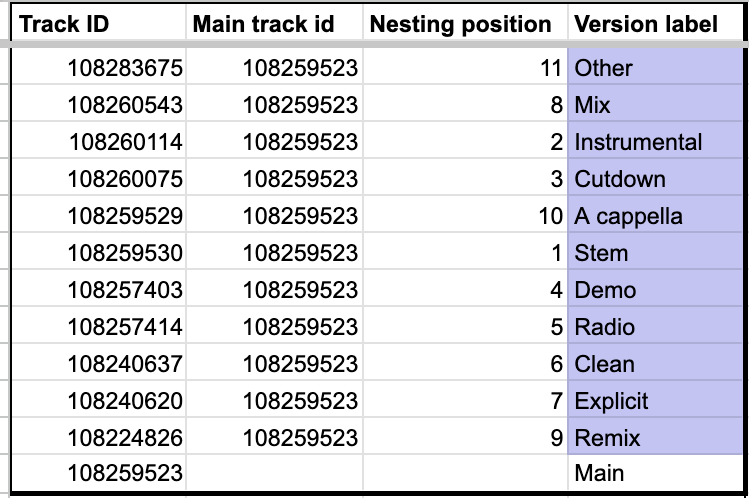
- Optional: Add a Version label for each of the Nested Tracks.
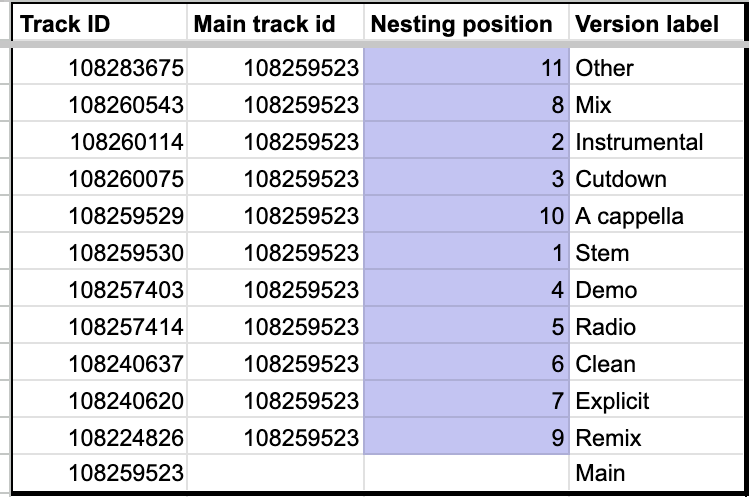
- Optional: Add the Nesting position (e.g. 1-11) for each of the Nested Tracks.


Edit an existing Nested set
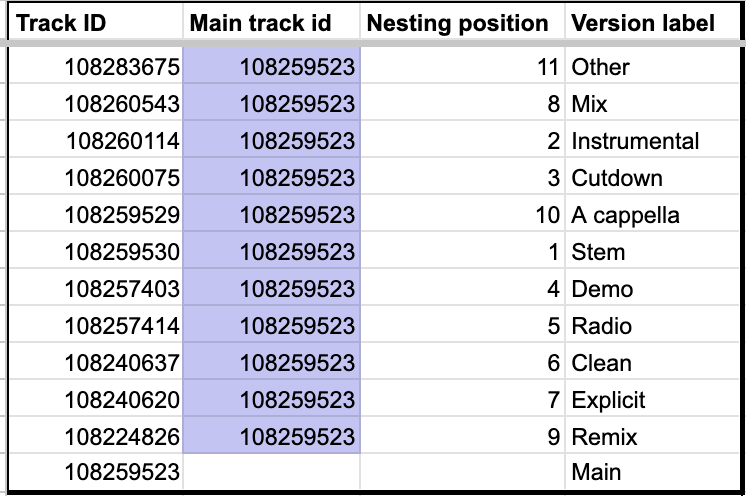
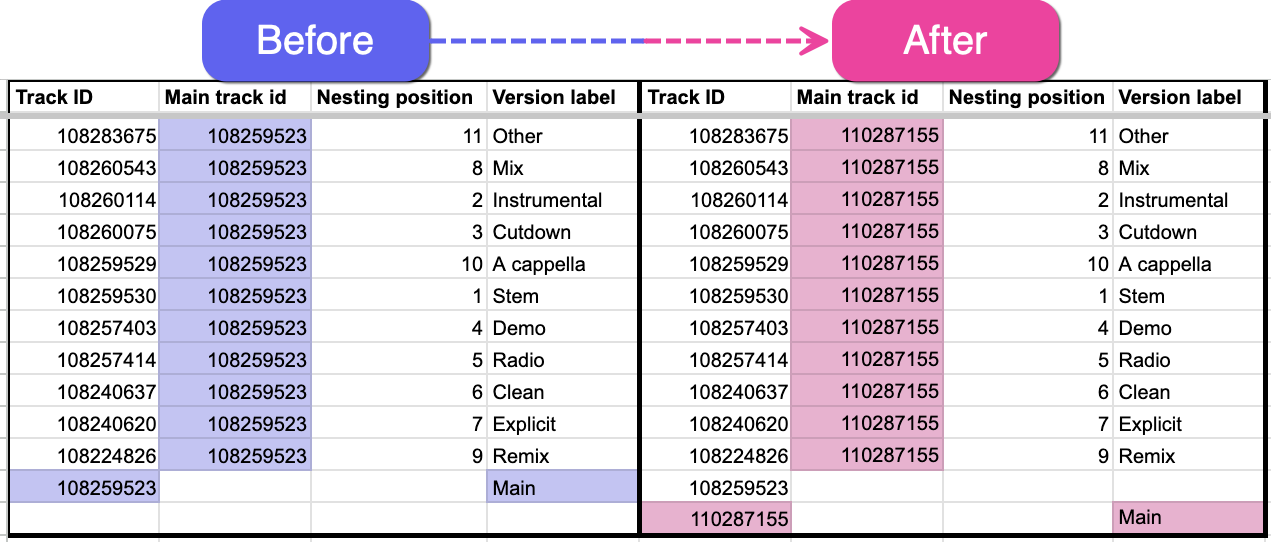
- Move Nested Tracks to a new Main Track:
- Copy the Track ID for the new desired Main Track.
- Remove the Main track id for all Nested Tracks in the set.
- Paste the Track ID for the new Main Track in the Main track id field for all Nested Tracks.
- Recommended: Remove the 'Main' Version label from the old Main Track.
- Optional: Add the 'Main' Version label to the new Main Track.
- Update or remove Nesting position:
- Update or remove the numbers in the Nesting position column.
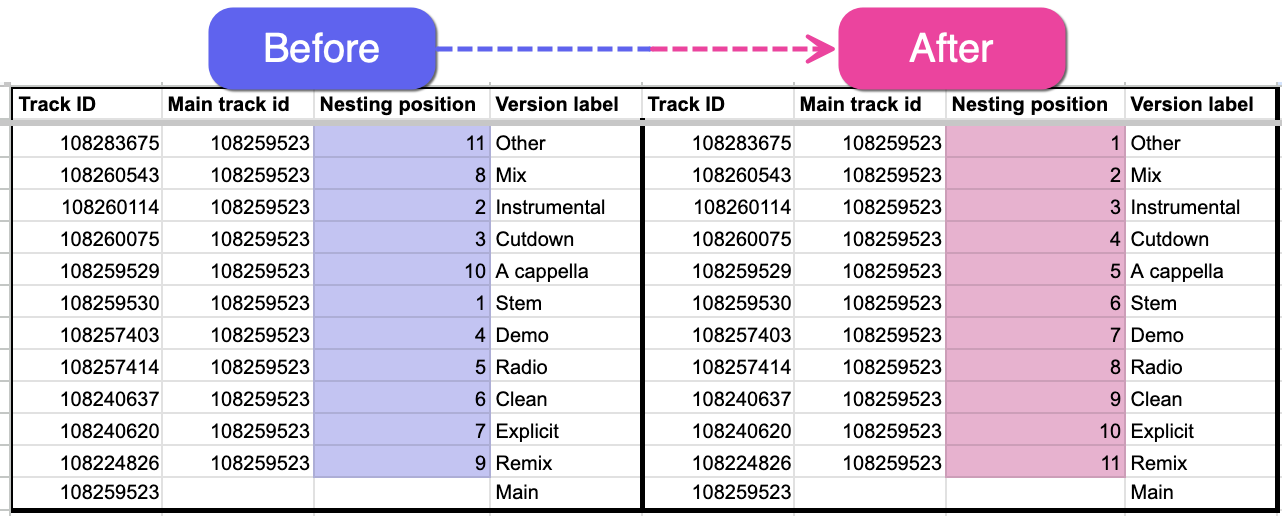
- Update or remove the numbers in the Nesting position column.
- Update or remove Version labels:
- Update or remove the labels in the Version label column.
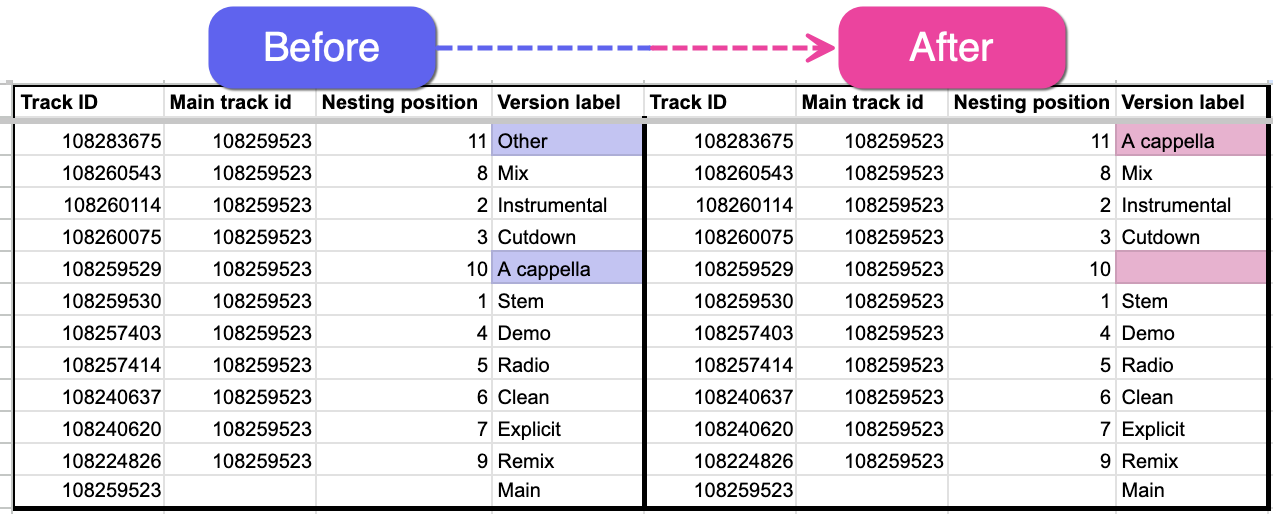
- Update or remove the labels in the Version label column.
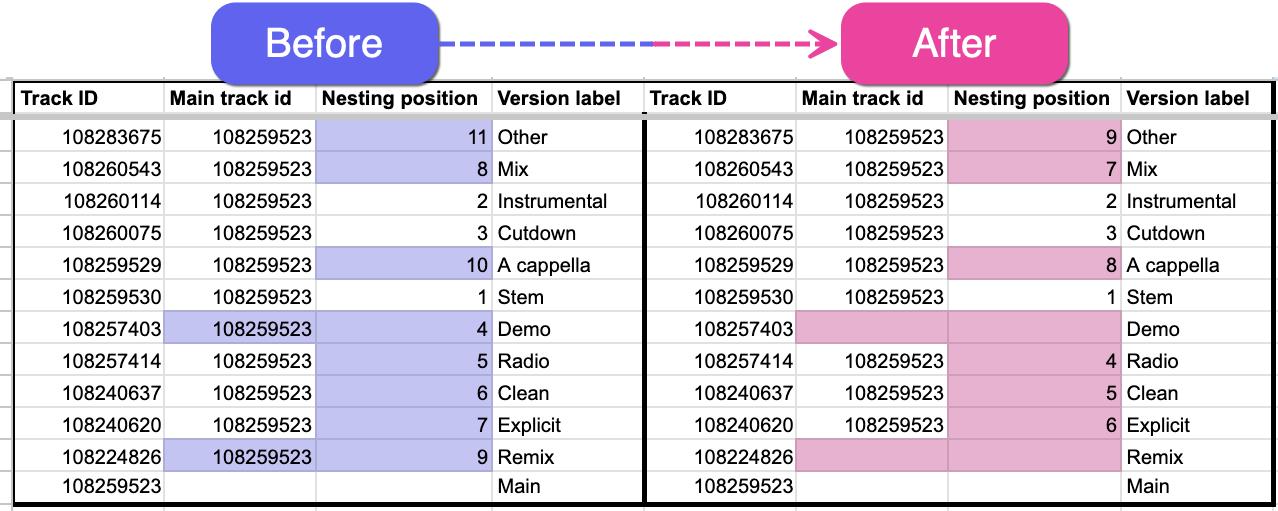
- Remove some Tracks from a Nested set:
- Remove the Main track id from the Nested Tracks you want to remove.
- If the Tracks had Nesting positions, you will need to update these for the remaining Tracks.
- Undo Nesting:
- Remove the Main track id from all Nested Tracks in the set.
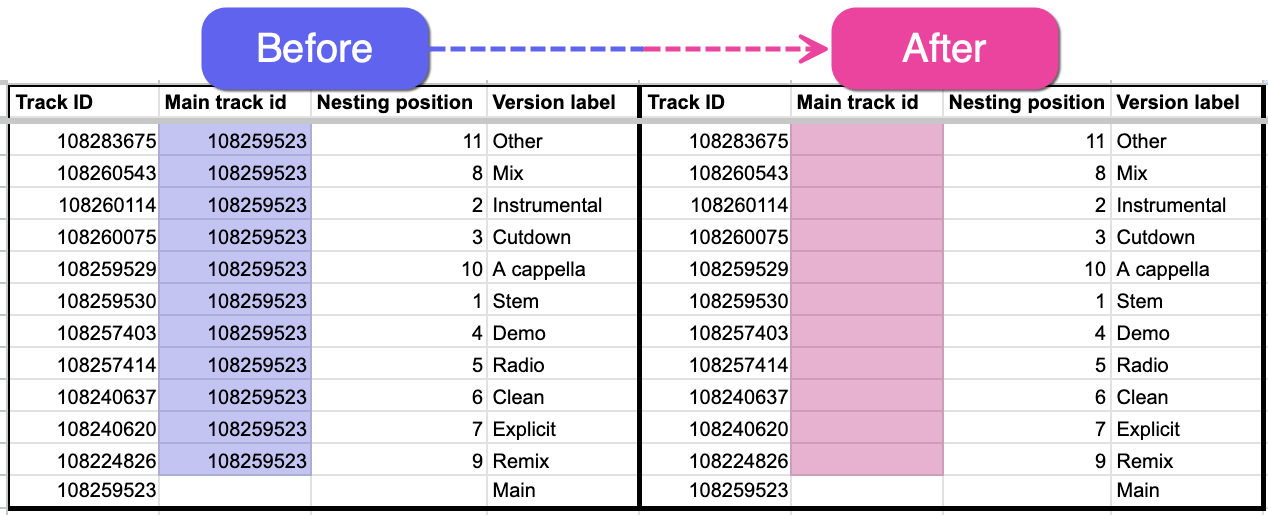
- Remove the Main track id from all Nested Tracks in the set.


Re-importing your file
Once you have double-checked that all information is correct, contact our Support team to request that your file be re-imported into your DISCO.
