What are DISCO Catalogs?
DISCO Catalogs (formerly known as DISCO Libraries) are essentially mini-websites you can create in your DISCO to host and publish specific curated content in a simple, searchable, and easy-to-use way. There are many use cases for Catalogs – whether it's to showcase a specific group of Artists/Albums, highlight your 1-stop/easy clears, or make a Catalog specifically for a client.
You can customize access permissions to Catalogs to limit who can view and download your content. Primary Catalogs also make it easier for music supervisors to find your content and download it or save it straight to their DISCO!
How do I get access to DISCO Catalogs?
Catalogs are included when you sign up for our our Discovery Suite subscription.
For more information on Catalogs, check out out Discovery Suite Course in the School of DISCO! Specifically, we recommend the following videos to help establish a baseline on Catalogs:
You can have multiple Catalogs in your DISCO.
Creating a new Catalog
- On the left sidebar of your DISCO, under Discovery Suite, select Catalogs.
- From the Catalogs page, click the Create new catalog button in the top-right.

- Add a Name for your Catalog and click the Save button.

- Directly after creating your Catalog, you'll be taken to Catalog Settings page with the Content section open.


Adding content to your Catalog
Adding Tracks to your Catalog
Tracks are added and published to your Catalog in two ways:
- from being contained in a Channel that you've linked in your Catalog Settings (under Content > Connect channels), as outlined in the steps below
- from being contained in a Playlist or Album that has been published to your Catalog (see the next section of this article for details)
To add Tracks to your Catalog from Channels:
Tip: We recommend creating dedicated Channels and Folders for your Catalog content. This makes it easier to manage the content in your Catalog without having to change the existing structure of your content in other Channels.
- From the Catalog Settings page, under Content, select Connect channels.
- Check the box(es) next to the desired Channel(s) and Folder(s) to add the content from them to your Catalog.
- Click the Update content button.
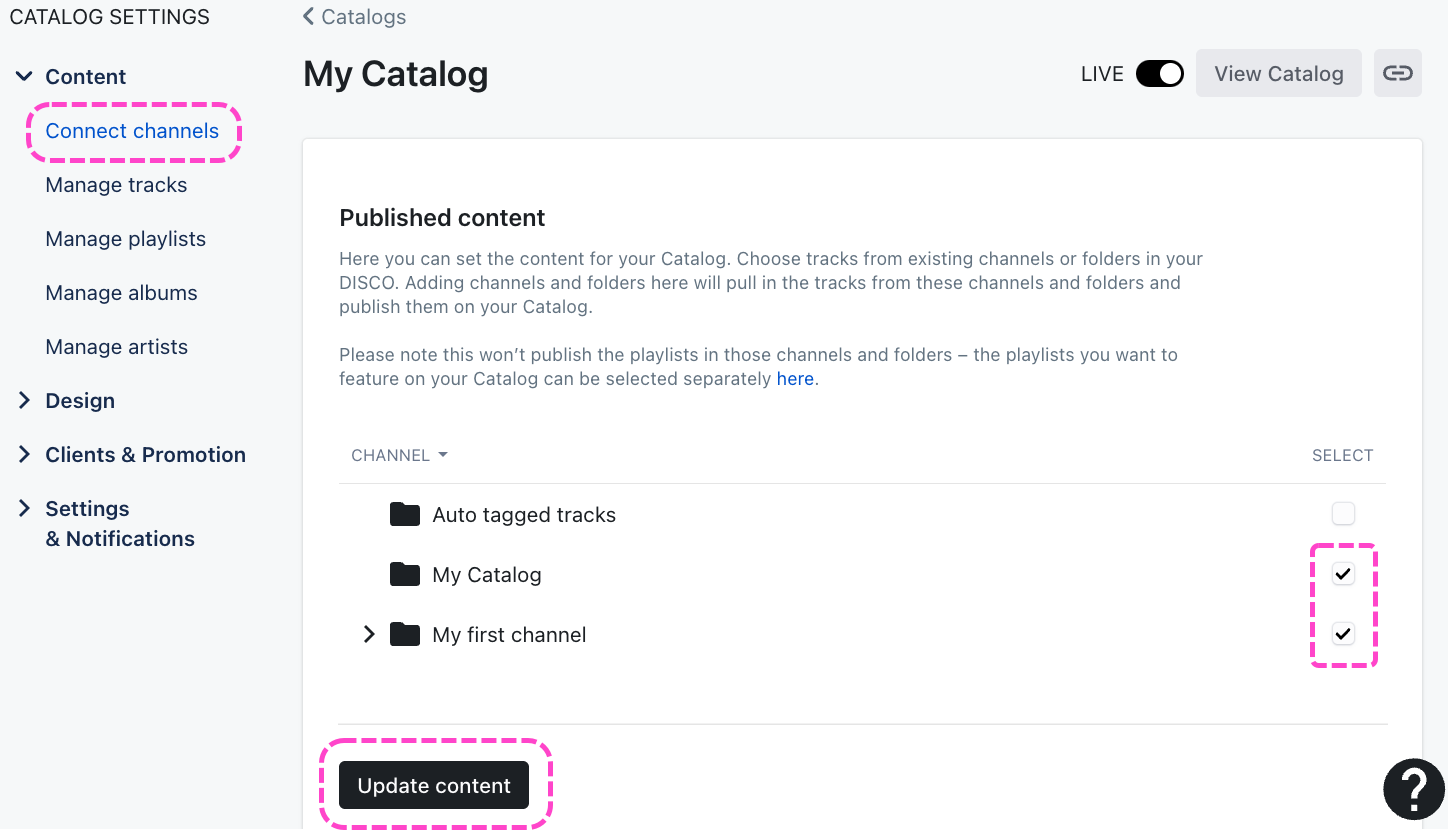
- All Tracks contained in the Channel(s) you selected will now be published on your Catalog.

Playlists and Albums contained within the Channel(s) you select here will not be published on your Catalog just yet, as there are additional steps to take. See the next section of this article for details.
However, any Tracks contained within published Channels, regardless of whether or not they are contained within any Playlists/Albums, will be published to your Catalog. They'll be immediately visible from searches, the Artists section, and any of the applicable tag sections (Tempo, Mood/feel, Instrument, Vocals, Genre, Lyric themes, Duration) on the left sidebar of your Catalog.
Adding Playlists/Albums to your Catalog
Adding and publishing Playlists/Albums to Catalogs works differently than adding and publishing Tracks via Channels. Even if you previously published Tracks to your Catalog via Channels, and those Tracks were within Playlists/Albums, those Playlists/Albums wouldn't have been published to your Catalog.
To add Playlists/Albums to your Catalog:
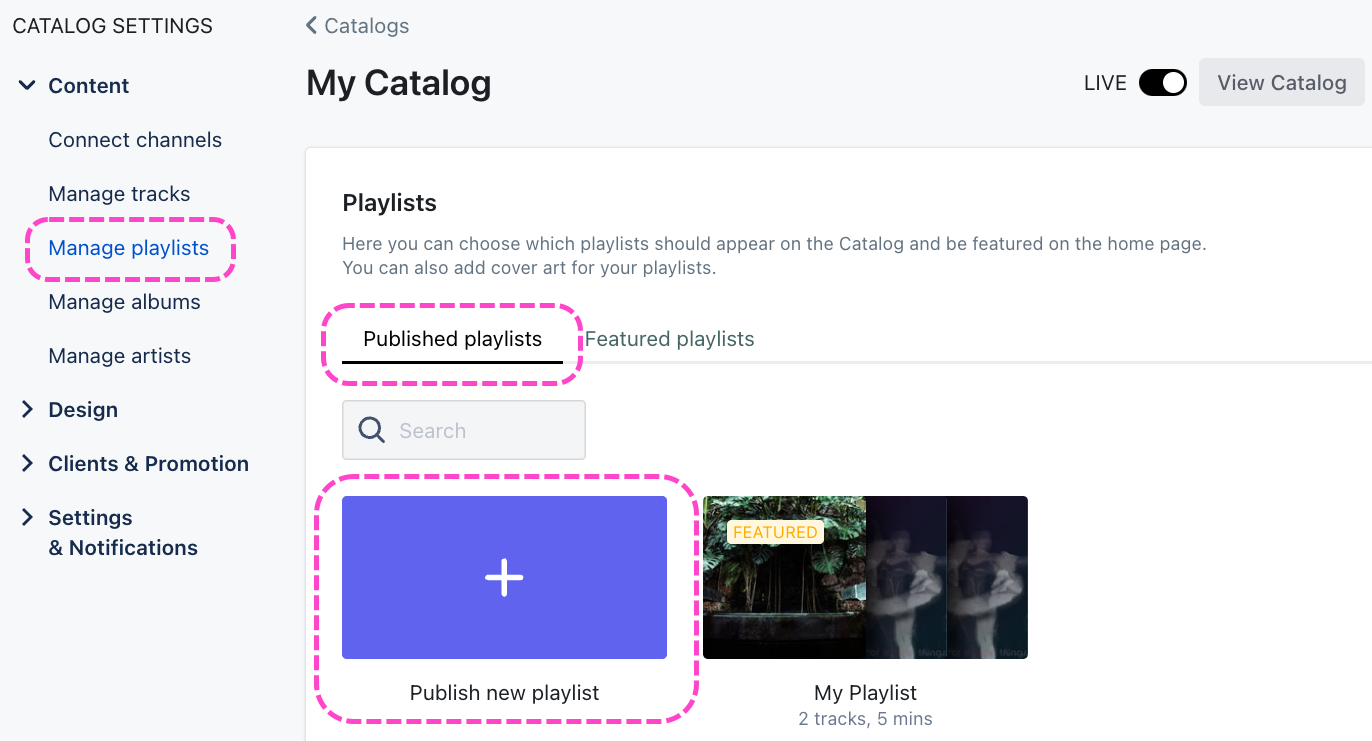
- From the Catalog Settings page, under Content, select Manage playlists or Manage albums.
- From the Published playlists or Published albums tab, click the + plus to Publish new playlist or Publish new album.
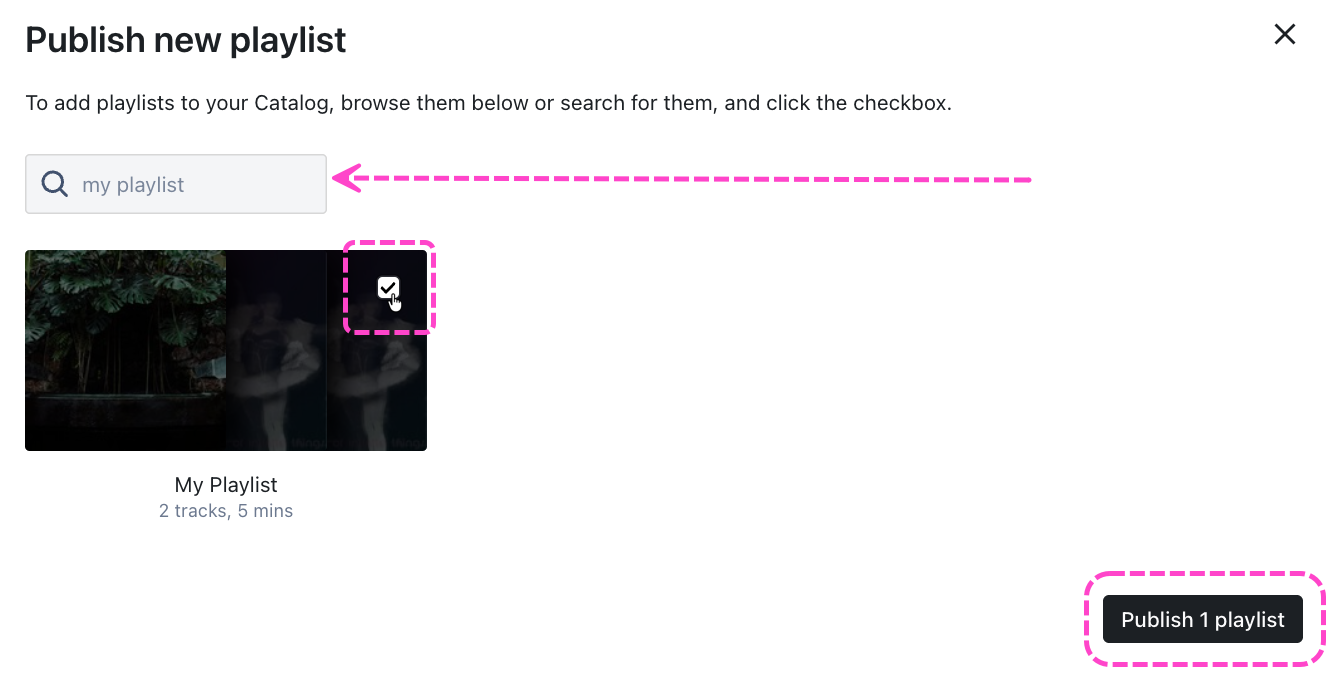
- Use the search box or browse the page to find your Playlists/Albums.
- Hover over the Playlist/Album and check the box. You can select multiple Playlist/Albums at once.
- Click the Publish playlist(s) or Publish album(s) button.


Adding Featured content to your Catalog
In addition to adding and publishing content, you can also Feature selected Tracks, Playlists, and Albums on the home page of your Catalog. Visit this article for more information on Featured content.
Removing Content from your Catalog
Removing Playlists/Albums
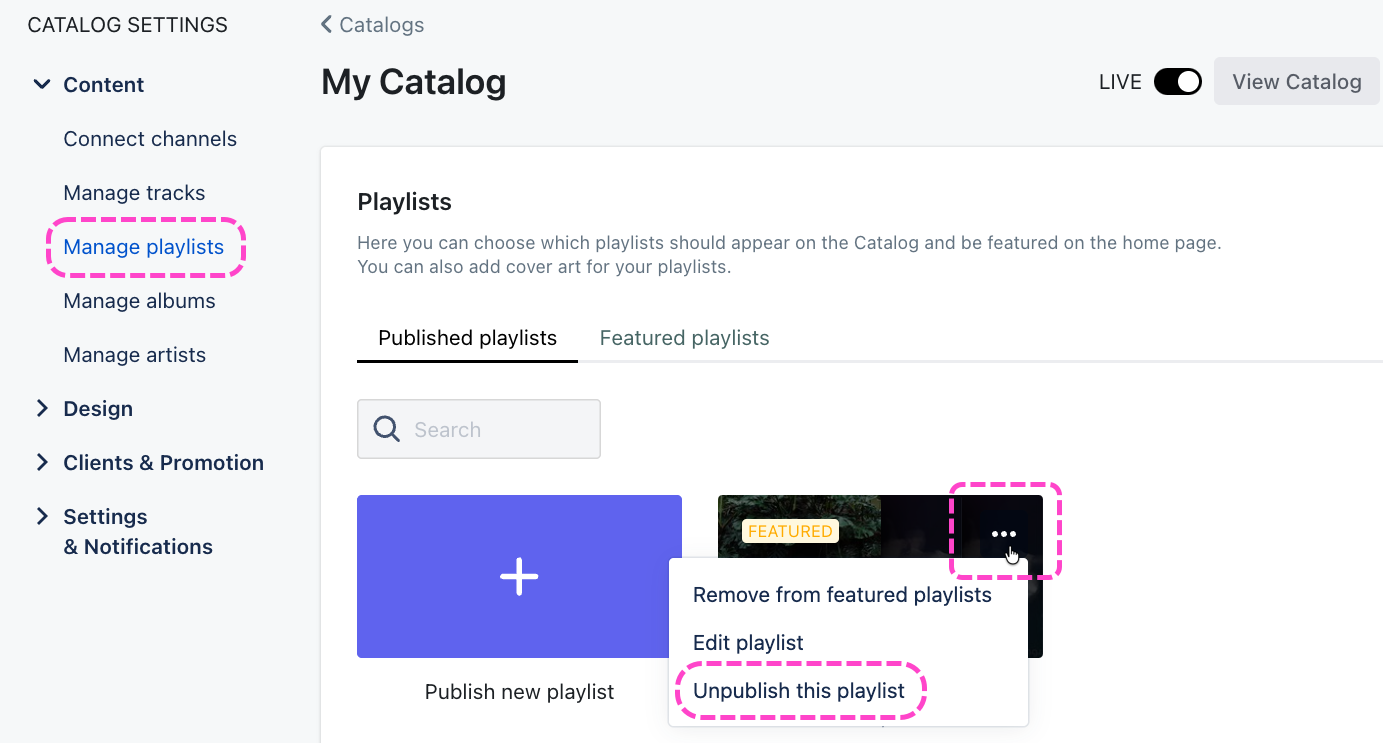
- From the Catalog Settings page, under Content, select Manage playlists or Manage albums.
- Select the Published playlists or Published albums tab.
- Hover over the Playlist or Album.
- Open the ellipses menu (…) and select Unpublish this playlist or Unpublish this album.

Removing Tracks
To remove individual Tracks from your Catalog, you can either:
- remove them from the published Playlist(s) they're contained in
- remove them from the published Channel(s) or Folder(s) they're contained in
- unpublish the Playlist(s) they're contained in
Designing your Catalog home page
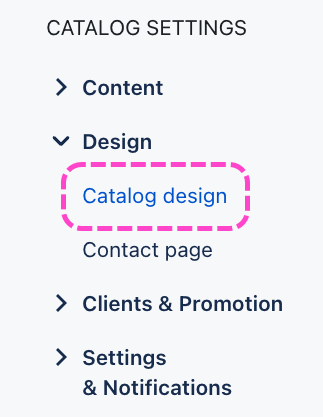
- From the Catalog Settings page, under Design, select Catalog design.
- Here you can add:
- banner image - optimal dimensions 2400 x 1000 px (3:1 ratio)
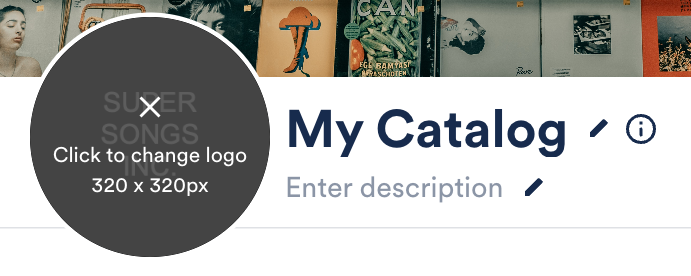
- logo - dimensions 320 x 320 px
- name - the title that appears on the home page of your Catalog
- description - a short description for your Catalog home page
- You can also update your Catalog title by clicking the edit pencil:

- Click the Save button.


Example Catalog home page:
Editing Playlist and Album designs
- From the Catalog Settings page, under Content, select Manage playlists or Manage albums.
- Select the Published playlists or Published albums tab.
- Hover over the Playlist(s), open the ellipses menu (…), and select Edit playlist or Edit album.
- In the Playlist design or Album options window, choose a design view for your Playlist (which will update the Playlist cover):
- Default - This is a cover generated by DISCO using various artwork from the Playlist.
- Choose a color - This allows you to choose a single color for the cover using a color picker.
- Choose an image - This allows you to upload a custom cover image for the Playlist. The recommended size is 1500 x 1000 px.

Note: Albums have one additional option: You can select a Release date. - Click the Confirm button.


Publishing your Catalog
There are two ways to do this:
Method 1
- On the left sidebar of your DISCO, under Discovery Suite, select Catalogs.
- From the Catalogs page, set the STATUS toggle for the desired Catalog to ON.


Method 2
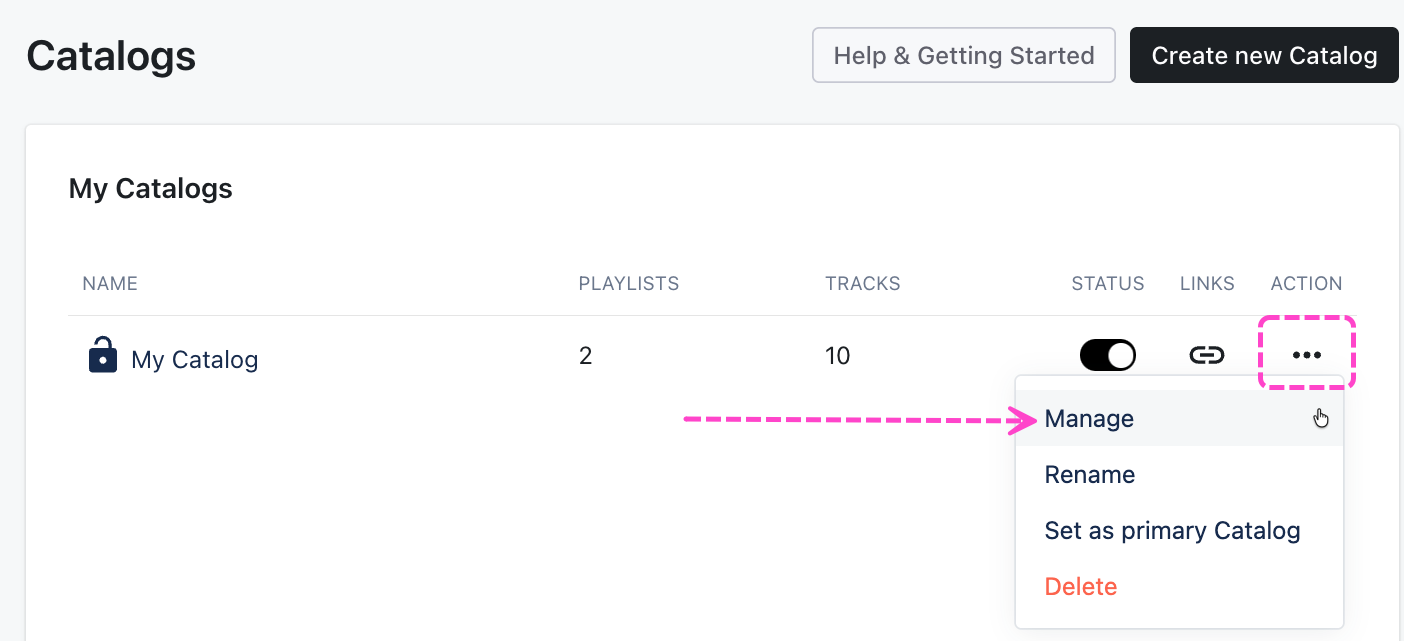
- On the left sidebar of your DISCO, under Discovery Suite, select Catalogs.
- From the Catalogs page, open the Action menu (…) to the right of the desired Catalog and select Manage.

- From the Catalog Settings page, in the top-right corner, set the UNPUBLISHED toggle to ON.
 It should now show as LIVE.

 It should now show as LIVE.
Viewing your Catalog
- On the left sidebar of your DISCO, under Discovery Suite, select Catalogs.
- From the Catalogs page, open the Action menu (…) to the right of the desired Catalog and select Manage.
- From the Catalog Settings page, in the top-right corner, click the View Catalog button.


Sharing your Catalog
- On the left sidebar of your DISCO, under Discovery Suite, select Catalogs.
- From the Catalogs page, open the Action menu (…) to the right of the desired Catalog and select Manage.
- From the Catalog Settings page, in the top-right corner, choose one of the following options:
- Click the QR code and select Download or Copy.

- Click the Copy URL button.

- Click the QR code and select Download or Copy.
- Once you share this QR code or URL, your recipients can log in (if you've invited them), or request access via the Catalog. Refer to this section of this article for more information on managing Catalog access requests.


After adding and publishing content in your Catalog, you can then add Featured tracks, Featured playlists, and Featured albums to the home page.

Adding Featured Tracks
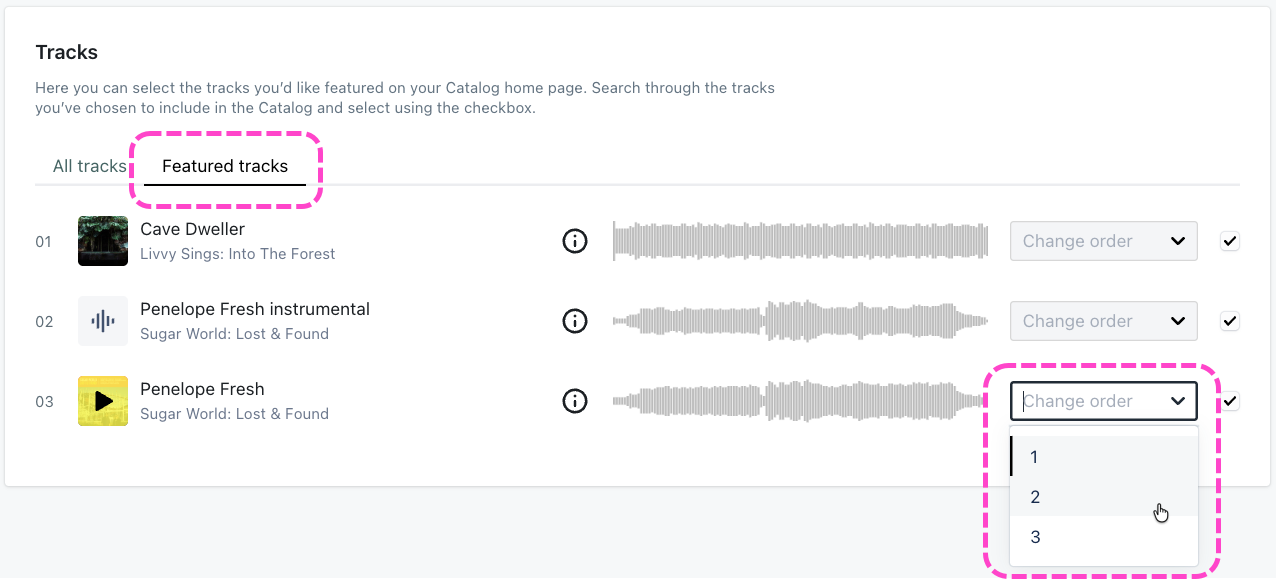
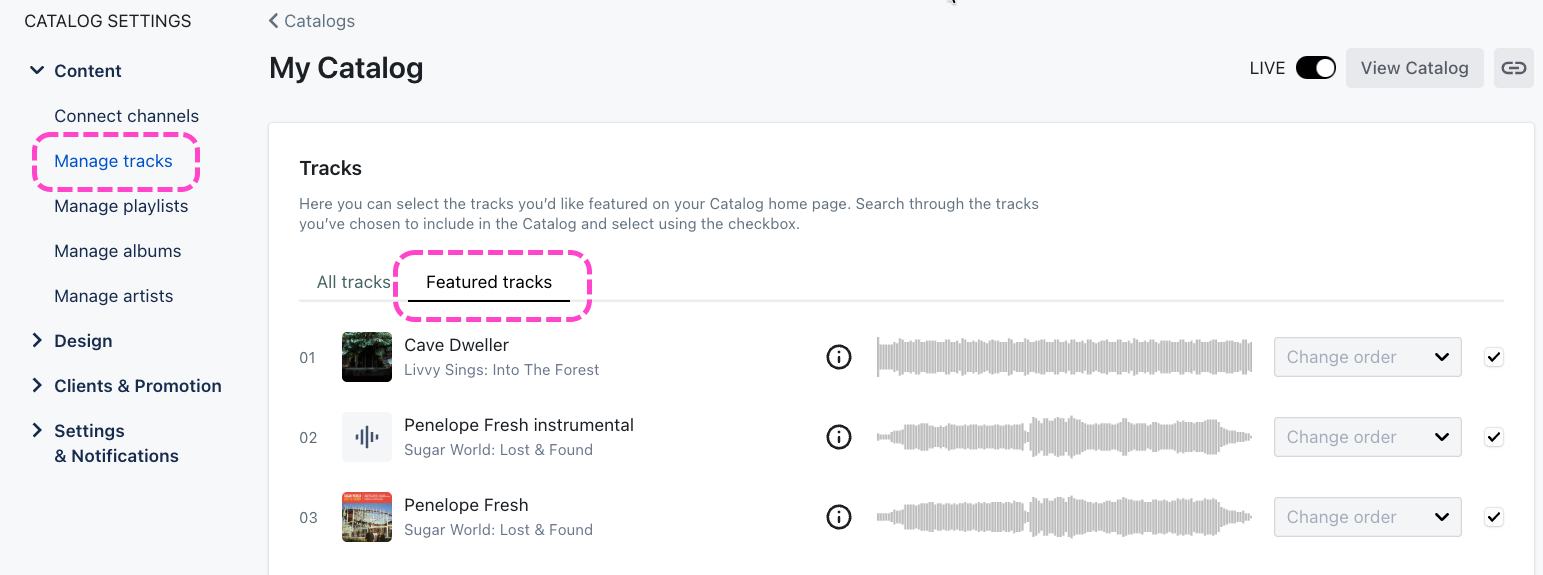
- From the Catalog Settings page, under Content, select Manage tracks.
- You'll see a list of all the Tracks published in your Catalog. Check the box(es) next to the Track(s) you'd like to feature.

- These will be added to the Featured tracks tab. You can open the Change order drop-down to change the order in which they'll appear on the home page if you like.


Adding Featured Playlists and Albums
- From the Catalog Settings page, under Content, select Manage playlists or Manage albums.
- From the Published playlists or Published albums tab, hover over the Playlist or Album.
- Open the ellipses menu (…), and select Add to featured playlists or Add to featured albums.
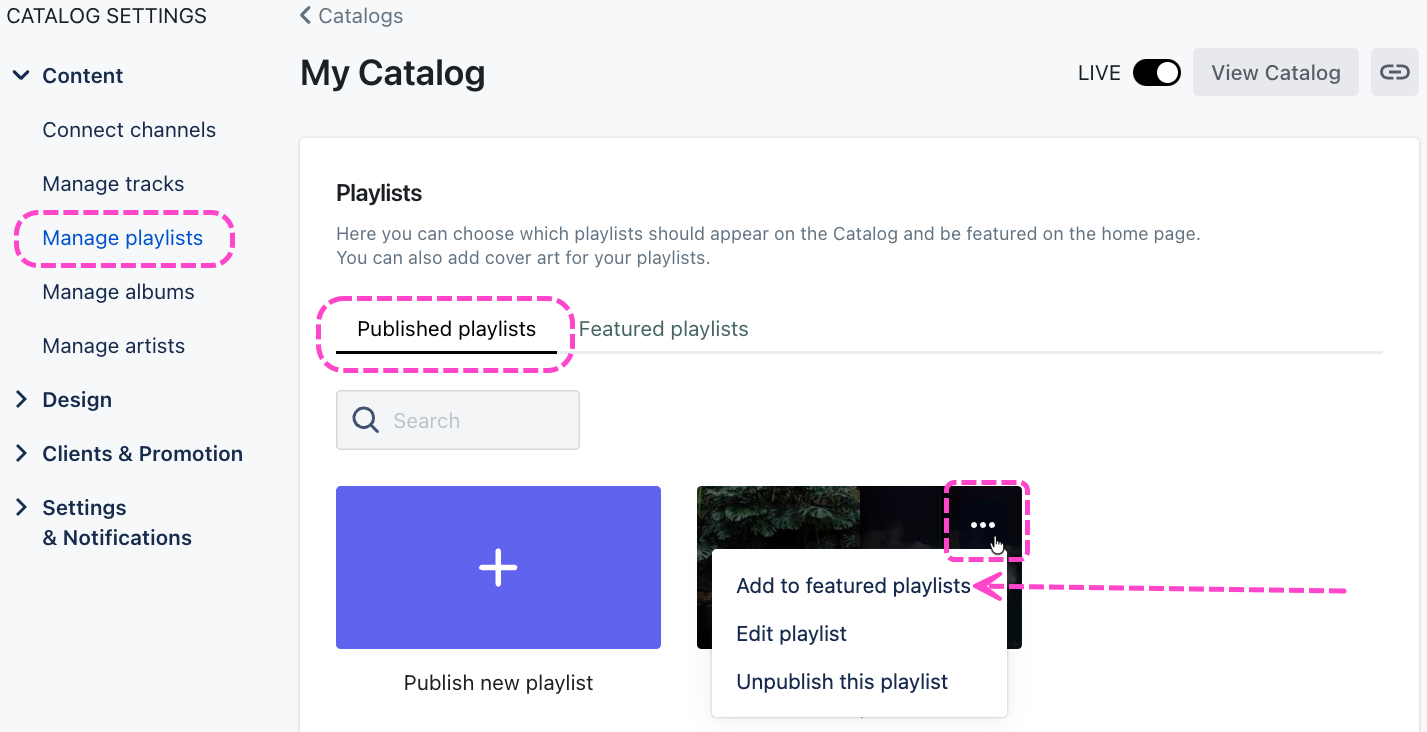
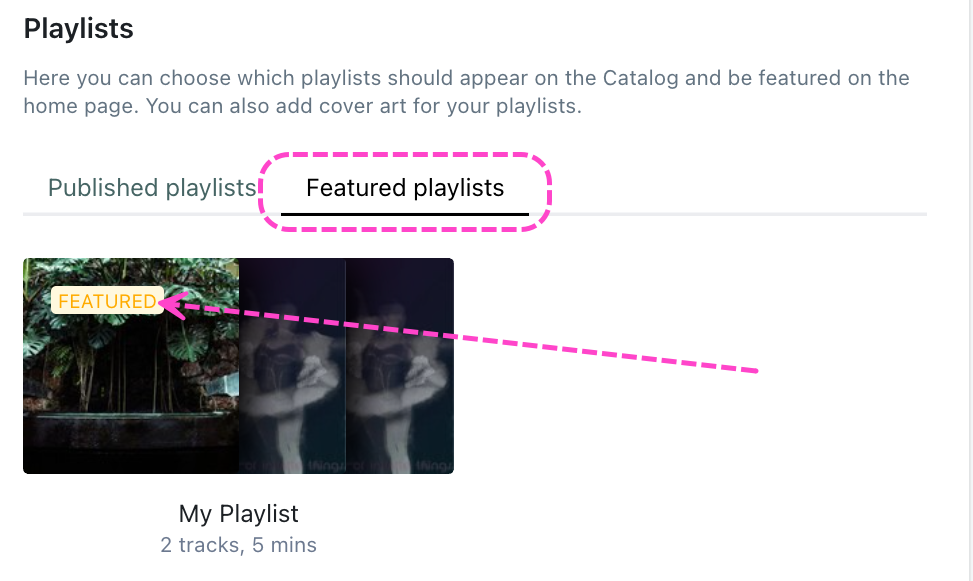
- These will be added to the Featured playlists or Featured albums tab and will have a FEATURED label.


Removing Featured Tracks, Playlists, and Albums
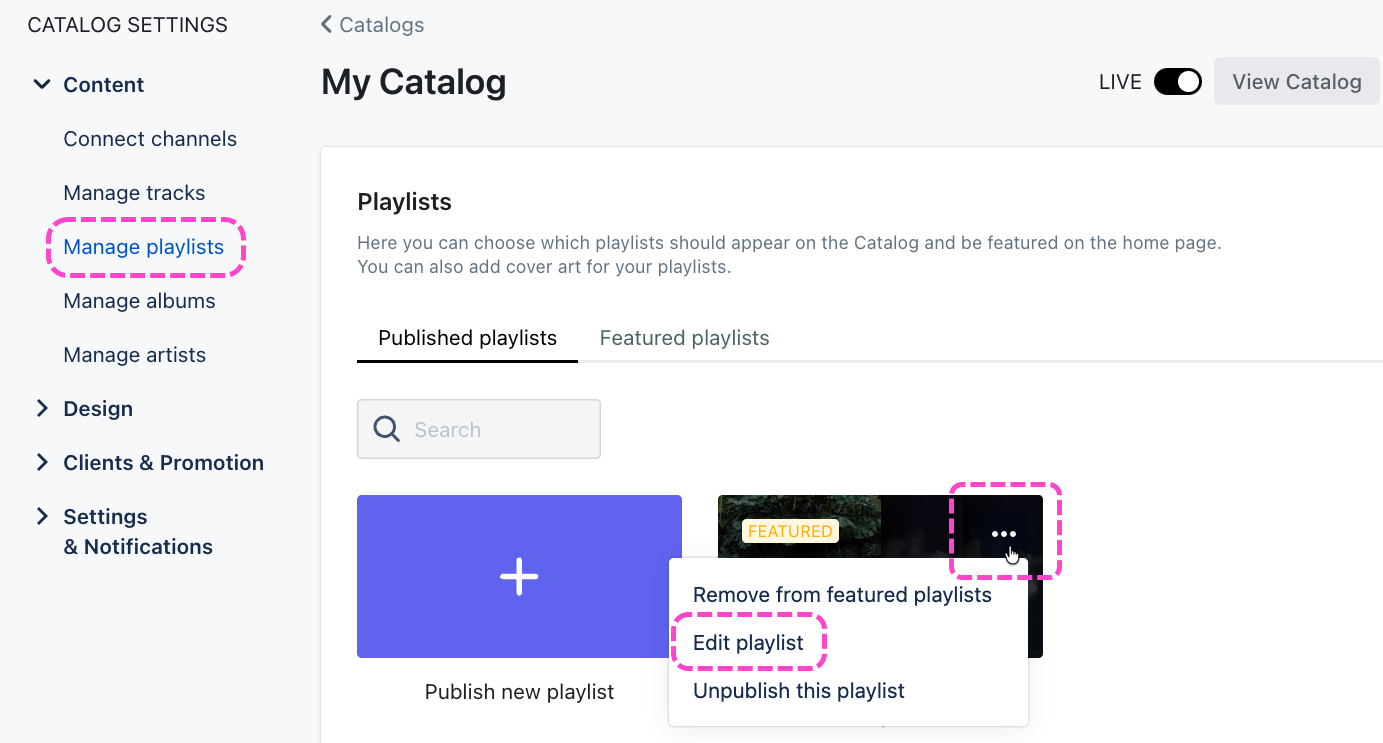
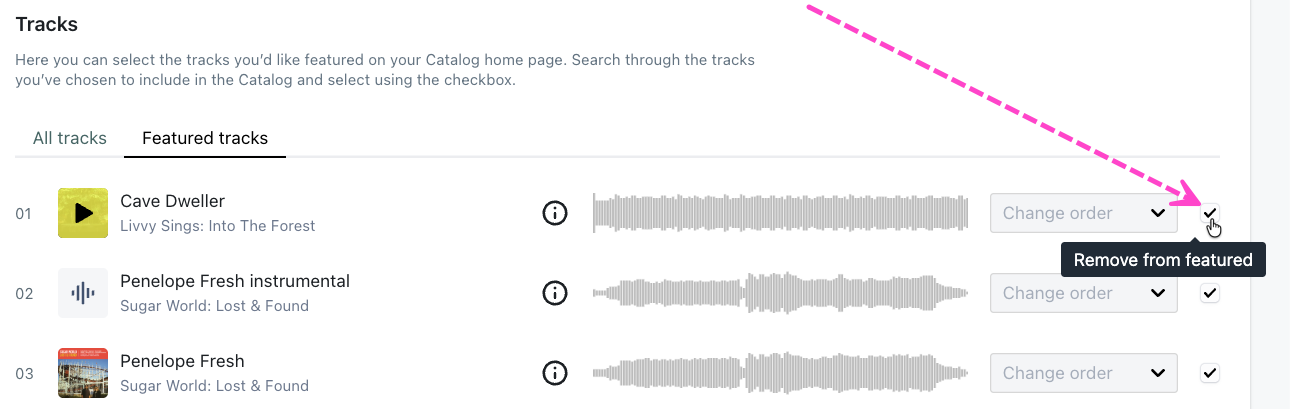
- From the Catalog Settings page, under Content, select Manage tracks, Manage playlists, or Manage albums.
- Select the Featured tracks, Featured playlists, or Featured albums tab.
- For Tracks: Uncheck the box(es) next to the Track(s) to Remove from featured.
 For Playlists and Albums: Hover over the Playlist(s) or Album(s), open the ellipses menu (…), and select Remove from featured playlists or Remove from featured albums.
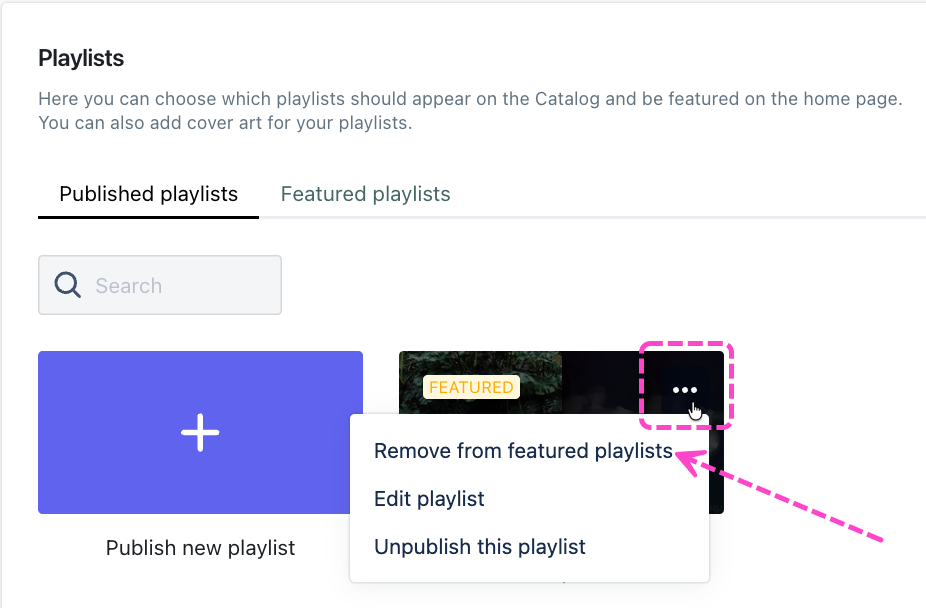
- The Track(s), Playlist(s), and Album(s) will still exist in your Catalog, they'll just no longer be featured on the home page.

 For Playlists and Albums: Hover over the Playlist(s) or Album(s), open the ellipses menu (…), and select Remove from featured playlists or Remove from featured albums.
Editing Artists
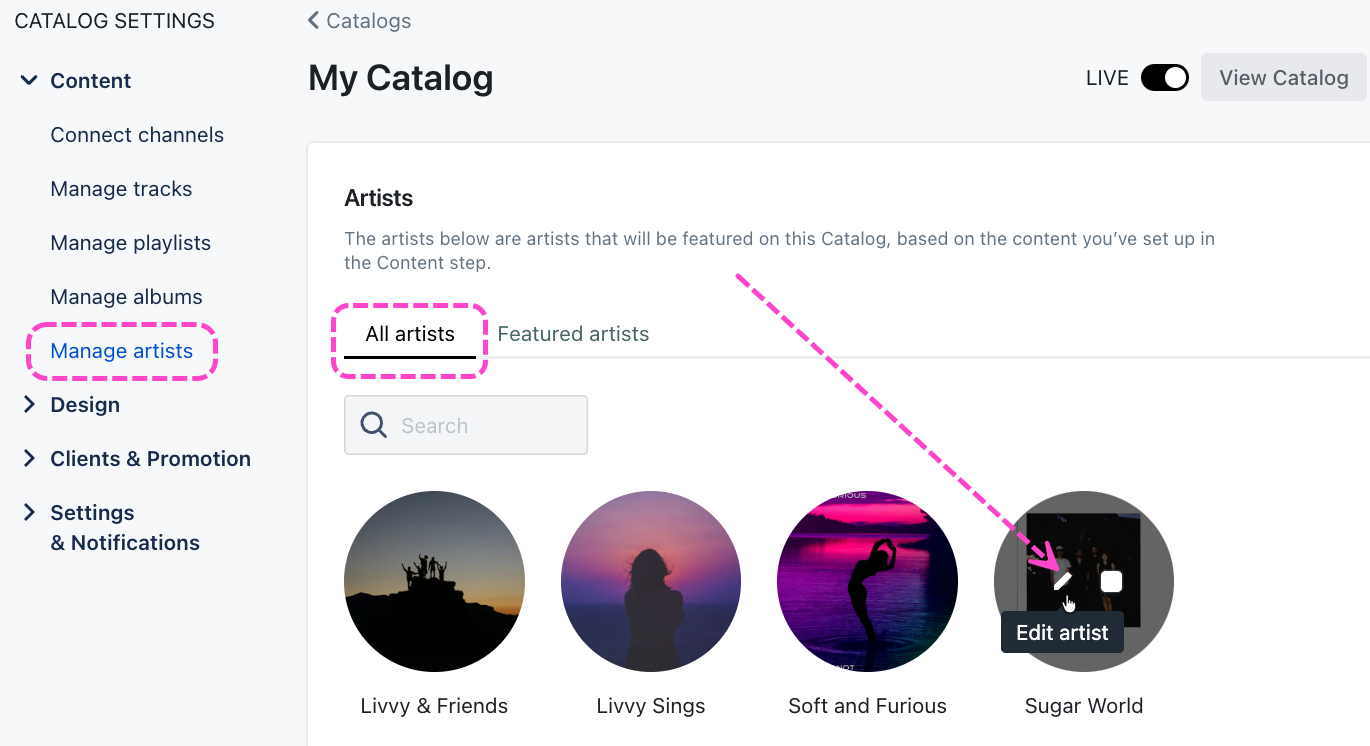
- From the Catalog Settings page, under Content, select Manage artists.
- From the All artists tab, you'll see a list of all the Artists from the Tracks in your Catalog.
- Hover over the artist thumbnail, and click the pencil to Edit artist.
- Here you can:
- Edit the Artist Profile.
- Manage Featured Tracks and their order on the Catalog home page:
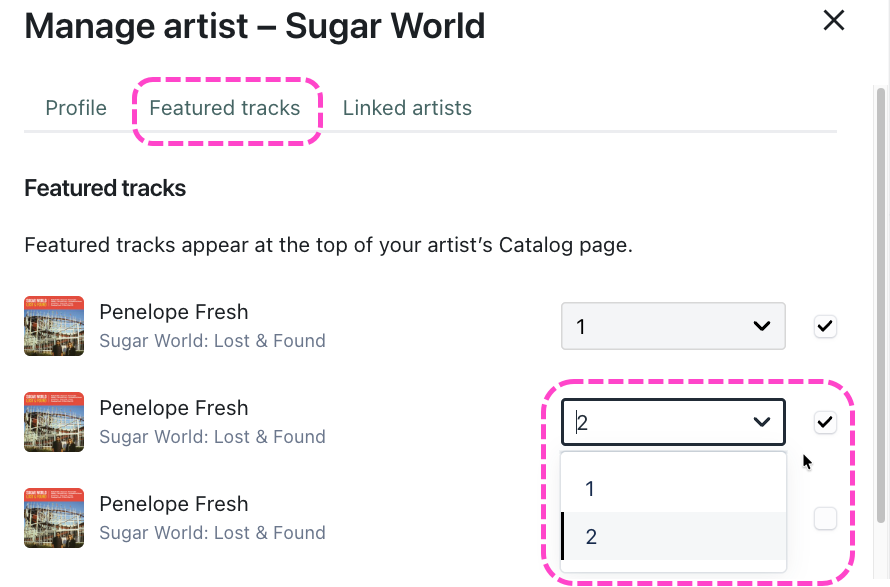
- Manage Linked artists.


Adding Featured Artists
- From the Catalog Settings page, under Content, select Manage artists.
- From the All artists tab, you'll see a list of all the Artists from the Tracks in your Catalog.
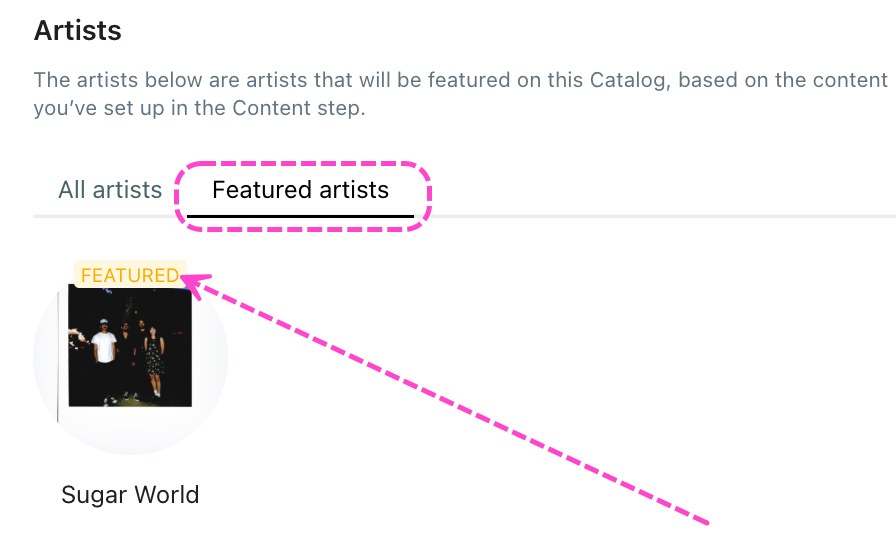
- Hover over the artist thumbnail, and check the box that appears to Feature this artist.

- They will be added to the Featured artists tab and will have a FEATURED label.


Removing Featured Artists
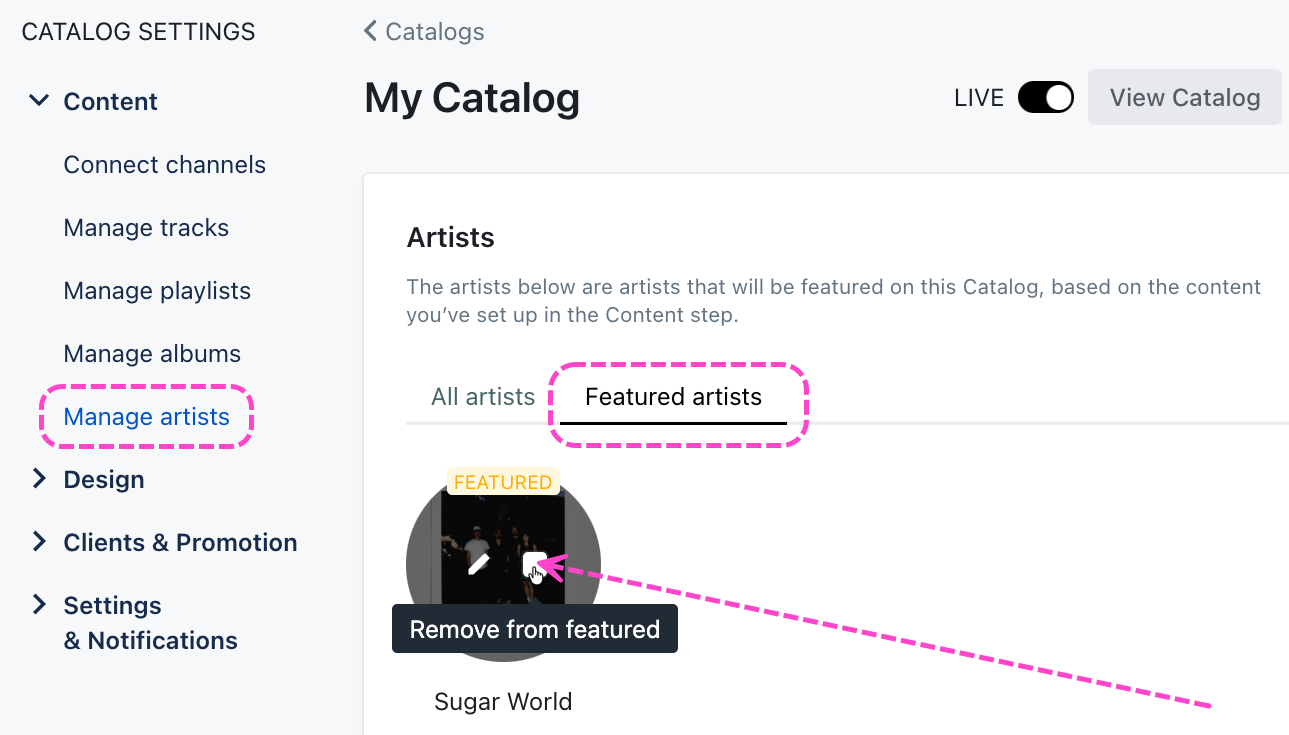
- From the Catalog Settings page, under Content, select Manage artists.
- Select the Featured artists tab.
- Hover over the artist thumbnail, and uncheck the box that appears to Remove from featured.

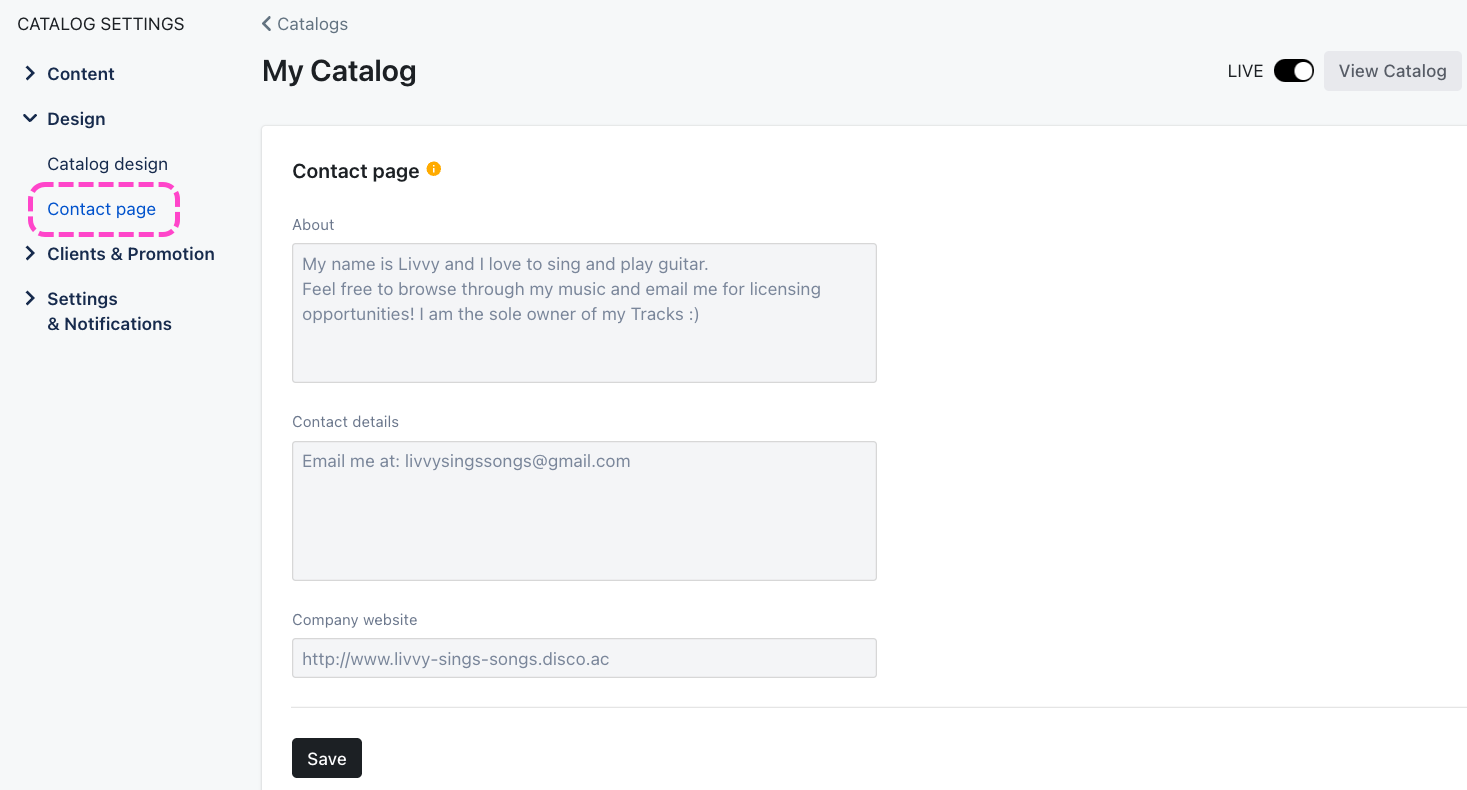
- From the Catalog Settings page, under Design, select Contact page.
- You can add information about you or your company in the About section.
- You can also add your Contact details and Company website.
- Click the Save button.

Your Catalog must be published (with the status set to LIVE) to manage access.

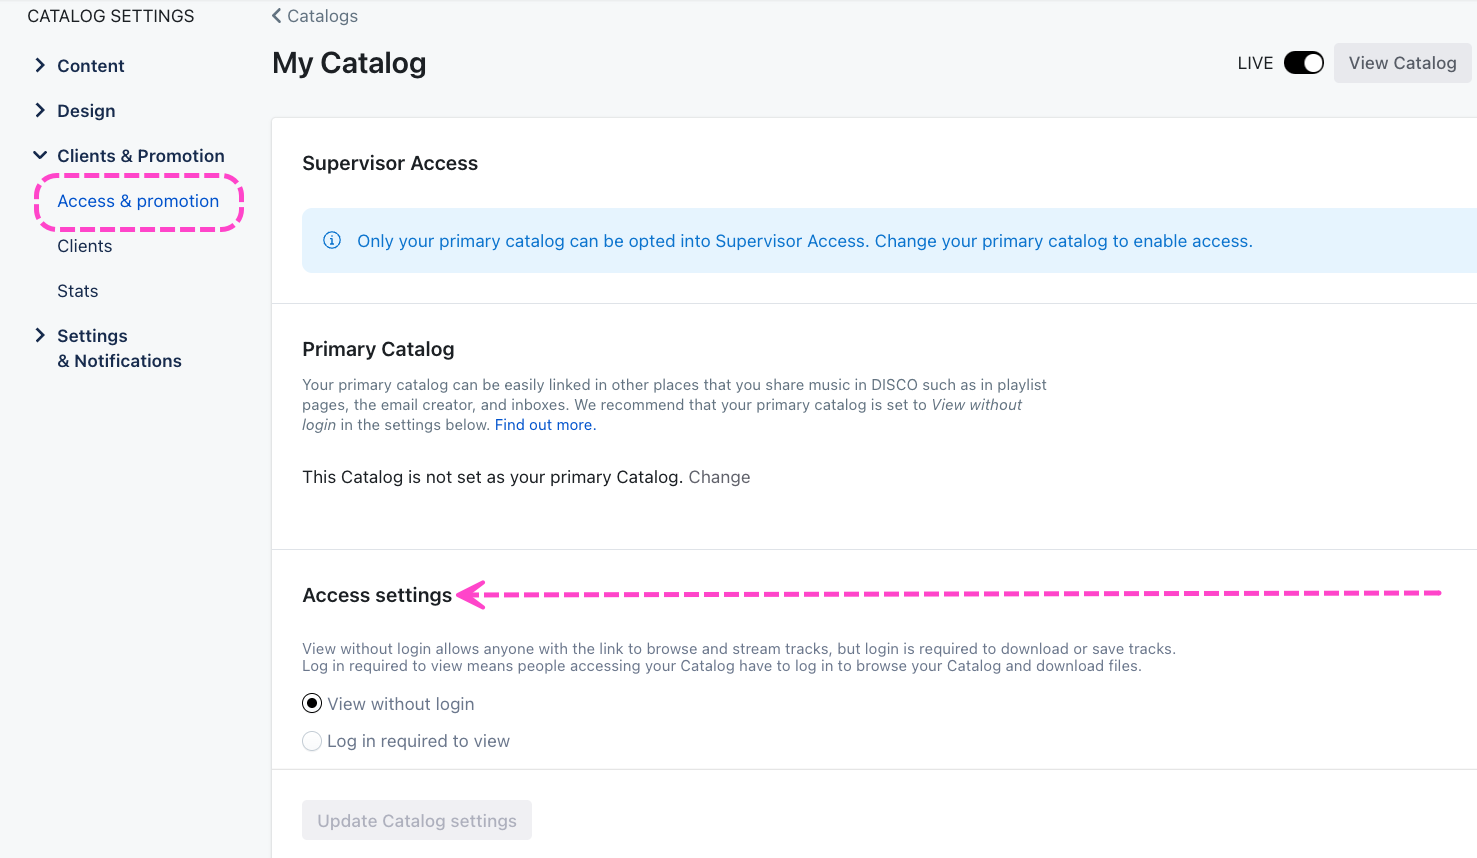
General access settings
- From the Catalog Settings page, under Clients & Promotion, select Access & promotion.
- Under Access settings, choose an option:
- View without login - Anyone can browse your Catalog and stream Tracks, but a DISCO login is required to download Tracks, save Tracks to DISCO, and create Playlists.
- Log in required to view - A DISCO login is required to browse your Catalog.
- Click the Update Catalog settings button.

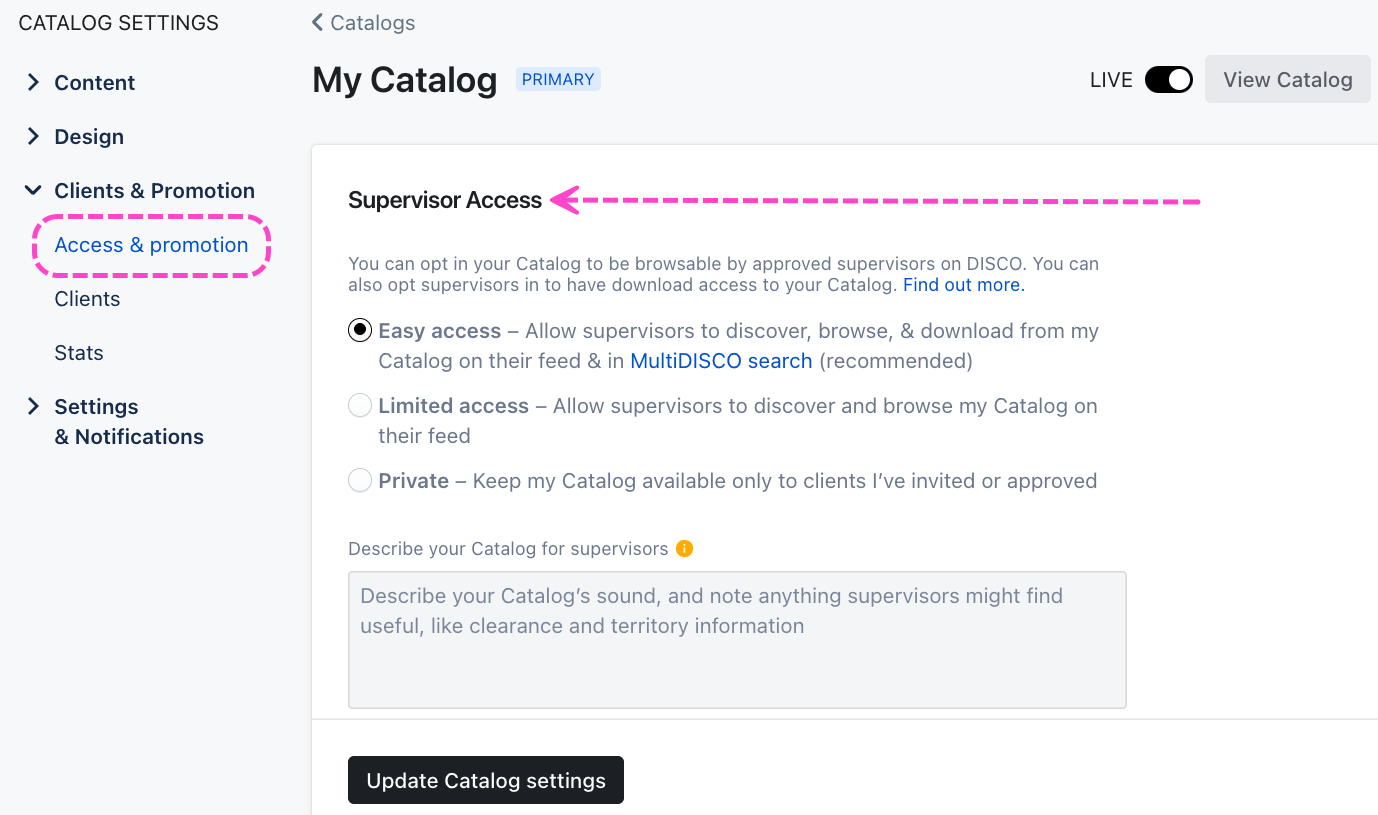
Access for supervisors
Note: Only your Primary Catalog can be opted in for Supervisor Access.
- From the Catalog Settings page, under Clients & Promotion, select Access & promotion.
- Under Supervisor Access, choose an option:
- Private - Only clients you've invited and approved can view your Catalog.
- Limited access - Supervisors can find and browse your Catalog from their Discover Music feed.
- Easy access - Supervisors can find, browse, and download content from your Primary Catalog from their Discover Music feed and their MultiDISCO Search results. Recommended for making your Primary Catalog more discoverable by music supervisors.
- Click the Update Catalog settings button.

Access for clients
Check out this article for information on inviting clients to your Catalog.
At a glance
This is done from within the Catalog Settings.
Before you can invite Clients to your Catalog, it must be published.
Inviting Clients to your Catalog
- On the left sidebar of your DISCO, under Discovery Suite, select Catalogs.
- From the Catalogs page, open the Actions menu (…) to the right of the desired Catalog and select Manage.
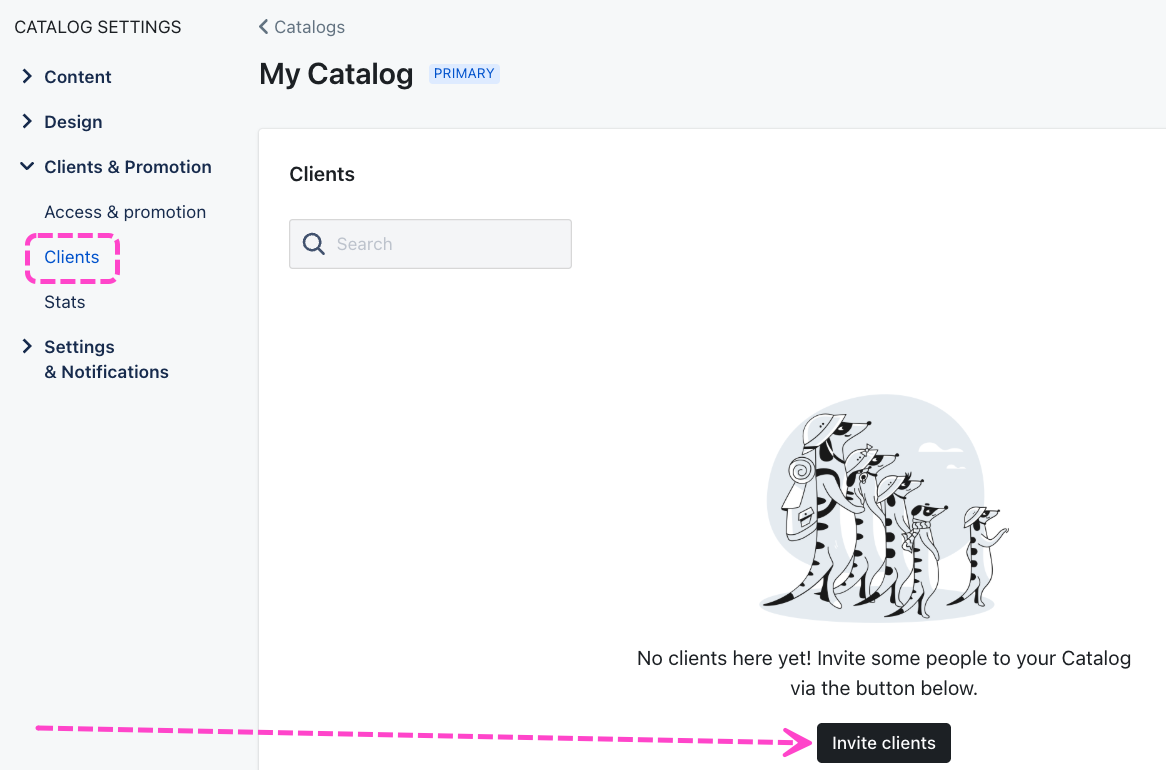
- From the Catalog Settings page, under Clients & Promotion, select Clients.
- Click the Invite clients button.
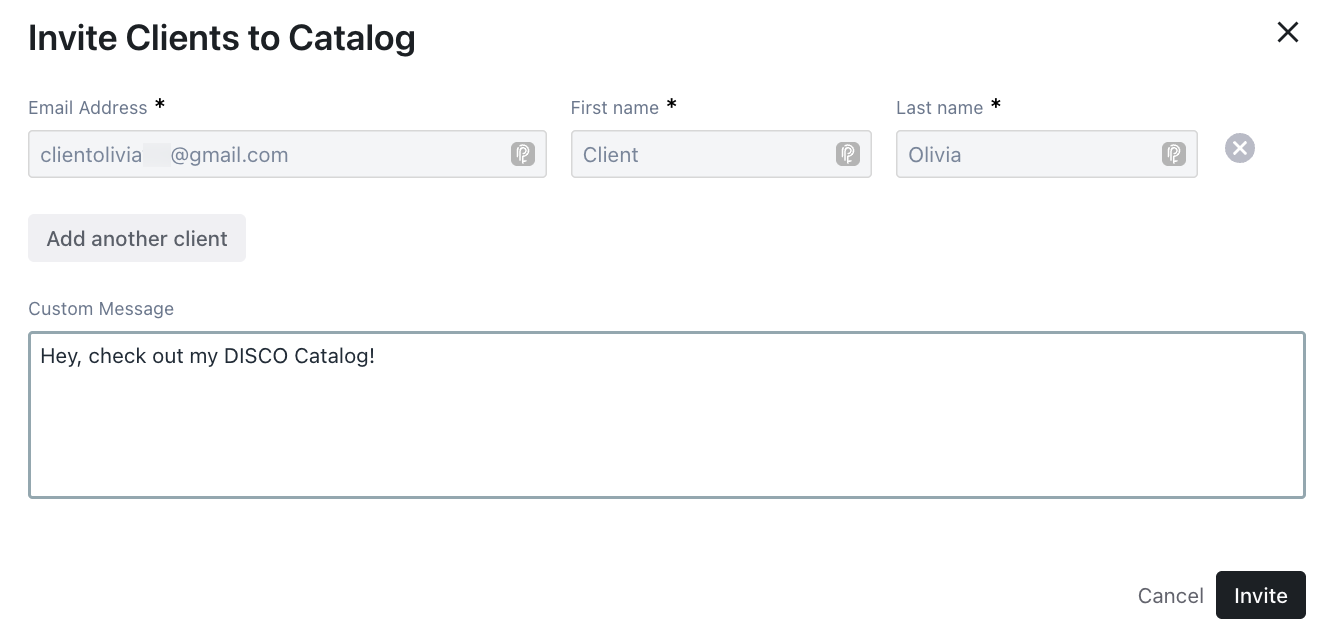
- In the Invite clients to Catalog window, enter their Email Address, First name, and Last name.
- Add a Custom Message (optional), and click the Invite button.
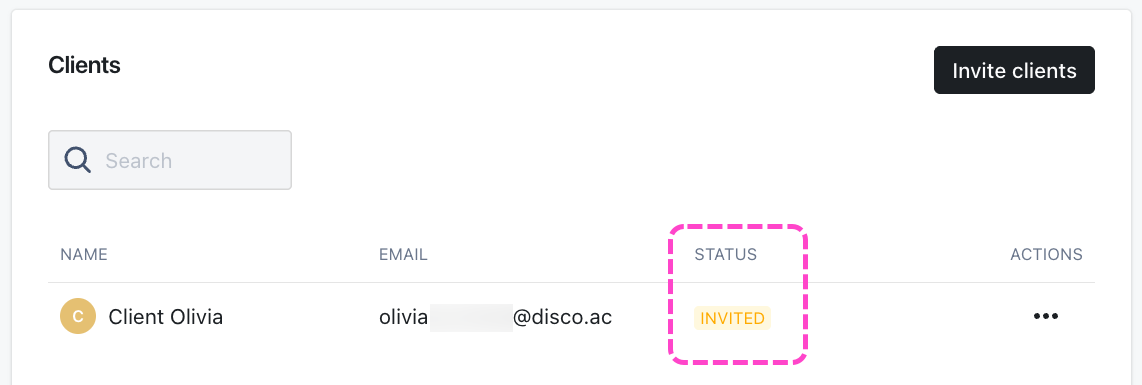
- Their name will appear on the Clients list with the Status showing Invited until they accept the invite.


Once invited, Clients will receive an email with a link to your Catalog. If they have a DISCO account, they can use that sign in. If they don't have a DISCO account, they can create a free DISCO Catalog account to access your Catalog.
Once they log in to your Catalog, they can browse and search for content, and their status in your Catalog Settings Clients list will change from Invited to Approved:
Managing Catalog access requests
When you share your Catalog, recipients can log in if you've invited them, or they can request access via the Catalog.
Viewing access requests
When someone requests access to your Catalog, a few things will happen:
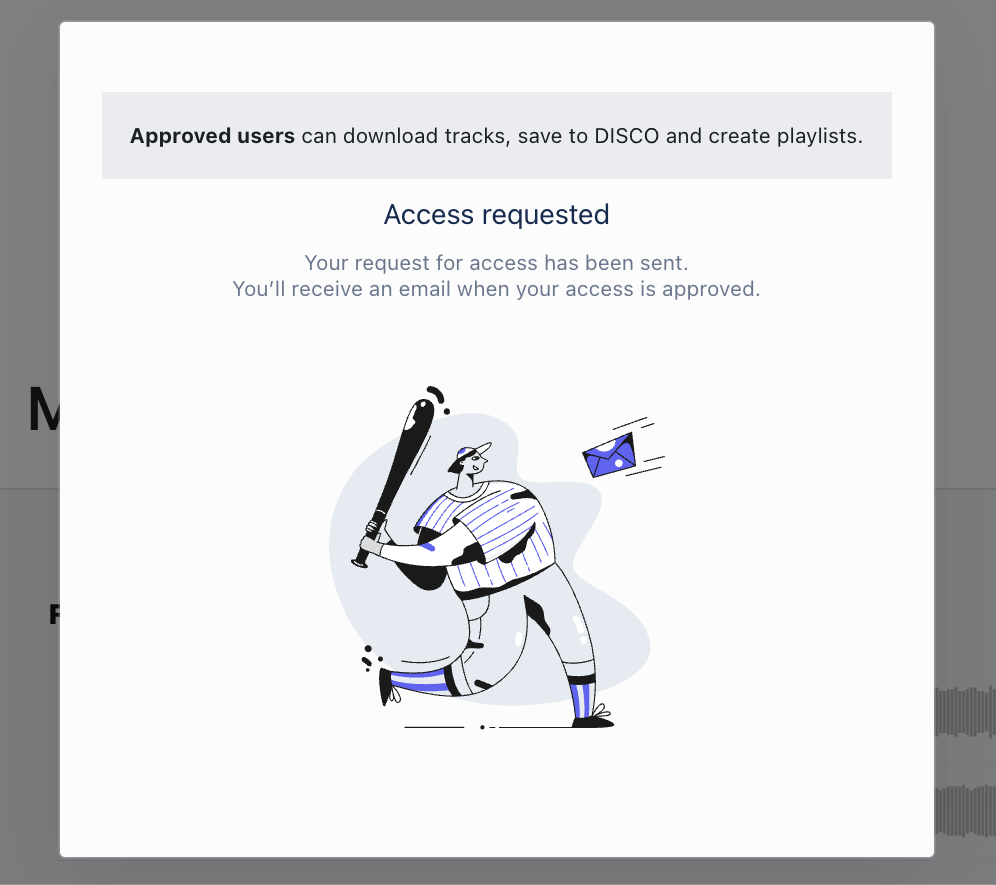
- the requester will see this message
- the user in your DISCO who created the Catalog will get a notification in-app

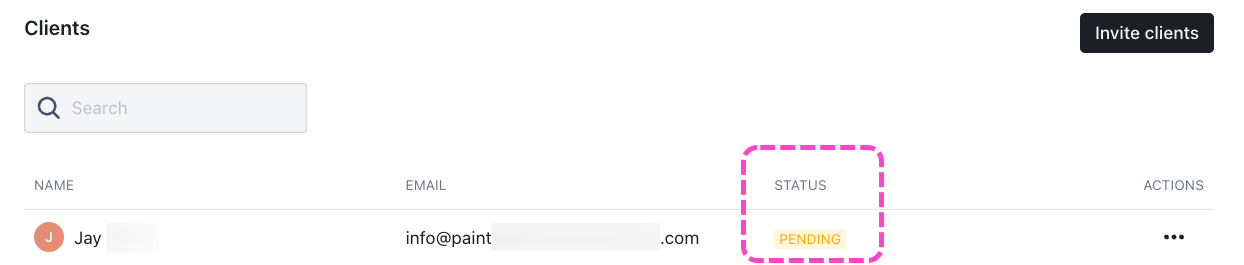
- the requester's name will appear in your Clients list in your Catalog Settings with the status Pending


Approving, rejecting, and removing access
To approve or reject access:
- From the Catalog Settings page, under Clients & Promotion, select Clients.
- From the Clients list, locate the Client with the Pending status.
- Open the Actions menu (…) and select the appropriate option: Approve, Reject, or Delete.
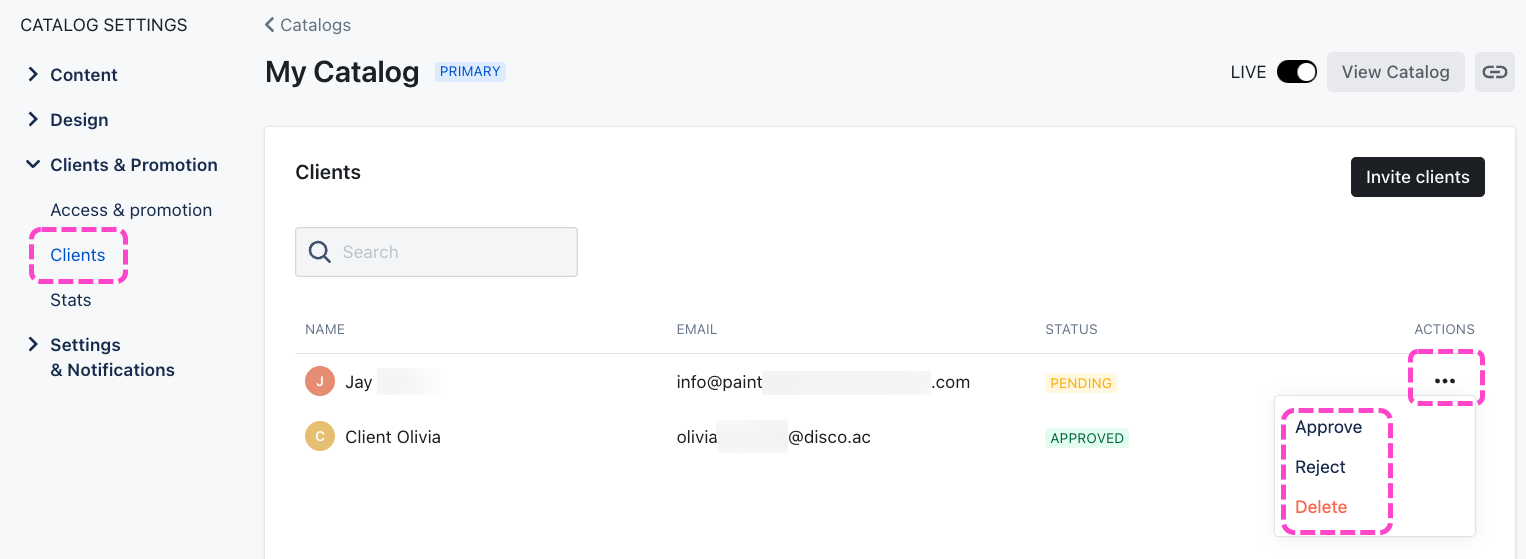
- The Status for that Client will change from Pending to either Approved or Rejected.

To remove previously approved access:
Open the Actions menu (…) and select Reject or Delete.
With Primary Catalogs, clients and supervisors can find your music more easily. While you may need multiple Catalogs, your Primary Catalog is designed to be the best holistic representation of your music.
At a glance
In order for your Catalog to be visible to music supervisors in DISCO, it must be set as the Primary Catalog and opted in for Easy access.
DISCO automatically assigns a Primary Catalog for you, but you can change this if you like.
Setting a Primary Catalog
- From the left sidebar of your DISCO, select Catalogs.
- From the Catalogs page, open the Actions menu (…) for the desired Catalog and select Set as primary Catalog.
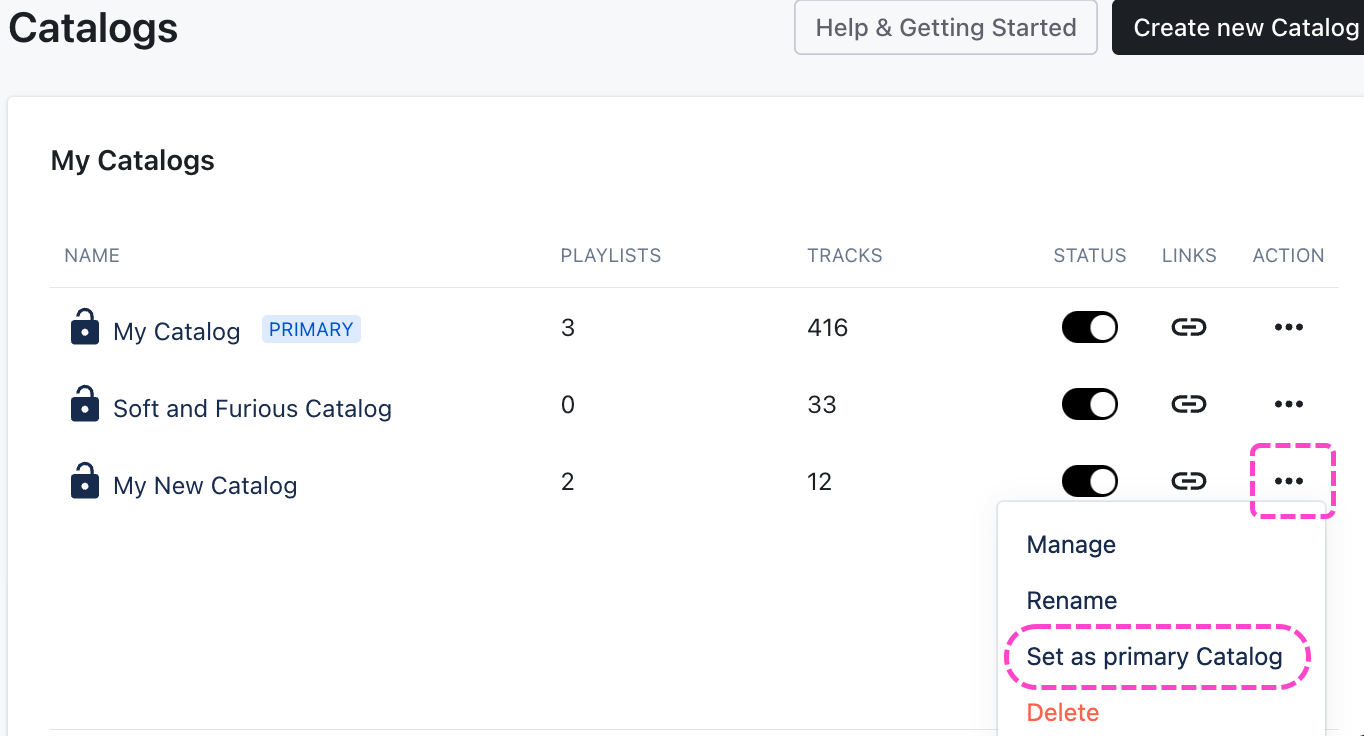
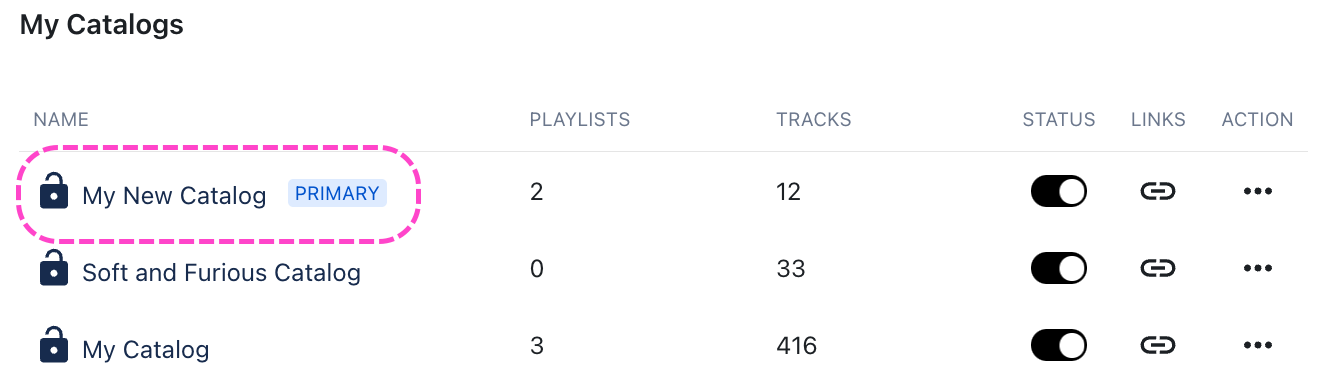
- Your Primary Catalog will move to the top of the list and have a PRIMARY label.


Best Practices
First, we recommend opting in your Primary Catalog for easy access, and allowing your Primary Catalog to be viewed without requiring a login.
You can set both of these from the Catalog Settings:
- From the left sidebar, select Catalogs.
- From the Catalogs page, open the Actions menu (…) for your Primary Catalog and select Manage.
- On the Catalog Settings page, under Access & promotion, select these radio buttons:
- Easy access (under Supervisor Access)
- View without login (under Access settings)
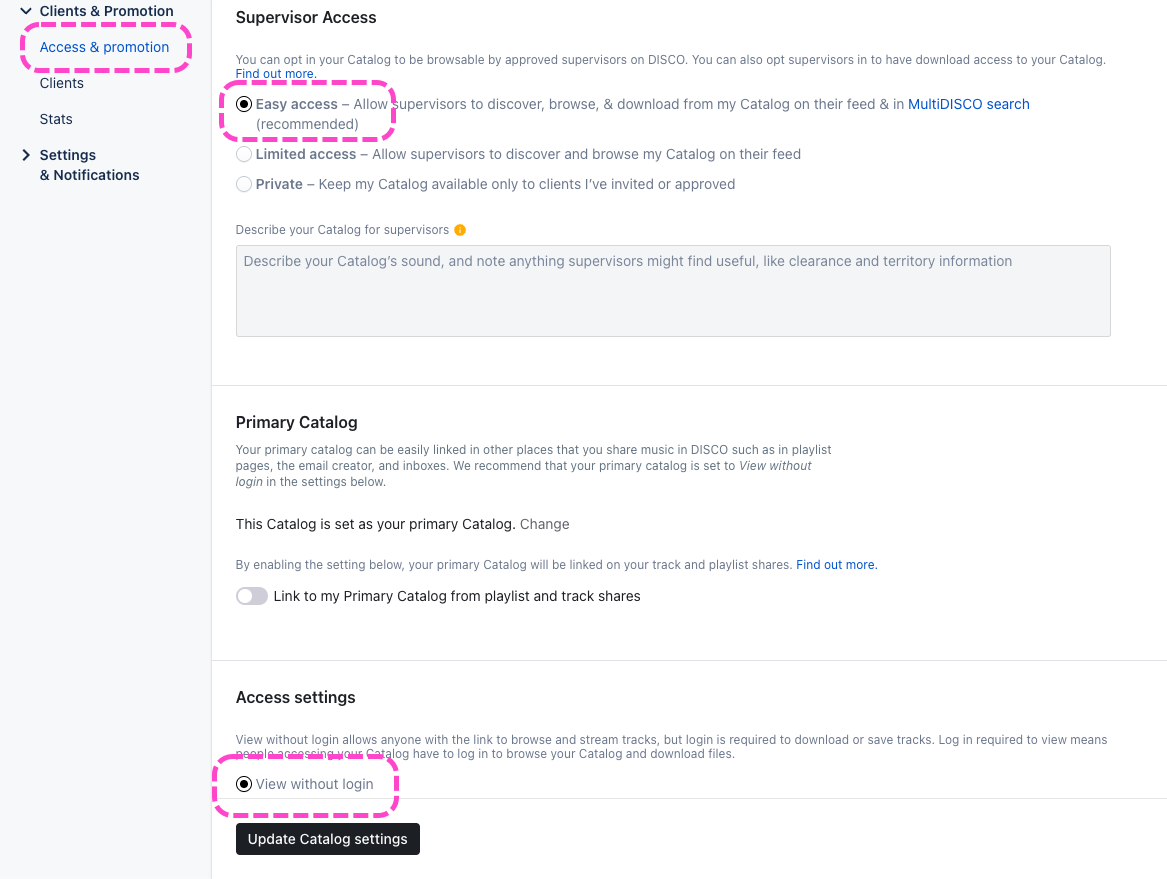
- Click the Update Catalog Settings button.

Next, we recommend linking your Primary Catalog to your business.
Once your Primary Catalog has been set you'll have the option to link it to your business across DISCO.
At a glance
Once linked, the Playlists (including Artist and Album Pages) and Tracks that you share from DISCO will include a clickable link to your Primary Catalog, making it more easily accessible:

Linking your Primary Catalog
- From the left sidebar, select Catalogs.
- Open the Actions menu for your Primary Catalog and select Manage.
- Under Clients & Promotion > Access & promotion, set the Link to my Primary Catalog from playlist and track shares toggle to ON.
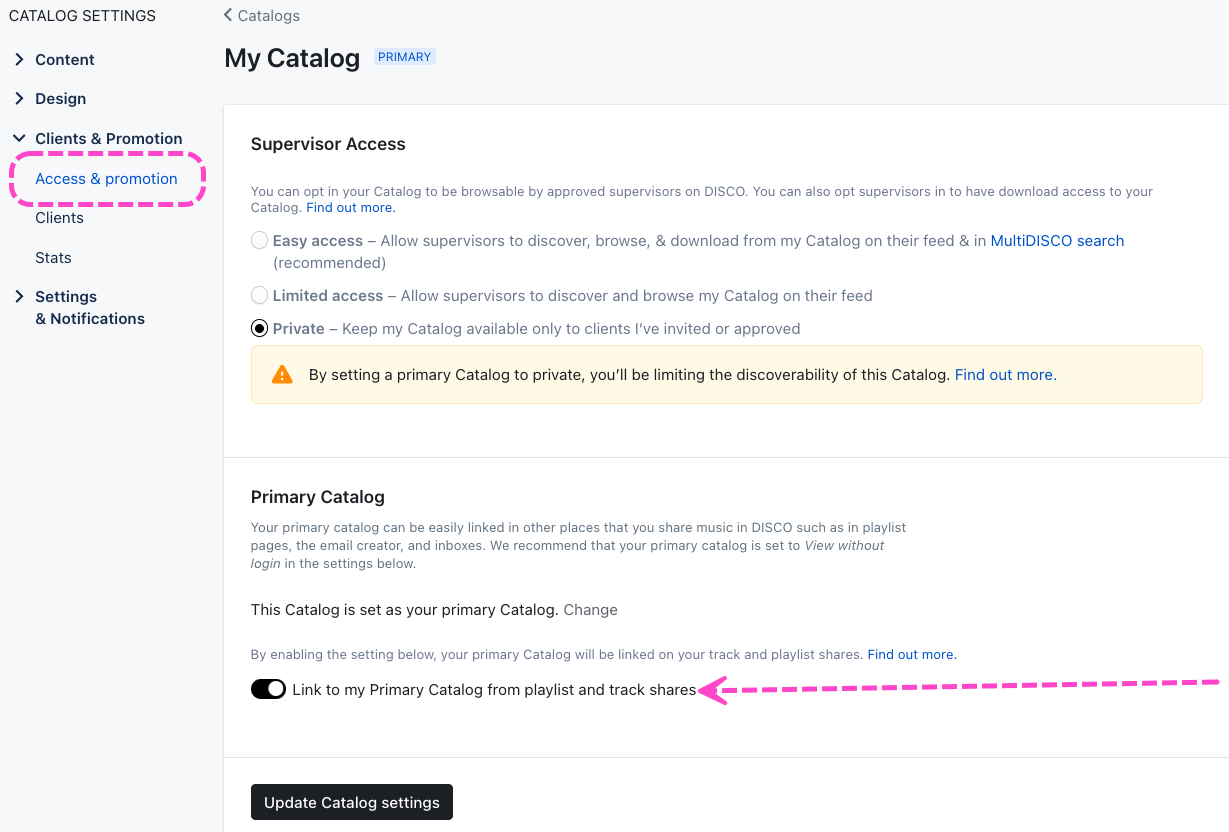
- Click the Update Catalog settings button.

For Track artwork
Your Track artwork should be square. We recommend saving a JPG or PNG file at high image quality, with a size of 1400px x 1400px.
For DISCO Catalogs
- Home page logo: 320 by 320 pixels
- Home page main banner image: 2400 by 800 pixels

- Playlist cover image: 1500 by 1000 pixels


Example Catalog home page:
For Artist and Album Pages
Click on the Image recommendations link:

When uploading an image for an Artist or Album Page, use the following specifications:
- Image Orientation: Landscape
- File Formats: jpeg, png
- Resolution: minimum of 2000px wide
- Positioning: Keep the primary part of your image in the top 2/3 of the image
Example:

If Single sign-on (SSO) is enabled on your DISCO, you can use it when logging in to your DISCO, and when logging in to a DISCO Catalog!
At a glance
Not all Catalogs will require a login to be viewed. This is dependent on the settings of each individual Catalog. But, you may be required to log in at some point to either view the Catalog or to save and download Tracks from the Catalog.
When logging in to a Catalog, you will see two options:
- Continue with DISCO account
- Sign in with SSO
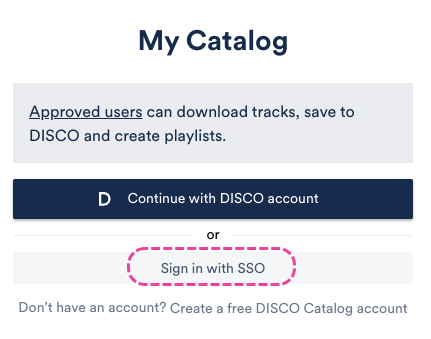

In this article, we will cover the Sign in with SSO option.
Note: If you don't have a DISCO account, you can choose this option: Don't have an account? Create a free DISCO Catalog account
Logging in using Single sign-on (SSO)
- Open the link to the Catalog you would like to view.
- Click the Sign in with SSO button.
- Enter your email address (that you use to log in to your DISCO using SSO).
- Click the Continue button.
- You will be redirected to a login page for your SAML identity provider (e.g. Okta, Auth0, etc).
- Enter your credentials for that provider and complete the login.
- You will be redirected back to the Catalog.
- If you haven't been approved by the Catalog owner previously, you may see this Access requested message:
- Once you are approved by the Catalog owner, you will receive an email confirmation from support@disco.ac:
- You can now access the Catalog by clicking View catalog in the email, or pasting the URL into your browser.
- If you haven't been approved by the Catalog owner previously, you may see this Access requested message:

Error Message: "SSO is not enabled for your DISCO."
SSO must be enabled on your DISCO before you can use the Sign in with SSO option.
If SSO is not enabled, and you attempt to use the Sign in with SSO option when logging in to a Catalog, this error message will appear:
If you would like to start using SSO, you can send a request to our Support team.
In the meantime, you can click Back to Sign in and choose another option.
Requesting SSO to be enabled on your DISCO
Contact our Support team to request that SSO be enabled on your DISCO.
Once enabled, you will have the option to use SSO both when logging in to your DISCO, and when logging in to any Catalogs when necessary.
You can enable a licensing request form on your DISCO Catalog to directly source inquiries from potential licensors of your music in a quick, streamlined format.
At a glance
The license request form can be enabled from the Catalog Settings page.
- On the left sidebar of your DISCO, under Discovery Suite, select Catalogs.
- From the Catalogs page, open the Actions menu (…) to the right of the desired Catalog and select Manage.
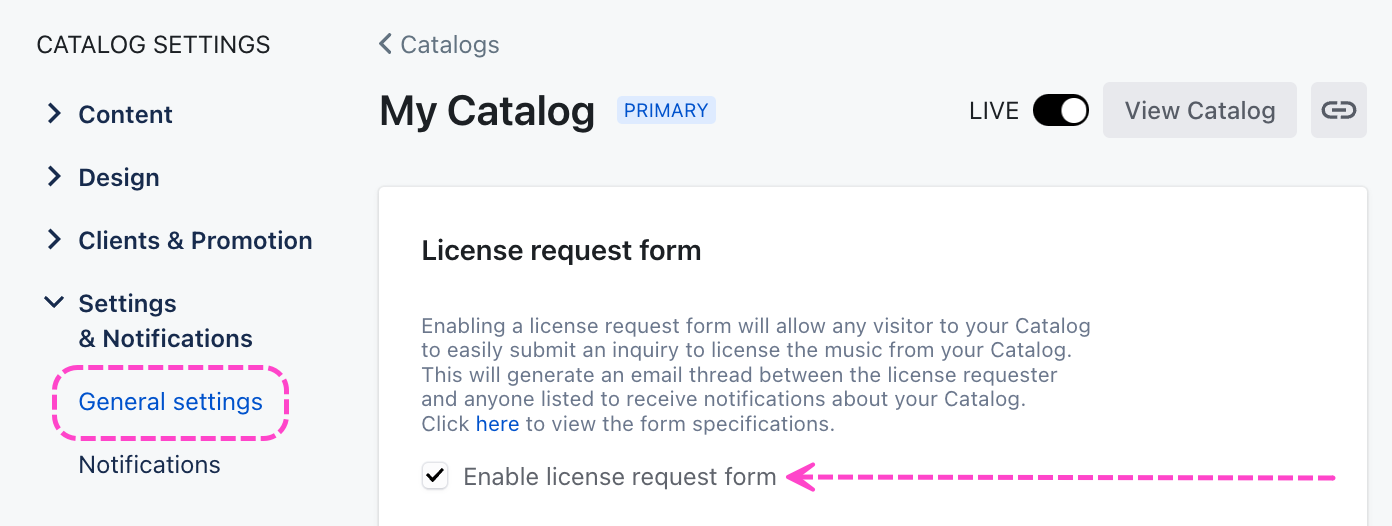
- From the Catalog Settings page, under Settings & Notifications, select General settings.
- Check the box to Enable licensing request form.

How the form appears on your Catalog
Once enabled, the form will be present next to every Track, Playlist, and Album in your Catalog:

Licensing form fields and options
The form looks like this:

The fields and options include:
- Name* - The requester's name. Will be auto-populated if the requester has a DISCO account.
- Project Type* - To specify what the requester plans to use this content for. Drop-down options include: Feature Film, TV Show, Commercial, Other content
- Project Name - Optional.
- Budget - Optional. Drop-down options include: <1k, 1-5k, 5-10k, 10k+
- Duration - Optional. The duration of the Track the requester is asking to license. Drop-down options include: 0-:30, :30-1:00, 1:00-1:30, 1:30-2:00, Full Track
- Additional Info - Optional. Sample text: scene description, please include if it contains explicit content, etc.
*Indicates a required field.
Managing licensing form submissions
After a form is submitted, depending on your Catalog Notification Settings, you may receive in-app notifications and email notifications with the licensing requests.
You can use the Reply button in email notifications to start a conversation with the requester.

You can change how you'd like Catalog access request and licensing form submission notifications to be delivered, and who in your DISCO should receive them.
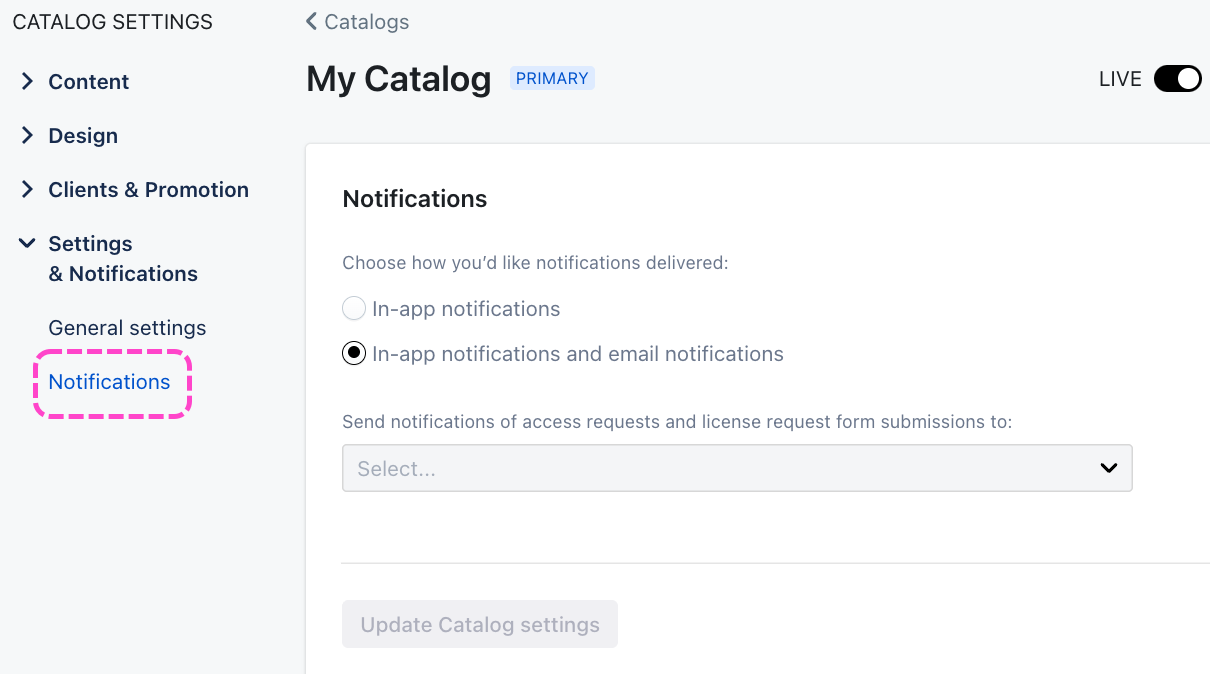
- From the Catalog Settings page, under Settings & Notifications, select Notifications.
- Choose one of the radio buttons: In-app notifications, or In-app notifications and email notifications.
- Optional: Select users from your DISCO in the drop-down to determine who should receive notifications.
- Click the Update Catalog settings button.

Users who have our Discovery Suite added to their base plan and use DISCO Catalogs have the option to set up a custom domain for their Catalog.
At a glance
Each DISCO can have up to three custom domains configured for their Catalog.
This is a three-part process that involves adding CNAME records that we provide to your domain's DNS (Domain Name Service) configuration.
- Part 1: Requesting CNAME Records
- Part 2: Adding CNAME Records
- Part 3: Contacting DISCO Support and waiting for confirmation
If you're unsure, we suggest reaching out to your webhost directly. If you don't have access to your DNS provider's control panel or you're not sure if you have access, contact your webmaster or a member of your IT team.
If you have any questions about this process, don't hesitate to contact our Support team.
Step-by-step guide
Part 1: Requesting CNAME Records
- Fill out this form to request the necessary CNAME records.
- You can either set up your DISCO Catalog as a subdomain (e.g. catalog.great-music.com) or you can setup your DISCO Catalog URL as your primary domain (e.g. www.great-music.com).
- If you set up your DISCO Catalog as your primary domain, you will not be able to use the domain for anything else.
- Subdirectories like great-music.com/catalog are not currently supported.
- Once you've submitted the form and our Support team has received the request, we will generate the necessary records and email them to you along with this guide. Requests are added to a queue, so please note it might take some time before your domain is processed.
Part 2: Adding CNAME Records
The process for adding CNAME records varies depending on which DNS provider you use. We suggest checking your DNS provider's documentation or contacting their support team for specific instructions. You can also find links to the relevant documentation for a few common DNS providers at the bottom of this page.
- Log into your DNS provider's control panel.
- Locate the area of where you update DNS records. The name of the area varies by provider; it may be called DNS Manager, Zone Editor, Domain Manager, or something similar.
- Create two CNAME records using the "Names" and "Values" provided to you. You can find examples of CNAME records for your reference below.
Example CNAME records:
|
NAME
|
Value
|
|---|---|
|
_214j14833d54d8a.catalog.great-music.com |
_ea23351814889.3asdjiiu.acm-validations.net |
|
catalog.great-music.com |
cat3315.cat.disco.ac |
Note for Cloudflare users: When adding CNAME records, make sure that you turn off the “Cloudflare Proxy” setting and/or switch it to a “DNS-only” setting for the CNAME records that you’re adding. Refer to their documentation for more information.
Part 3: Contact DISCO Support & Wait For Confirmation
After adding your CNAME records, contact our Support team so that we can initiate the final steps. Once complete, we will reach out and let you know when your custom domain is live.
After your custom domain has gone live, the original DISCO domain (e.g. https://great-music.disco.ac/lib/123456789) will still work. This also means that while you are waiting for your custom domain, you can continue to send invites to your Catalog using the link to the original DISCO domain 👍
DNS Provider-Specific Documentation
Here is a list of documentation on adding DNS records for a few of the more popular DNS providers:
- CloudFlare
- HostGator
- Amazon Web Services
- Namecheap
- Dreamhost
- GoDaddy
- Google Domains
- Hover
- Squarespace
The Easy access setting for DISCO Catalogs helps to simplify the experience for music supervisors to discover and utilize your Tracks!
At a glance
This setting is only applicable to your Primary Catalog.
How do music supervisors find my Primary Catalog?
Music supervisors find Catalogs using special features we developed specifically for them: Discover Music and MultiDISCO Search.
More specifically, they use these special features to browse and search for Catalogs (and the Tracks within them) across DISCO.
How do I make my Primary Catalog visible to music supervisors on DISCO?
First, your Catalog must be published and set as your Primary Catalog. Next, you'll need to opt in your Primary Catalog by enabling the Easy access setting.
Enabling Easy access to opt in your Primary Catalog
- On the left sidebar of your DISCO, under Discovery Suite, select Catalogs.
- From the Catalogs page, open the Actions menu (…) to the right of the your Primary Catalog and select Manage.
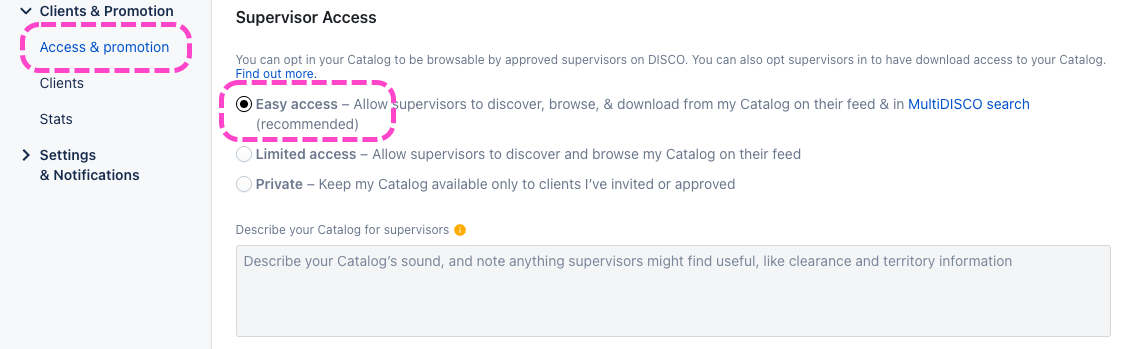
- From the Catalog Settings page, under Clients & Promotion, select Access & promotion.
- Under Supervisor Access, select Easy access.
Stats for opted-in Easy access Catalogs
How it works
You'll receive stats when a supervisor opens, streams, or saves a track from your Primary Catalog that has appeared in their search.
However, to protect their privacy, their activity in the Stats will remain anonymous, so you'll only see which company they are accessing your Primary Catalog from, not their name or email. It will look something like this: [Company Name] - Supervisor.

Note: If a supervisor has already accepted an invitation to your Primary Catalog, or is later invited to it, their regular contact info will be displayed here.
Viewing your Catalog Stats
- On the left sidebar of your DISCO, under Discovery Suite, select Catalogs.
- From the Catalogs page, open the Actions menu (…) to the right of the desired Catalog and select Manage.
- From the Catalog Settings page, under Clients & Promotion, select Stats.
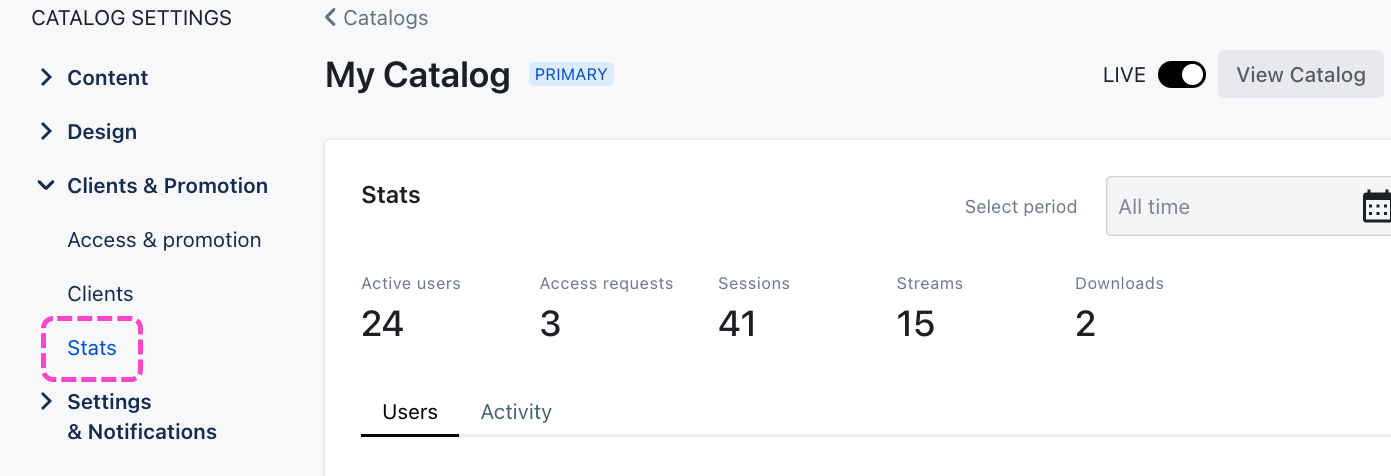
-
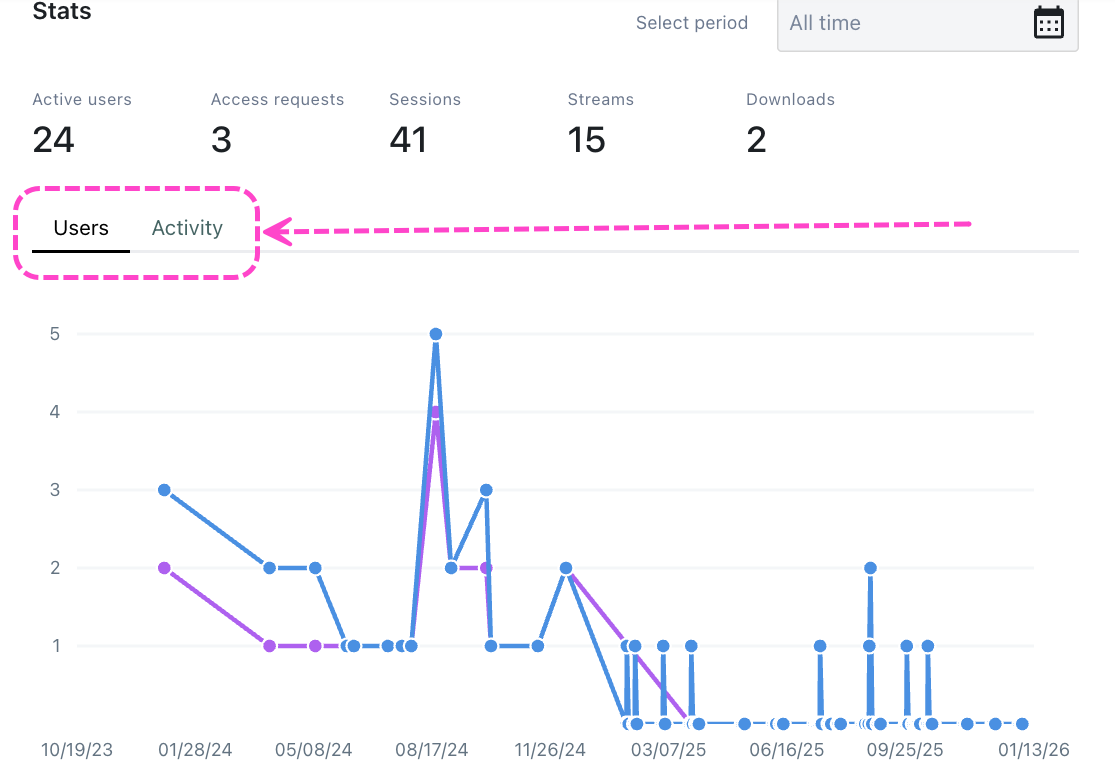
Here you can see a breakdown of Users and Activity.

With the Easy access setting, users with a Primary DISCO Catalog can set their Primary Catalogs to allow login/download access to any vetted music supervisor on DISCO with no invite or approval process needed!
At a glance
We built this feature to make it easier for supervisors to find great music through Catalogs and download Tracks or save them to their DISCO (using the Save to DISCO button). This helps speed up the process of pitching and using Tracks when on a tight timeline.
 By default, Catalogs are not set to Easy access. New Catalogs will still be set to ‘Private’ by default and existing Catalogs will retain their current settings. Catalog owners must enable the Easy access setting manually.
Using Discover Music to browse Easy access Catalogs
Supervisors on DISCO have access to a tool in their Discovery Suite called Discover Music.
On the Discover Music page, there is a section to Browse Catalogs which includes an Easy access toggle. Set this toggle to ON to browse through a feed of all Primary Catalogs on DISCO that have Easy access enabled, plus any others that you've been invited to or been approved to access.
Privacy and security
To protect supervisor privacy, supervisors accessing Catalogs under Easy access permissions will not* be listed by name or email in the Catalog owner's Clients list or Stats in their Catalog Settings. Instead, they’ll appear as [Company Name] - Supervisor.
However, if the supervisor was already invited to the Catalog previously or has requested access to a Catalog, they'll appear as normal with their name and email.
Important: This means that previous activity within the Catalog will be associated back to the supervisor's real identity as a Client of the Catalog.
Example - Catalog Clients list (anonymized)
Example - Catalog Stats (anonymized)
Opting out of the easy access group
Supervisors can opt out of being in the easy access group. To do this:
- Go to your Discover Music page.
- On the top-right corner of the page (next to the Create new Catalog button), open the ellipses menu (…).
- Select Opt out of easy access.


Q: What are DISCO Catalogs?
DISCO Catalogs (formerly known as DISCO Libraries) are essentially mini-websites you can create in your DISCO to host and publish specific curated content in a simple, searchable, and easy-to-use way. There are many use cases for Catalogs – whether it's to showcase a specific group of Artists/Albums, highlight your 1-stop/easy clears, or make a Catalog specifically for a client.
You can customize access permissions to Catalogs to limit who can view and download your content. Catalogs also make it easier for music supervisors to find your content and download it or save it straight to their DISCO!
Q: Can I subscribe to Catalogs only?
No, the Discovery Suite is sold as a package that includes Catalogs.
Q: Can clients access my Catalog without a login?
If you set your Catalog to public, anyone can browse and stream the Catalog, but only authorized users who are logged in will be able to download the tracks, save them to DISCO, and create playlists.
If you set your Catalog to private, only users who are logged in will be able to access the Catalog.
Q: How customizable is the Catalog design?
You can add your own logo and hero image, and customize the main Catalog color. You can also add artist images and bios, and playlist cover images.
Q: Where do I manage metadata and tags for Tracks in my Catalog?
Metadata and tags can be managed from the Track Information page. Any changes to metadata are reflected in your Catalogs.
Q: Can I perform a Similarity Search from within a Catalog?
No.
Q: Can I create multiple Catalogs?
Yes. Your Catalog Track quota will be shared collectively between Catalogs. 1 Track can be in 10 Catalogs and that counts as 1 Track towards your quota.
Note: Although you can create multiple Catalogs, only one of them can be opted in for supervisor access, and it must set as your Primary Catalog.
Q: Which Track formats are available for clients to access in Catalogs?
Clients can access all formats you have associated with your Tracks. From the Catalog Settings, you can choose to limit download access to MP3s only.

Q: Are stats and analytics available for activity in Catalogs?
Yes! Detailed stats are available for each Catalog. You can view these in your Catalog Settings under Clients & Promotion > Stats.

Q: If a supervisor or recipient of the Catalog URL does not have DISCO, can they still search, stream, and download content?
Yes, they'll be able to as long as you have granted them access to your Catalog, whether they have DISCO or not.
Q: Can I embed my DISCO Catalog on my website?
No, but instead you could set up a URL redirect with a custom domain once you're subscribed or simply link to your Catalog from your website.
Q: Can you license music directly from my Catalog?
No, not yet! Make sure you add Contact details to your Catalog and enable the licensing form so potential licensors can reach out to you.
Q: How can I get music from my other system into DISCO Catalogs?
Contact our Support team and we’ll help you import your music.
Q: How can I get my Catalog discovered by music supervisors?
You'll need to set the Catalog as your Primary Catalog and opt in to Easy access.
