Sharing music with DISCO is quick, easy, and convenient! The best way to do this is to share a Playlist.
At a glance
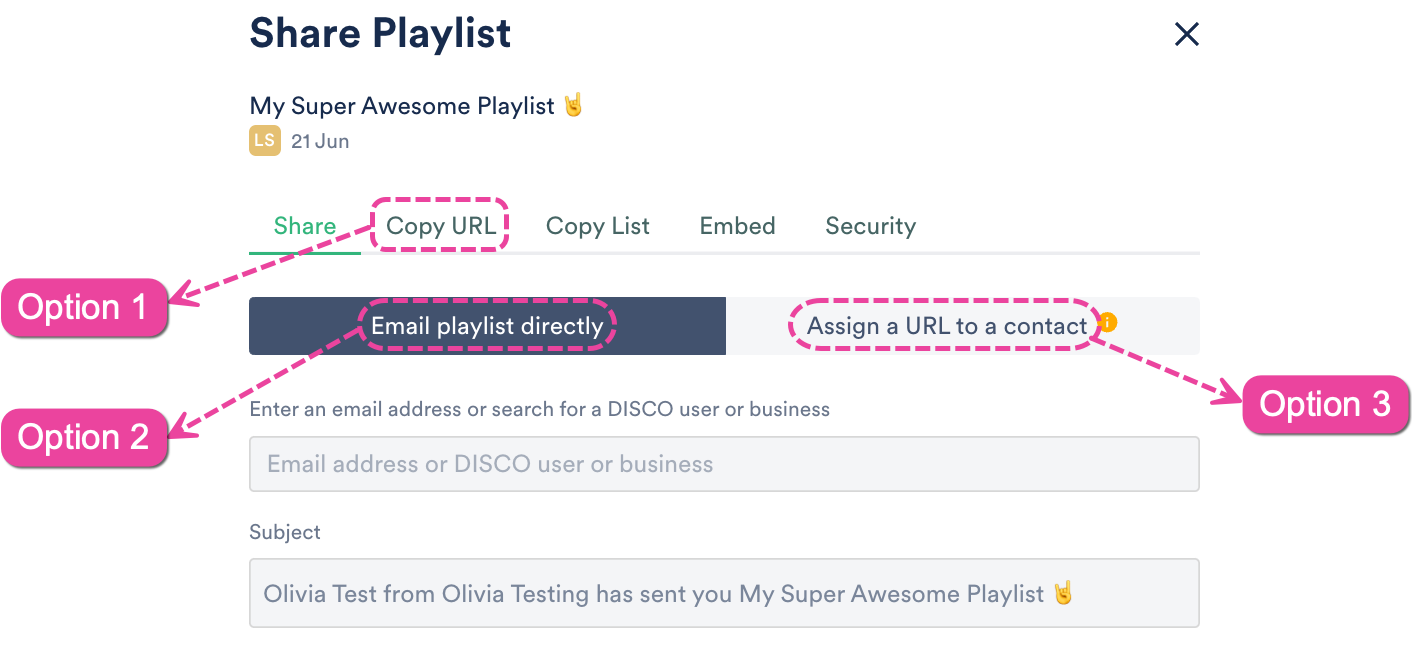
There are a few ways to share your Playlists with users on DISCO and outside of DISCO, including:
- emailing Playlists directly to your Contact(s)
- assigning unique Playlist URLs to your Contact(s)
- copying and sharing the Playlist URL outside of DISCO

Each of these share methods will generate Playlist Stats, but not all of them will be attributed to individual Contacts.
Emailing Playlists directly to Contacts
Note: Any activity (page views, streams, downloads) originating from this link will be attributed to the specific contact in the Playlist Stats, even if someone else were to access the link.
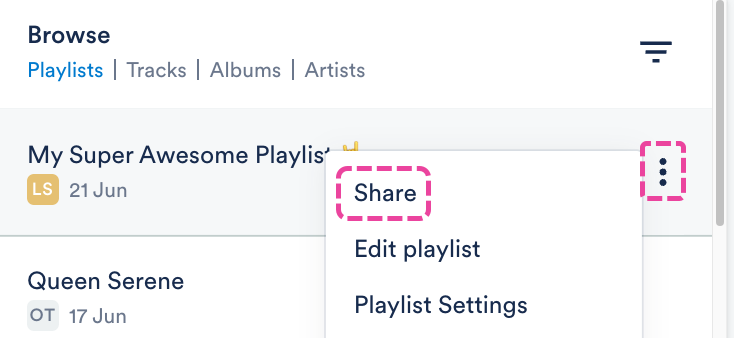
- Open the Playlist menu (⋮).
- Select Share.

- In the Share Playlist menu, from the Share tab, select Email playlist directly.
- Enter an email address, or search for a DISCO user or business name. You can also search for a Mailing List.
- Suggestions will populate as you begin to type:
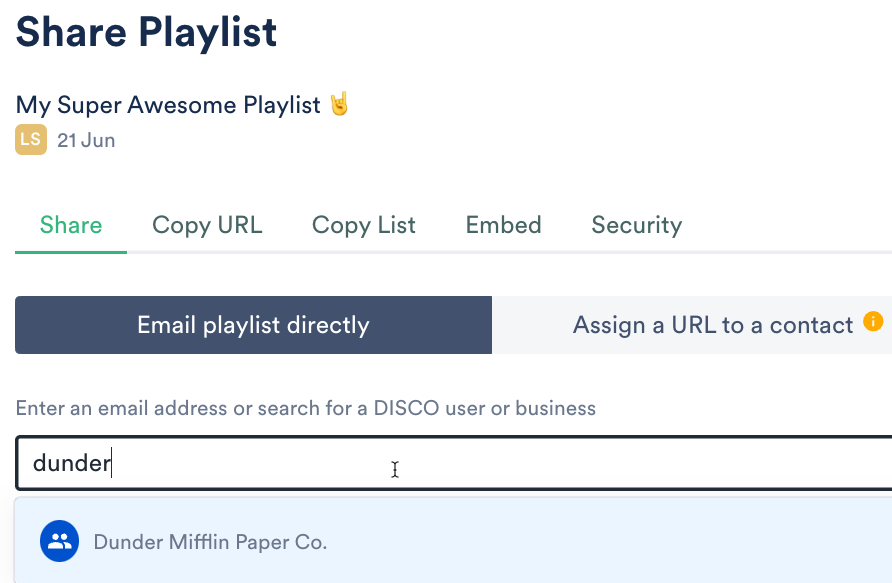 Searching for a business name will bring up their Team Inbox, a group inbox managed by the other business:
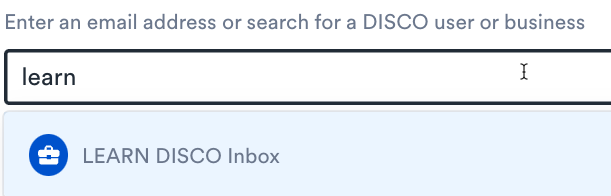 Selecting a Mailing List will populate all contacts from that list (and you'll be able to remove any before sending):

This icon indicates a single contact, which can be either a DISCO user or non-DISCO user. 
This icon indicates a DISCO Team Inbox (a general Inbox for a DISCO account). 
This icon indicates a Mailing List you've created. - You can then add a Message if you like, and click the Send to Recipients button.

- After sharing, you'll see options to view the playlist access stats, or share the Playlist again:
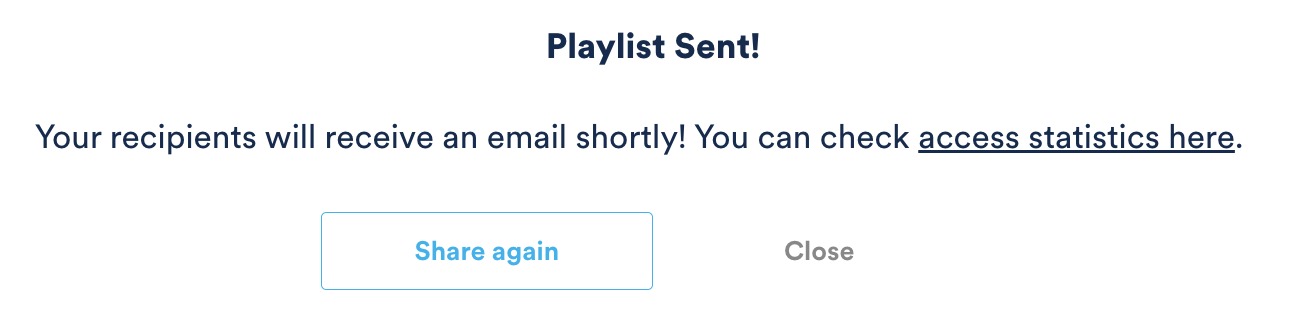
- Your recipients will be notified via email, and you'll also get a confirmation email. Both emails will come from no-reply@disco.ac.

 Searching for a business name will bring up their Team Inbox, a group inbox managed by the other business:
 Selecting a Mailing List will populate all contacts from that list (and you'll be able to remove any before sending):


Assigning Playlist URLs to your Contacts
Note: Any activity (page views, streams, downloads) originating from this link will be attributed to the specific contact in the Playlist Stats, even if someone else were to access the link.
- Open the Playlist menu (⋮).
- Select Share.
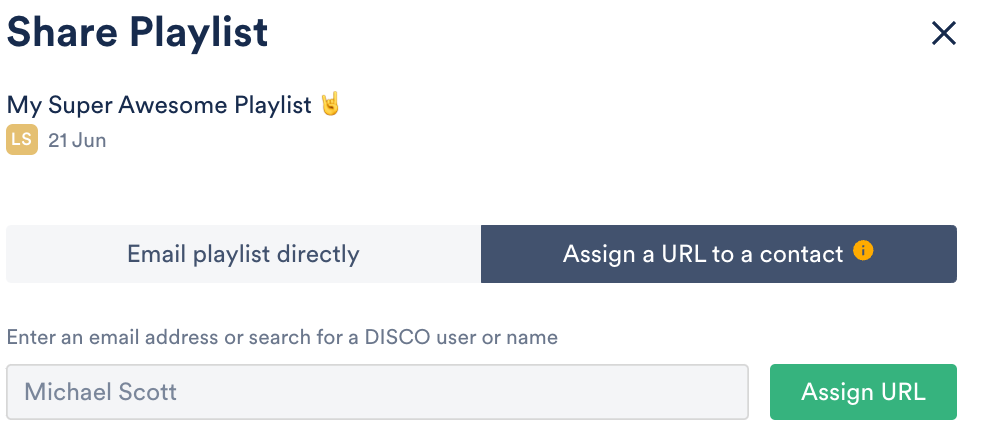
- In the Share Playlist menu, from the Share tab, select Assign a URL to a contact.
- Enter an email address, or search for a DISCO user or business name.

- Click the Assign URL button.
- Copy the URL and send it to the recipient.

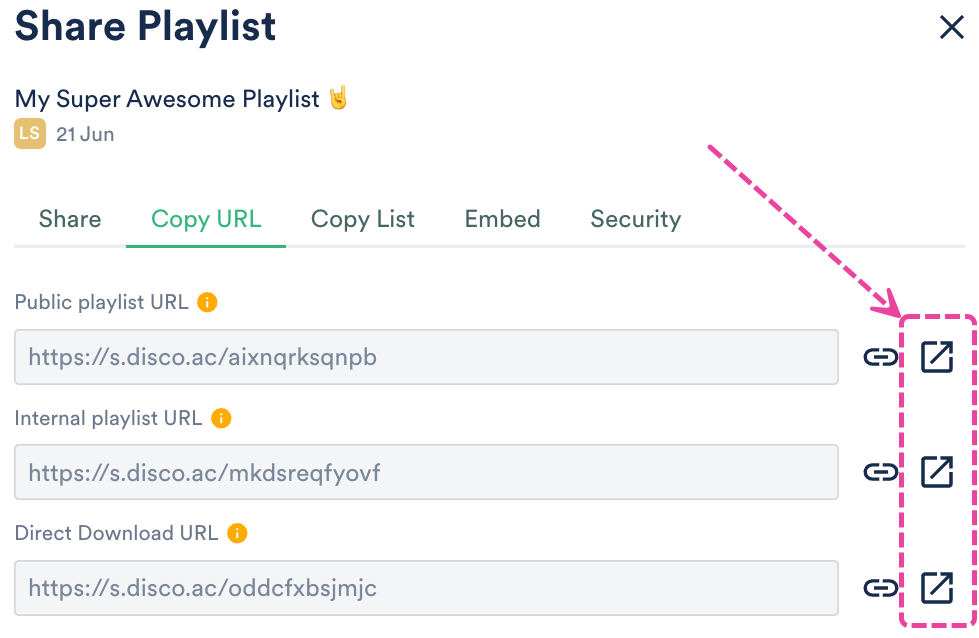
Copying and sharing the Playlist URL
Note: Copying and sharing any of the Playlist Share URLs will not generate individualized Playlist Stats. Instead, these stats will be aggregated under "Other recipients".
- Open the Playlist menu (⋮).
- Select Share.
- In the Share Playlist menu, from the Copy URL tab, you can copy any of these links and send them to anyone outside of DISCO.

When sharing a Playlist, there are two different share options:
- Email playlist directly → allows you to send an email to the recipient directly from DISCO, which contains a link to your Playlist. The recipient's activity (Streams, Downloads, etc.) will be recorded in your Playlist Stats.
- Assign a URL to a contact → allows you to create a unique URL for a specific recipient, copy it, and send it to them wherever you like. The recipient's activity (Streams, Downloads, etc.) will be recorded in your Playlist Stats.
Assigning Playlist URLs to your Contacts
Note: Any activity (page views, streams, downloads) originating from this link will be attributed to the specific contact in the Playlist Stats, even if someone else were to access the link.
- Open the Playlist menu (⋮) and select Share.
- In the Share Playlist menu, from the Share tab, select Assign a URL to a contact.
- Enter an email address, or search for a DISCO user or business name.
- Click the Assign URL button.
- Copy the URL and send it to the recipient.


Users on our Plus plan and above have the option to disable individual share URLs for Playlists so they'll no longer be accessible to recipients.
At a glance
This can only be done on share URLs you've generated by emailing playlists directly, or by assigning URLs to specific Contacts. Public playlist URLs cannot be disabled.
Disabling a Playlist share URL
- Open the Playlist menu (⋮).
- Select Share.
- In the Share Playlist menu, from the Share tab, scroll to the bottom where it says "View current Share URLs and Access Stats."
- Click the Share URLs link.
- A list of Current share URLs will appear. Click the X under the Action column to the right of the share URL you'd like to disable.
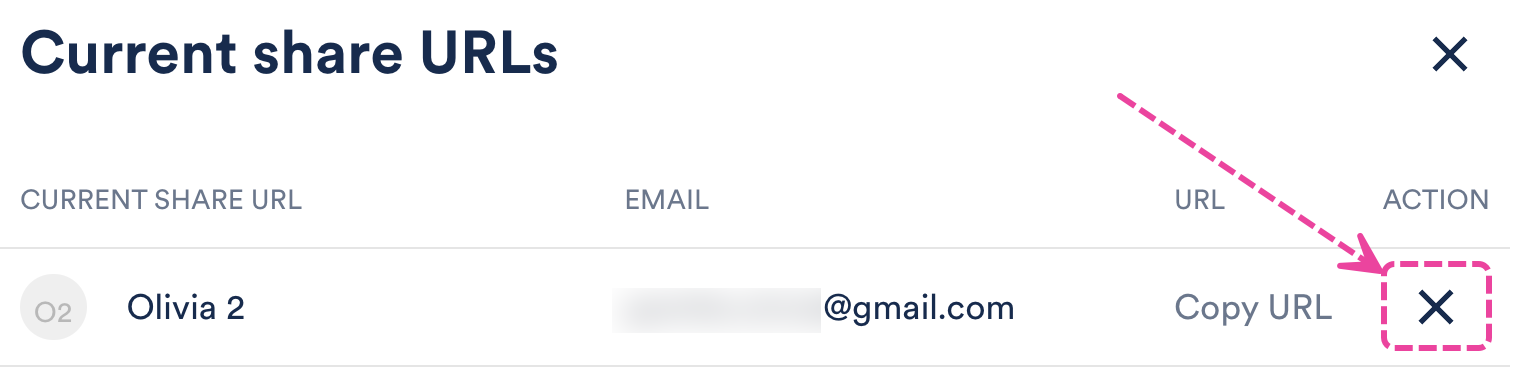
- You'll be asked to confirm that you want to disable the link. Click the red Confirm button.

Re-enabling a disabled Playlist share URL
- Open the Playlist menu (⋮).
- Select Share.
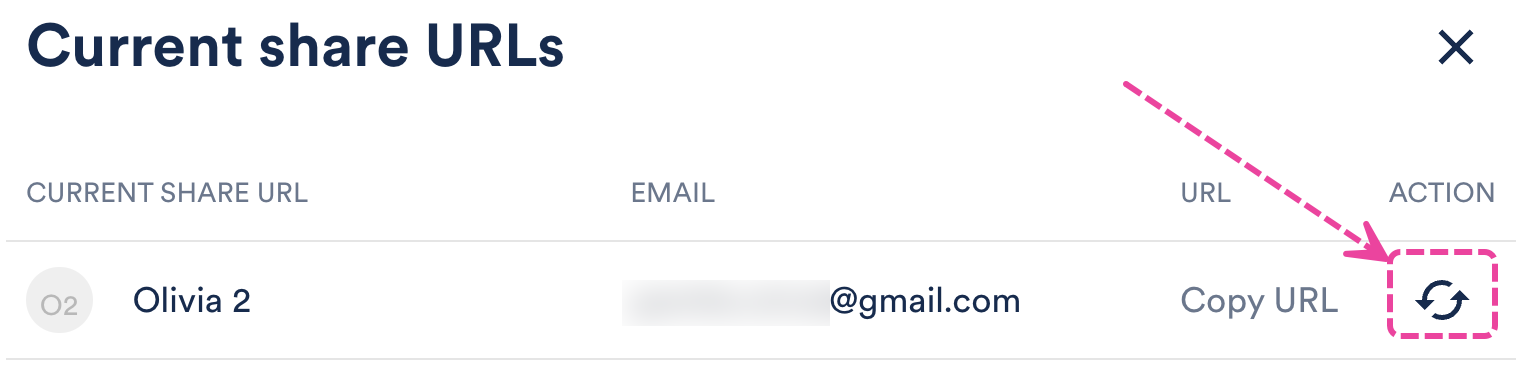
- In the Share Playlist menu, from the Share tab, scroll to the bottom where it says "View current Share URLs and Access Stats."
- Click the Share URLs link.
- A list of Current share URLs will appear. Click the refresh icon under the Action column to the right of the share URL you'd like to re-enable.

Frequently asked questions
How soon after disabling a URL will it become inaccessible?
Once you disable a URL, it will no longer load for recipients. If a recipient had the Playlist page open already before you disabled it, that page will be invalidated and a "page unavailable" message will appear within 10 minutes.
Users on our Pro and Enterprise plans can set expiry dates on Playlist share links.
At a glance
This is helpful if you'd only like a shared Playlist to be available for a certain amount of time. Once you set an expiry date, it will appear in green under the Security tab in the Share Playlist menu. Once the link has expired, it will no longer be accessible to recipients, and the date will appear in red.
Adding link expiry dates
Note: Once you set an expiry date for a Playlist, all share links for that Playlist will expire on that date.
- Open the Playlist menu (⋮) and select Share.
- In the Share menu, from the Security tab, set the Link expiry toggle to ON.
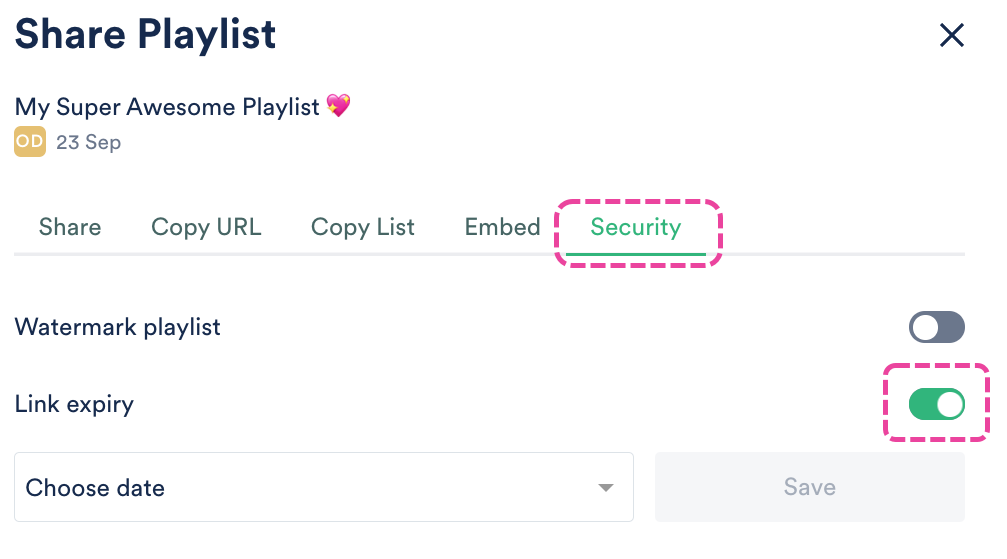
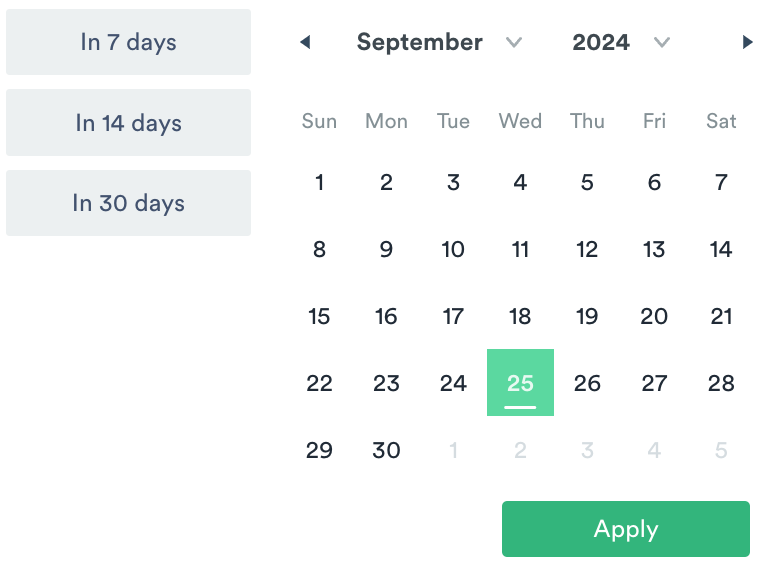
- Choose a date from the drop-down and select one of the options (In 7 days, In 14 days, In 30 days) or set a custom date.
- Click the Apply button, then click the Save button.


Updating and removing link expiry dates
To update an expiry date:
- Click the pencil icon to the right of the date.
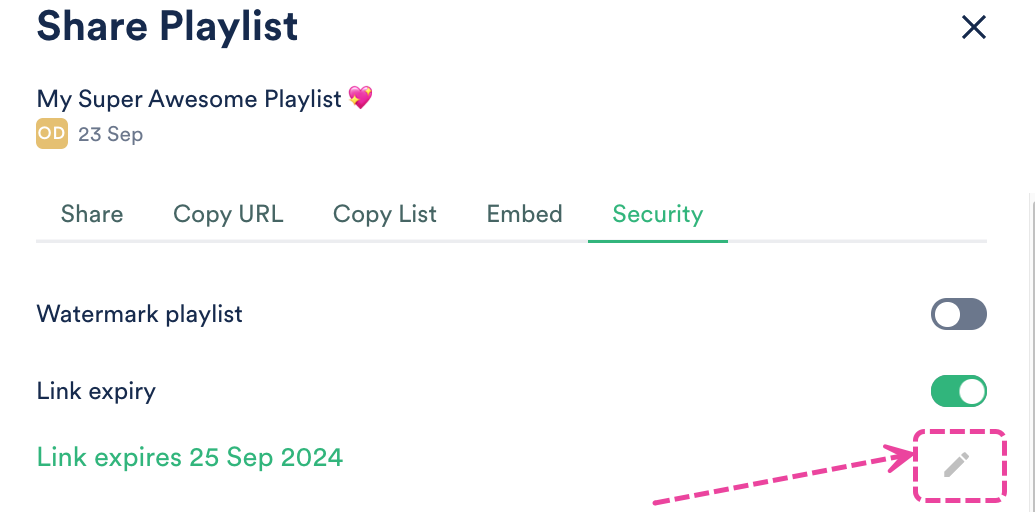
- Select a new date, then click the Apply button.
- Click the Save button.

To remove an expiry date:
- Set the Link expiry toggle to OFF (it should appear gray).


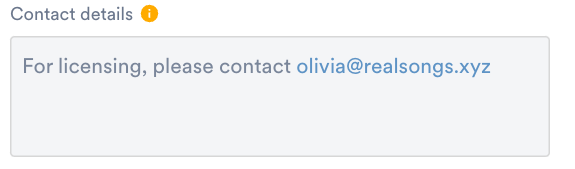
You can update your Settings to add custom Contact details in the footer of all your Playlists and Track pages.
At a glance
This information will appear on all Playlist and Track pages you share and is specific to you. Other users in your DISCO can add the same Contact details or include their own.

Updating your Settings
- In the top-left corner of your DISCO, click on your DISCO Business Name to open the menu.
- Select Settings and Account.
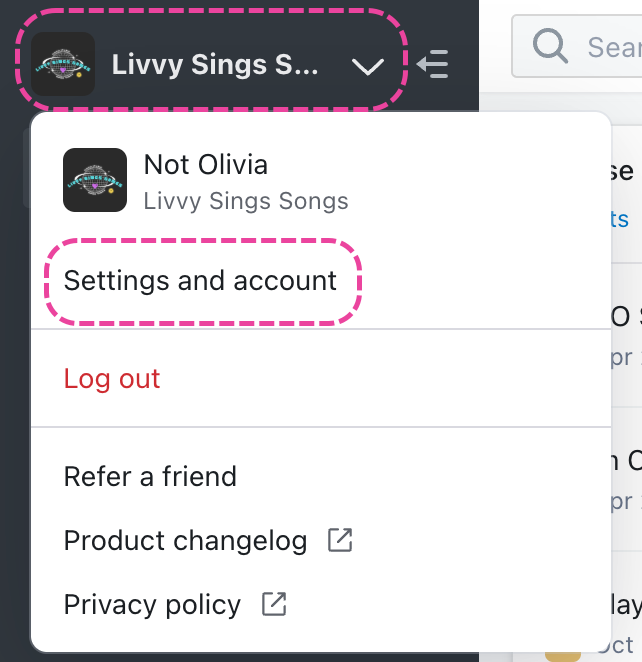
- Under My Settings select Profile & Account.
- Add your information in the Contact details box.
- Check the box to Include contact details on my public DISCO pages.
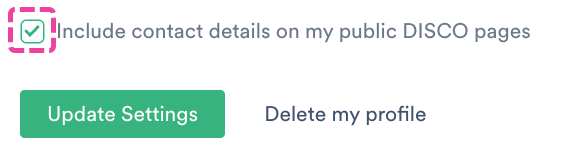
- Click the Update Settings button.


You can embed Tracks, Playlists, and more from your DISCO using our embeddable player.
At a glance
Here's an example of what an embedded Track player looks like (without customization or allowing downloads):
In addition to Tracks and Playlists, you can also embed all the other file types DISCO supports: video, images, text documents, PDFs, and more.
Note: Activity (such as Streams, Downloads, and Page Views) from a DISCO embeddable player does not generate Playlist Stats. Playlist Stats are only generated from Playlists you have shared using one of the methods from the Share and Copy URL tabs in the Share Playlist menu. Visit this article for more information on Playlist sharing and how Stats are generated.
Embedding content
- Open the Track menu (⋮) or the Playlist Menu (⋮).
- Select Share.
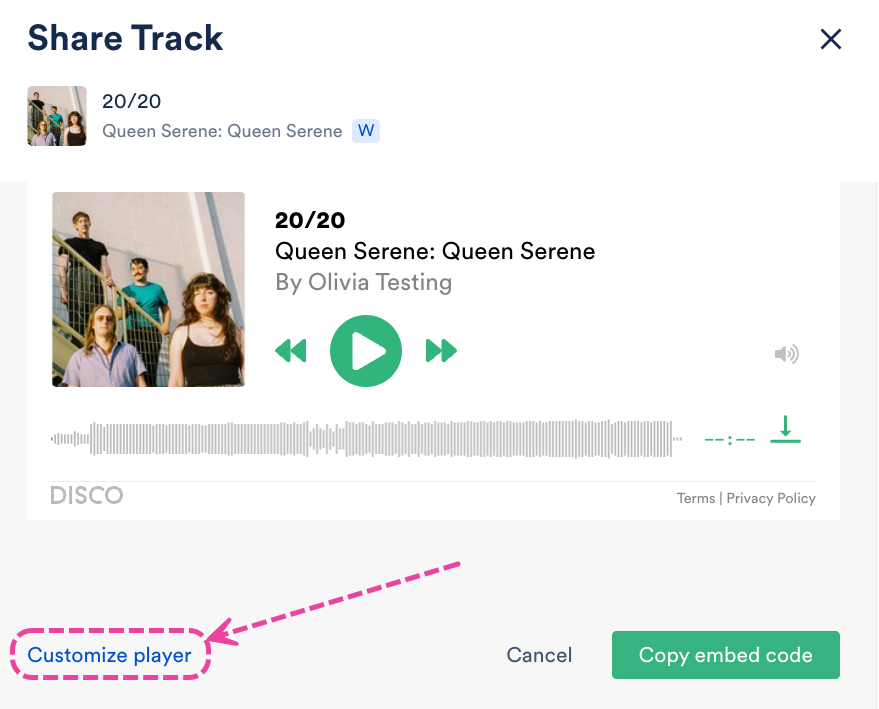
- In the Share Track or Share Playlist menu, select the Embed tab:
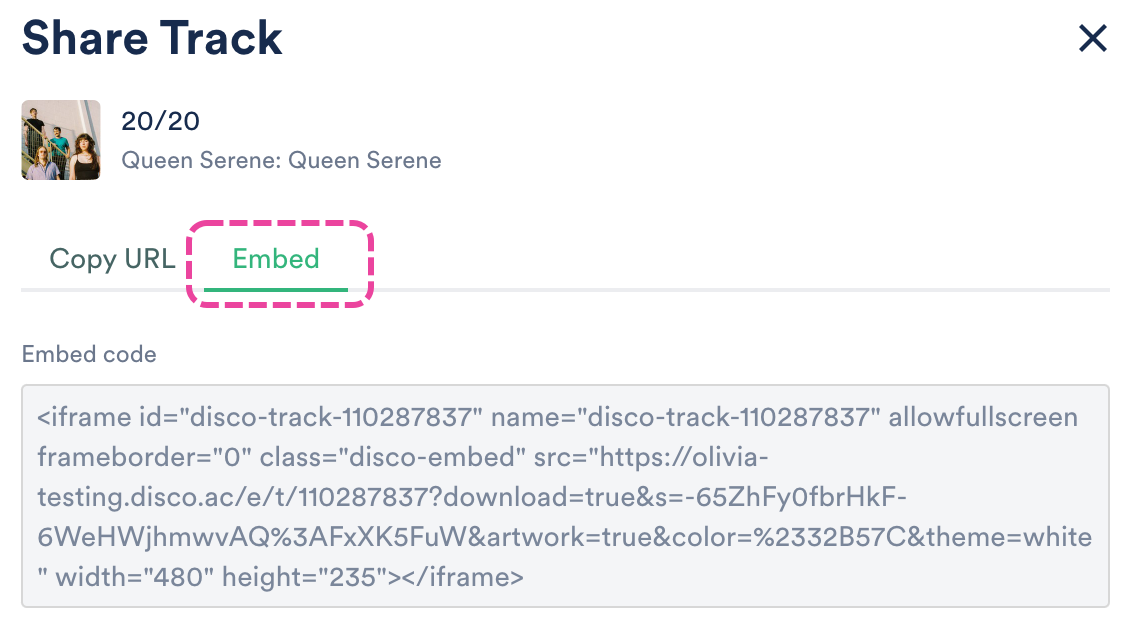
- Review the Player preview to make sure it is to your liking.

- Optional: Click the Customize player link to edit the design, enable or disable downloading, and show or hide the Track Artwork.
- Click the Copy embed code button.
- Insert the embed code into your site.


Customizing the player
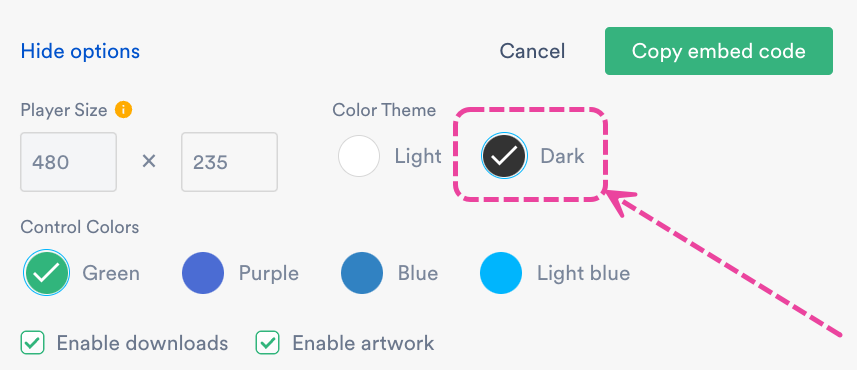
You can edit the design of your player, enable and disable downloading, and show or hide the Track Artwork by clicking the Customize player link.

This will open the customization options, which include: Player Size, Color Theme, Control Colors, Enable downloads, and Enable artwork.

After making the desired changes, the embed code will update automatically.
Note: If you copied the embed code before making changes, be sure to copy it again before inserting into your site so the changes are reflected.
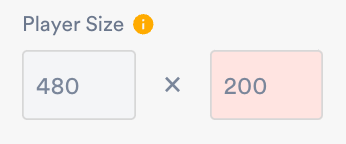
Edit the design
You can edit the following:
- Player size:
- By default, Playlist players are 480 pixels wide and 395 pixels high and Track players are 480 pixels wide and 235 pixels high.
- Players must have a minimum width of 355 pixels and a minimum height of 285 pixels. If you enter amounts lower than this, these fields will turn red and you'll need to enter an acceptable value:
- Color Theme: the background color of the player
- Control Colors: the color of the play/pause, next/previous track, and download buttons

Enable and disable downloading
You can update this setting by checking or unchecking the Enable downloads box.
Note: Downloads in embedded players are only available at the Track level, not the Playlist level.

Show or hide Track Artwork
You can update this setting by checking or unchecking the Enable artwork box.

Advanced customizations
You can add some more customization by making a few edits to the embed code after it has been added to your site, including:
- Using custom Control Colors - Replace the hex color value with the hex value of your desired color.
Example:
We replaced the highlighted portion of the code (after color=%23) from 32B57Cto F5A2CF.

This changed the Control Colors from green to light pink:
- Updating the "By [company]" line - You can change the company name by adding some additional code to your embed code (before the quotation mark before
width=).
Example:
We added this portion of code to our embed code.
 This changed the company name from Olivia Testing to Livvy Sings Songs:
- Removing the "By [company] line" - You can remove the company name by adding some additional code to your embed code (before the quotation mark before
width=).
Example:
We added this portion of code to our embed code.
 This removed the By Livvy Sings Songs line entirely:
- Collapsing Playlist Sections in embeds - By default, Sections in Playlists are expanded in embeds.
You can collapse these by adding some additional code to your embed code (before the quotation mark beforewidth=).
Example:
We added this portion of code to our embed code.
 This collapsed the Instrumentals and Videos Sections of the Playlist:
Feel free to reach out to our Support team if you need any help with this 🙂
When promoting your music, publicists and promo platforms typically want to listen to your music several weeks before the release date. With DISCO, it's easy to share your music with album artwork, metadata, and high-quality audio before it's released.
At a glance
You can share links and embed codes for individual Tracks from your DISCO to submit on promo platforms such as Submithub, Pytch, and Musosoup. This is not meant to be an exhaustive list of all platforms, if you find that a platform doesn't support DISCO links, feel free to contact their support or contact us and we'll try to get it sorted 👍🏼
Submithub
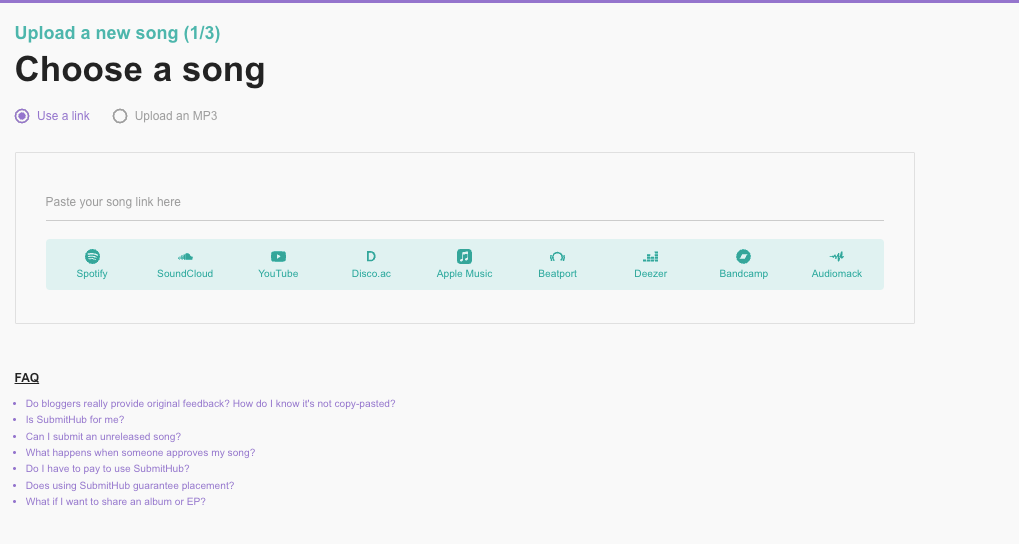
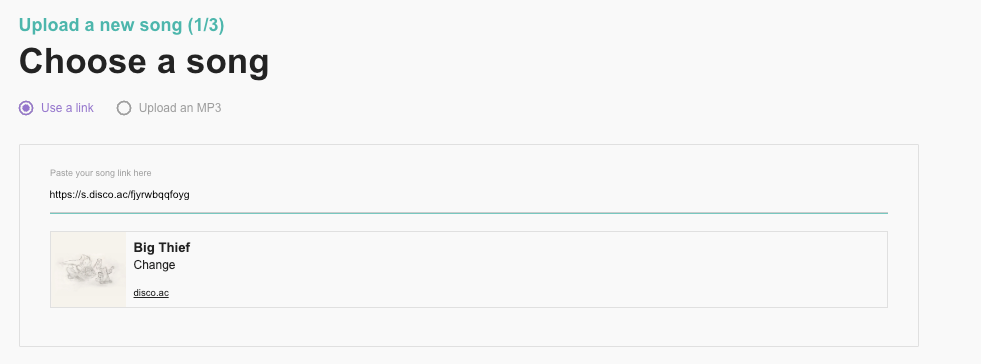
- Open the Track menu (⋮) and select Share.
- In the Share Track menu, from the Copy URL tab, copy the Regular track URL.

- Paste the DISCO Track URL into Submithub.


Musosoup
- Open the Track menu (⋮) and select Share.
- In the Share Track menu, from the Embed tab, click Customize player.
- Under Color Theme, select Dark (this is preferred for Musosoup).
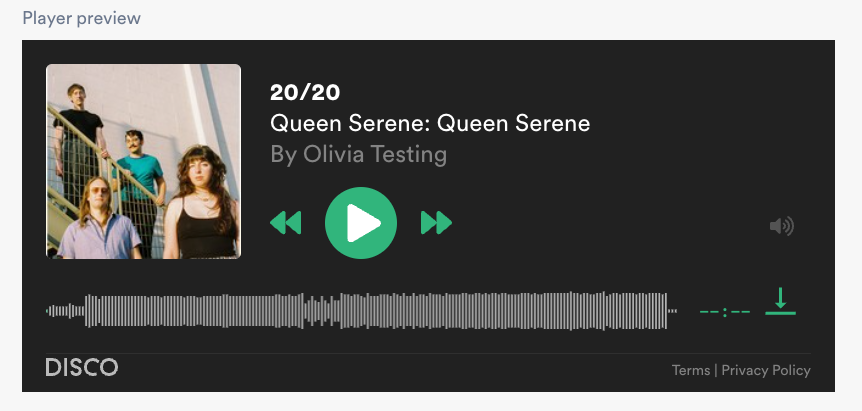
- Your Player preview should look something like this:
- Click the Copy embed code button.
- Paste the embed code into your Musosoup campaign.


Pytch
- Open the Track menu (⋮) and select Share.
- In the Share Track menu, from the Copy URL tab, copy the Regular track URL.

- Paste the DISCO Track URL into Pytch.