What are Channels on DISCO?
Channels are essentially folders where you can organize your Tracks and Playlists 🗂️
They're available to all DISCO users, regardless of plan type, and are especially useful for organizing specific types of content, such as:
- covers
- instrumentals
- a catalog or artist you represent
- a particular client or project
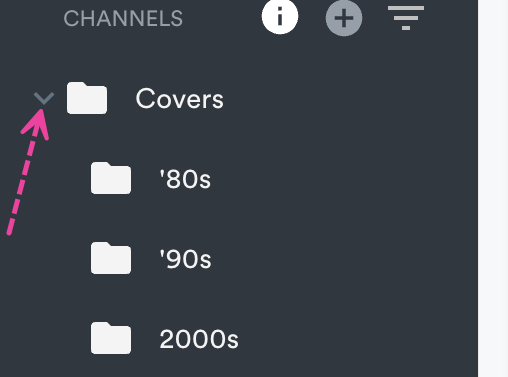
To keep things extra organized, you can also create Folders within Channels and Subfolders within Folders.

At a glance
There are a few ways to create Channels:
- from the left sidebar of your DISCO
- from any Playlist menu (⋮) or Track menu(⋮)
- from your account Settings
Create a new Channel
From the left sidebar of your DISCO
From the Channels section, click the + plus icon to Add new channel.
From any Playlist menu (⋮) or Track menu (⋮)
Open a Playlist menu (⋮) or Track menu (⋮) and select Add to channel.
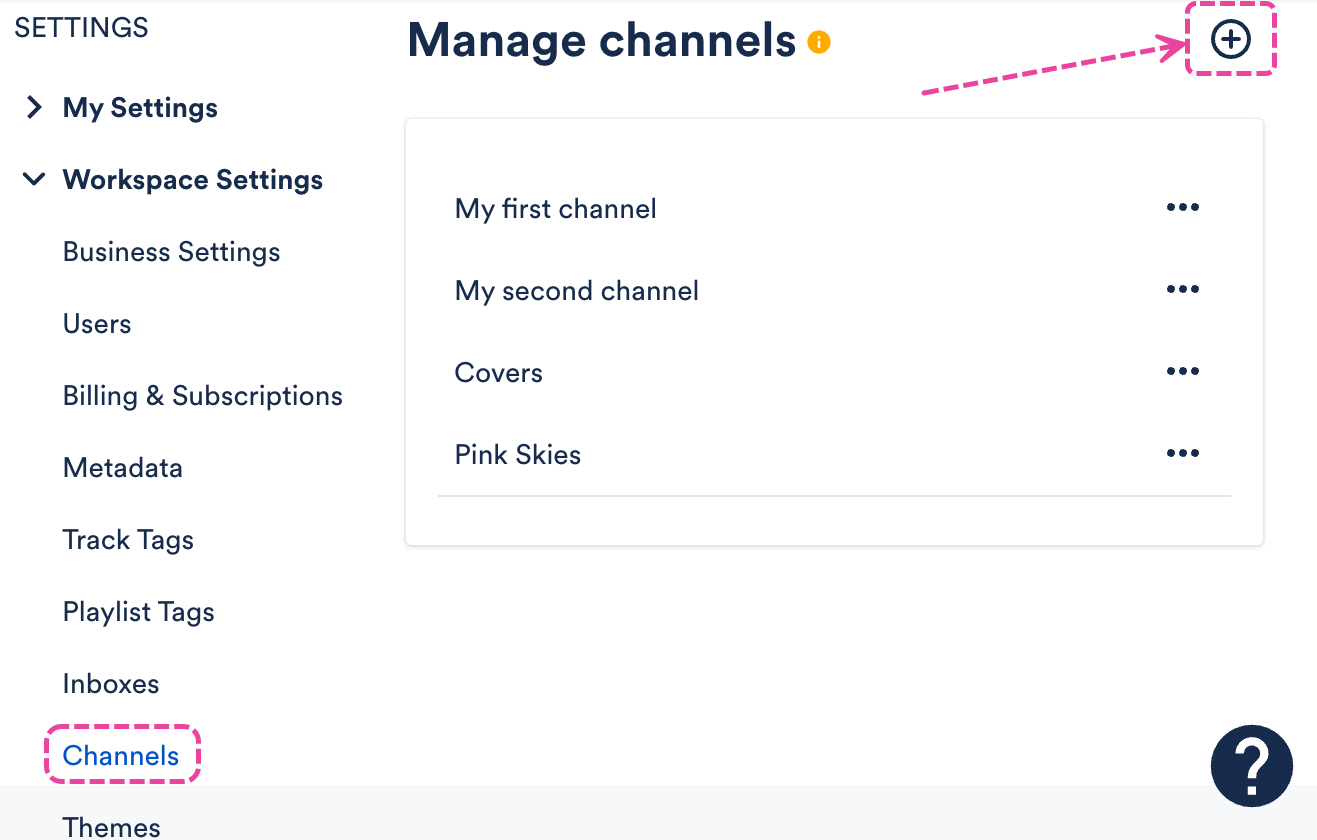
From your account Settings
- In the top-left corner of your DISCO, click on your DISCO Business Name to open the menu.
- Select Settings and Account.
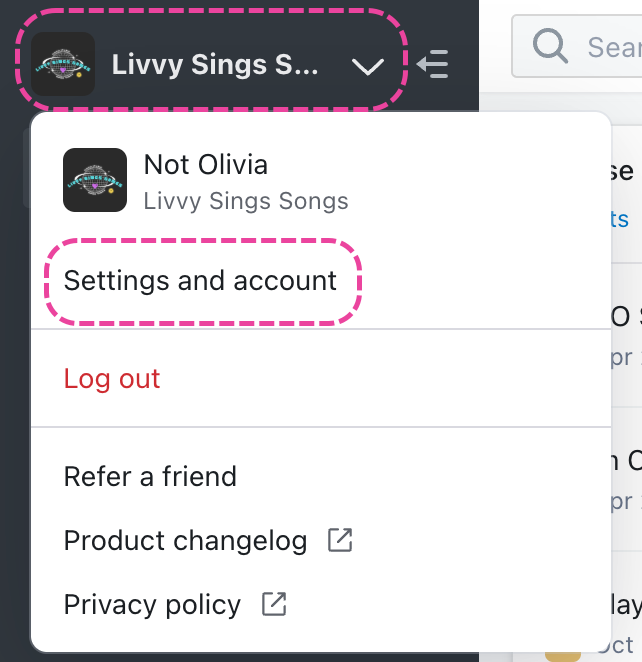
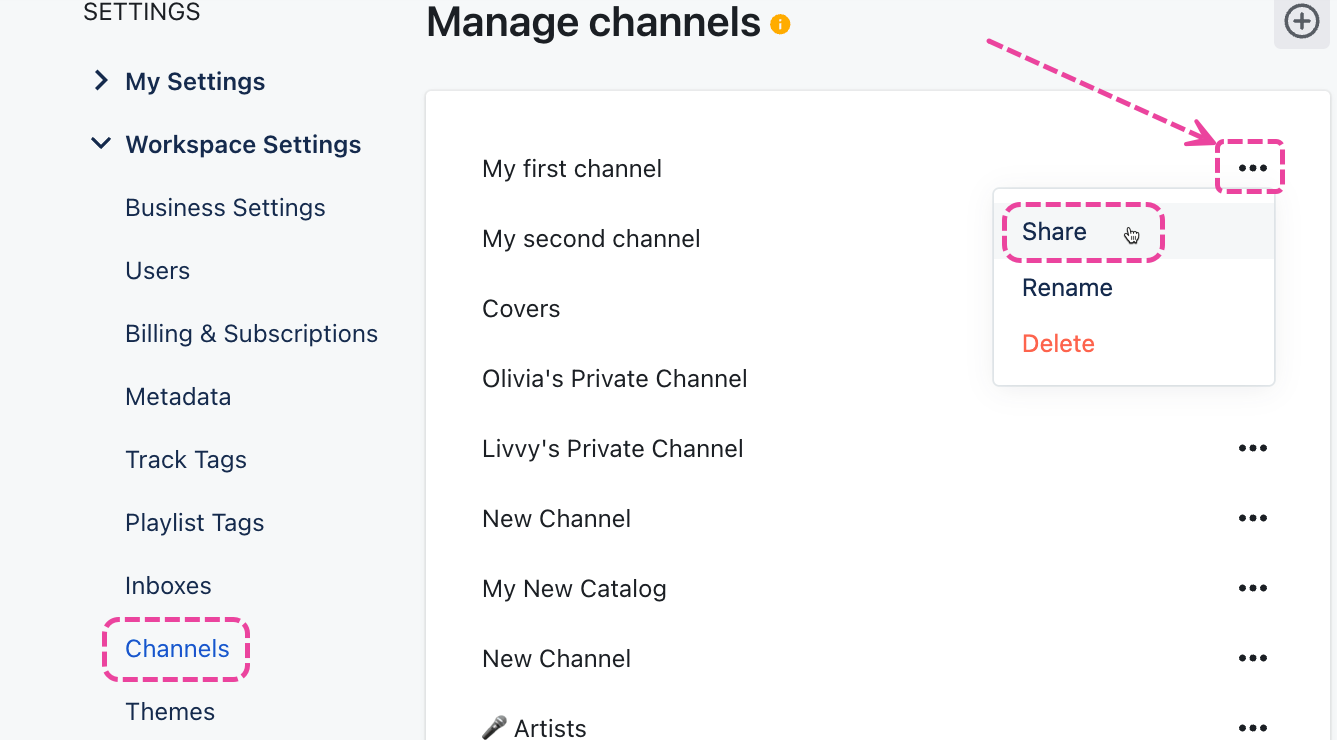
- Under Workspace Settings, select Channels.
- Click the + plus icon on the top right.


At a glance
There are multiple ways you can add content to Channels and Folders:
- drag and drop
- from any Track menu (⋮) or Playlist menu (⋮)
- from Playlist Settings or when saving a Playlist
Add content to a Channel or Folder
Drag and drop
Drag and drop any Track or Playlist from the Explorer directly into a Channel or Folder:
From any Track menu (⋮) or Playlist menu (⋮)
Open a Playlist menu (⋮) or Track menu (⋮) and select Add to channel.
From Playlist Settings or when saving a Playlist
From the Playlist Info tab, under Add to channel, you can search for or select a Channel from the dropdown:
Rename Channels
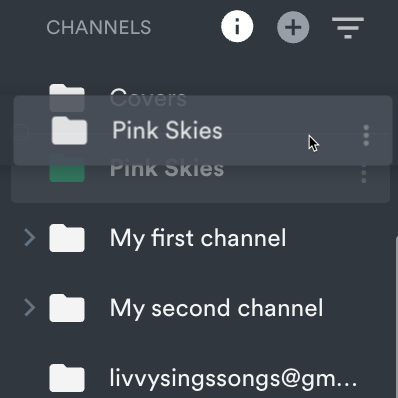
- On the left sidebar of your DISCO, under Channels, hover your cursor over the Channel name and open the menu (⋮) to the right.

- Select Rename.
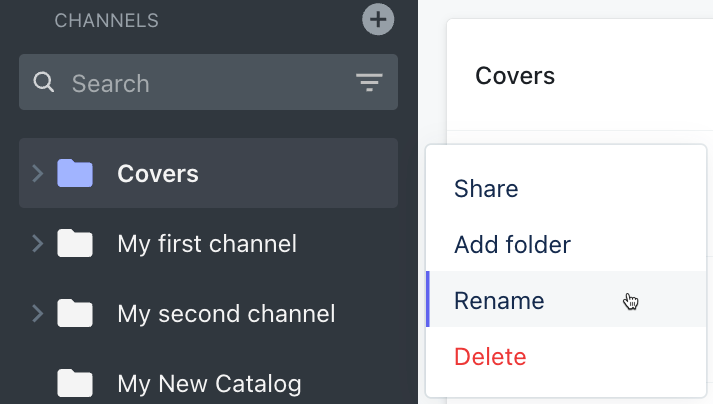
- Edit the Channel name and click the Rename button.


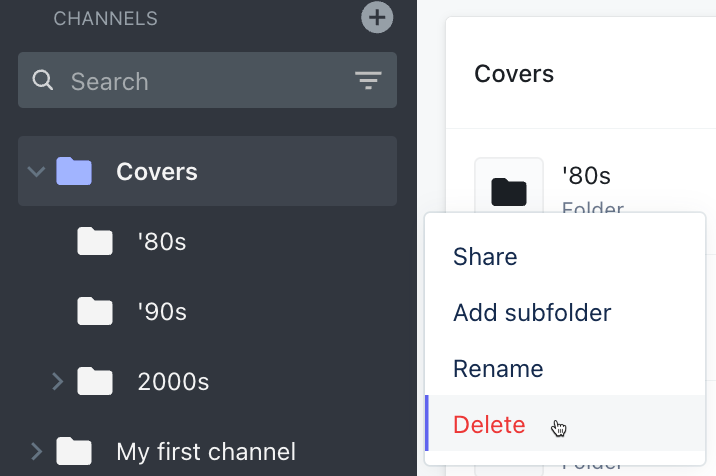
Delete Channels
- On the left sidebar of your DISCO, under Channels, hover your cursor over the Channel name and open the menu (⋮) to the right.

- Select Delete.
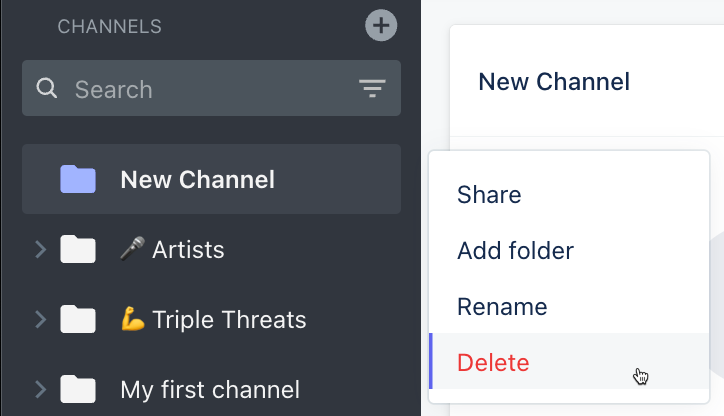
- Click the Delete button.


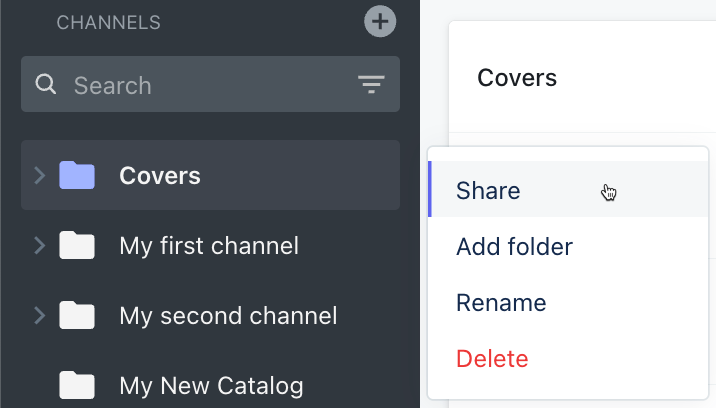
Add Folders to Channels
- On the left sidebar of your DISCO, under Channels, hover your cursor over the Channel name and open the menu (⋮) to the right.
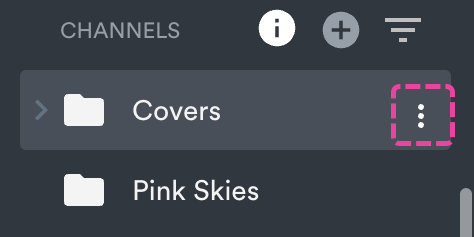
- Select Add folder.
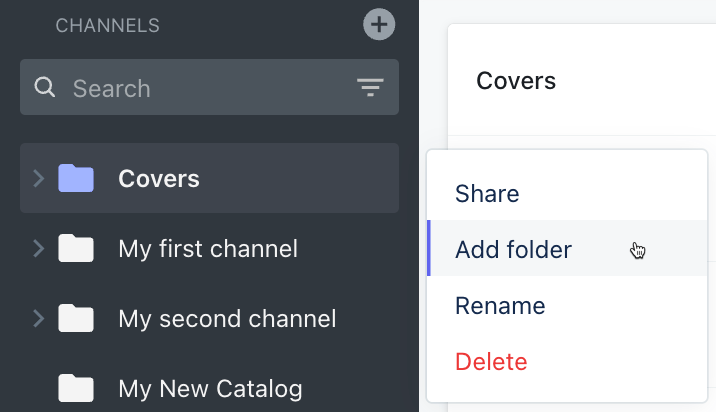
- Enter a Folder name and click the Create button.


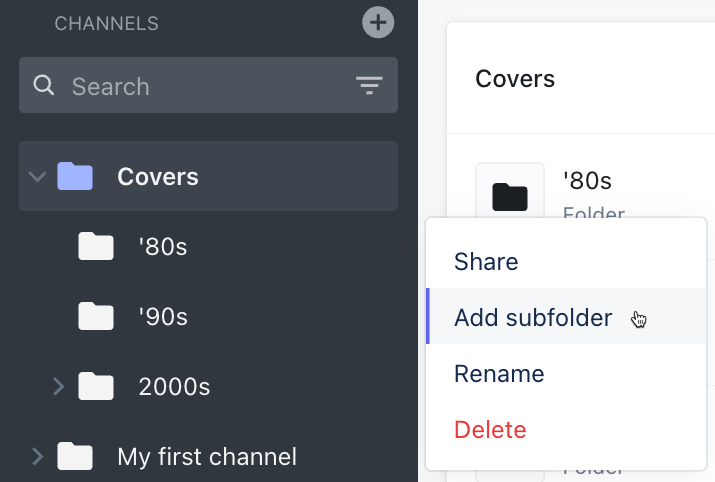
Add Subfolders to Folders within Channels
- On the left sidebar of your DISCO, under Channels, expand the Channel containing the folder you'd like to add a Subfolder to.

- Hover your cursor over the folder name and open the menu (⋮) to the right.
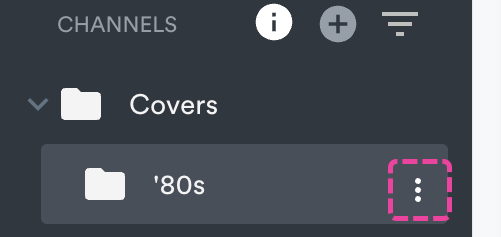
- Select Add subfolder.


Rename Folders
- On the left sidebar of your DISCO, under Channels, expand the Channel containing the folder you'd like to rename.

- Hover your cursor over the folder name and open the menu (⋮) to the right.

- Select Rename.
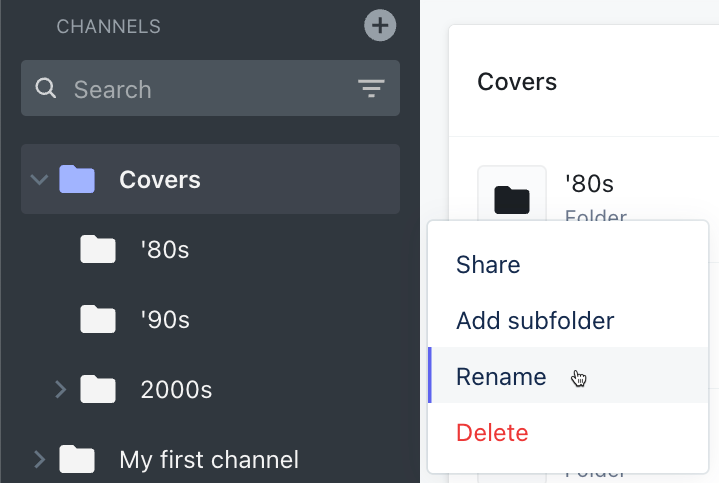
- Edit the Folder name and click the Rename button.


Delete Folders
- On the left sidebar of your DISCO, under Channels, expand the Channel containing the folder you'd like to delete.
- Hover your cursor over the folder name and open the menu (⋮) to the right.

- Select Delete.
- Click the Delete button.


You can control the permissions and visibility of Channels for users in your DISCO.
At a glance
Only Channel Managers can manage Channel permissions. Channels can also be set to be visible to everyone in your DISCO, specific users only, or private only to you.
Note: Updating Channel permissions won't restrict access to Playlists or Tracks. These can still be viewed by users in your DISCO via the Explorer, Search, and other Channels.
Channel roles
Every Channel has Managers and Members. When a new Channel is created, the person who created it automatically becomes a Manager of that Channel, and their name will auto-populate in the Select channel managers field. They can then choose to add Members and/or other Managers.
Managers can: ✅ view Channels in their DISCO ✅ add content to Channels ✅ remove content from Channels ✅ edit Channels
✅ delete Channels | Members can: ✅ view Channels in their DISCO ✅ add content to Channels ✅ remove content from Channels Members can't: ❌ edit Channels ❌ delete Channels |
❗️Important: Channel roles vs. DISCO user Labels
Channel roles differ from DISCO user Labels. In your account Settings, on the Users page, you can see a list of users and their Labels in your DISCO: Admin or User.
With that in mind, even if you're an Admin in a DISCO, there may still be Channels within that DISCO that you can't see or manage. In other words, being an Admin in a DISCO does not automatically make you a Manager of a Channel in that DISCO. Channel Managers are appointed automatically when Channels are created, and they can only be manually appointed by other Channel Managers.
Managing Channel permissions
You can manage Channel permissions after a Channel has been created. Channel permissions are accessible from the Share channel menu. There are three ways to access this menu:
- from the left sidebar
- from within a Channel

- from your account Settings > Workspace Settings > Channels


Channel permissions consist of:
- adding and removing Managers
- adding and removing Members
- updating Channel visibility (new Channels are visible to all users by default)
Adding and removing Channel Managers
To add Managers:
- In the Share channel menu, from the My team tab, under Select channel Managers, search or select their names from the dropdown.
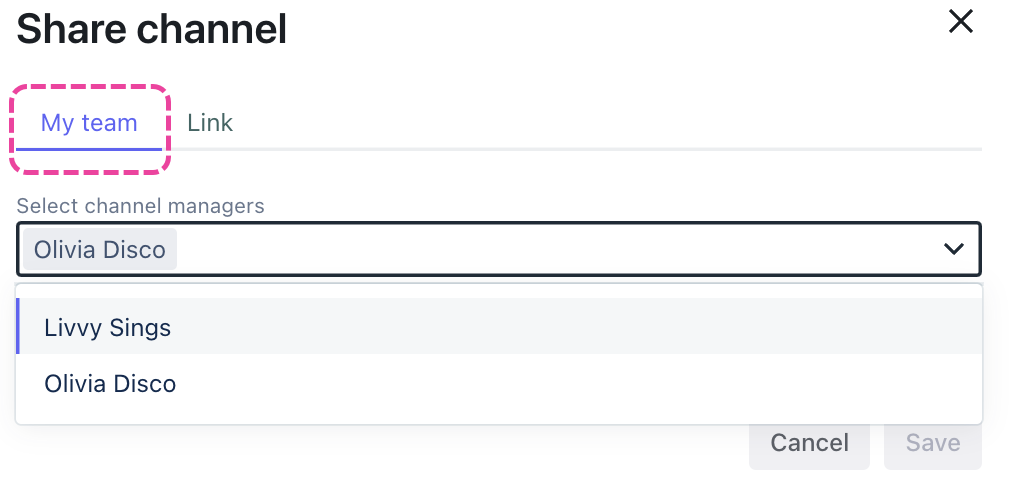
- Click the Save button.

To remove Managers:
- In the Share channel menu, from the My team tab, under Select channel Managers, click the X to the right of their name.
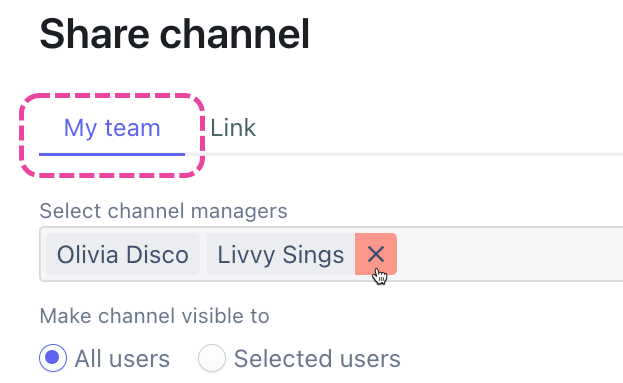
- Click the Save button.

Adding and removing Channel Members
To add Members:
- From the Share channel menu, under Make channel visible to, search or select their names from the dropdown.
- Click the Save button.

To remove Members:
- From the Share channel menu, under Make channel visible to, click the X to the right of their name.
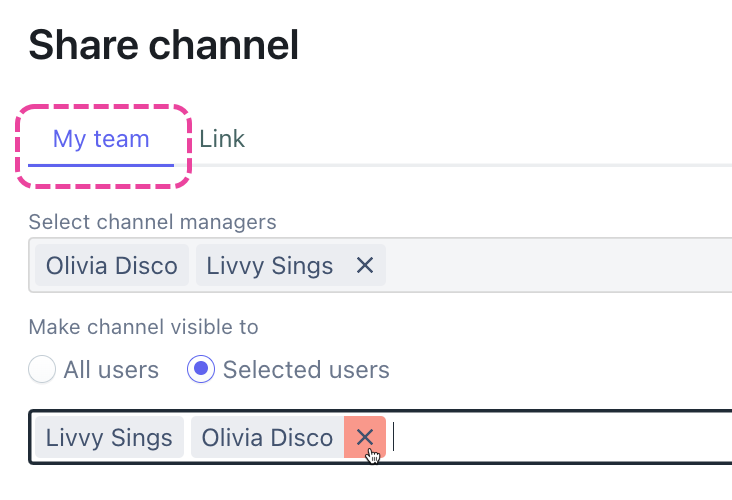
- Click the Save button.

Updating Channel visibility
If you'd like the channel to be visible to all users in your DISCO:
- In the Share channel menu, from the My team tab, under Make channel visible to, select All users.
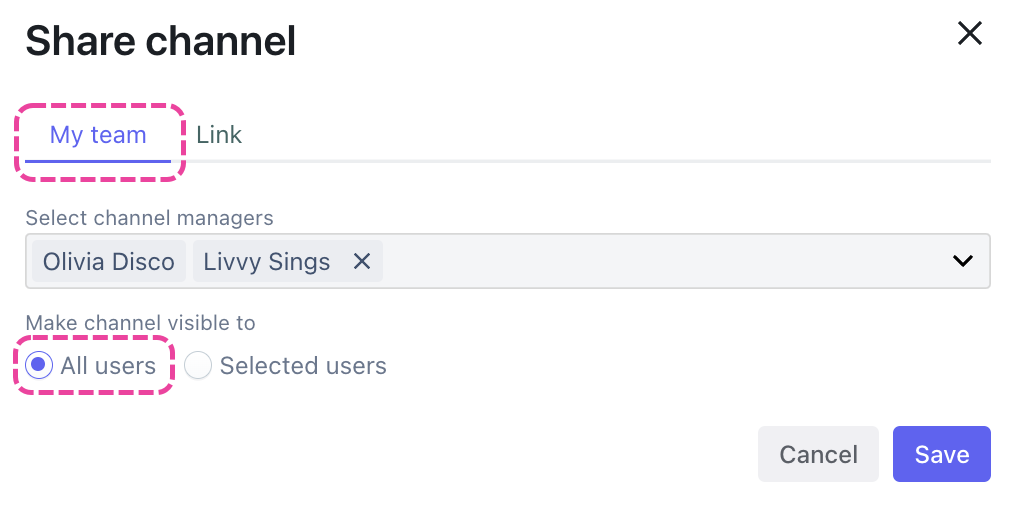
- Click the Save button.

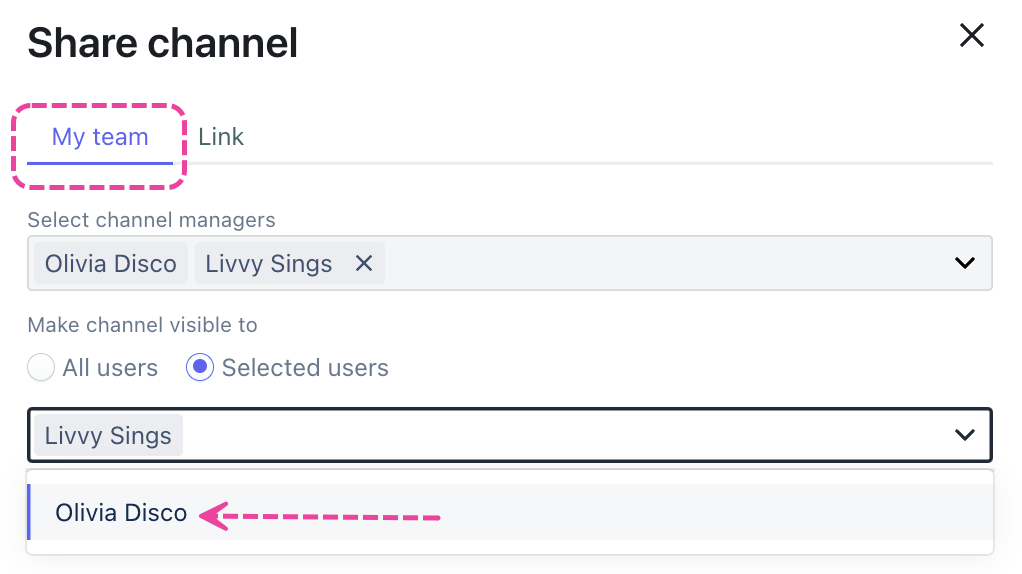
If you only want the Channel to be visible to specific users:
- In the Share channel menu, from the My team tab, under Make channel visible to, select Selected users and search or select their names from the dropdown.
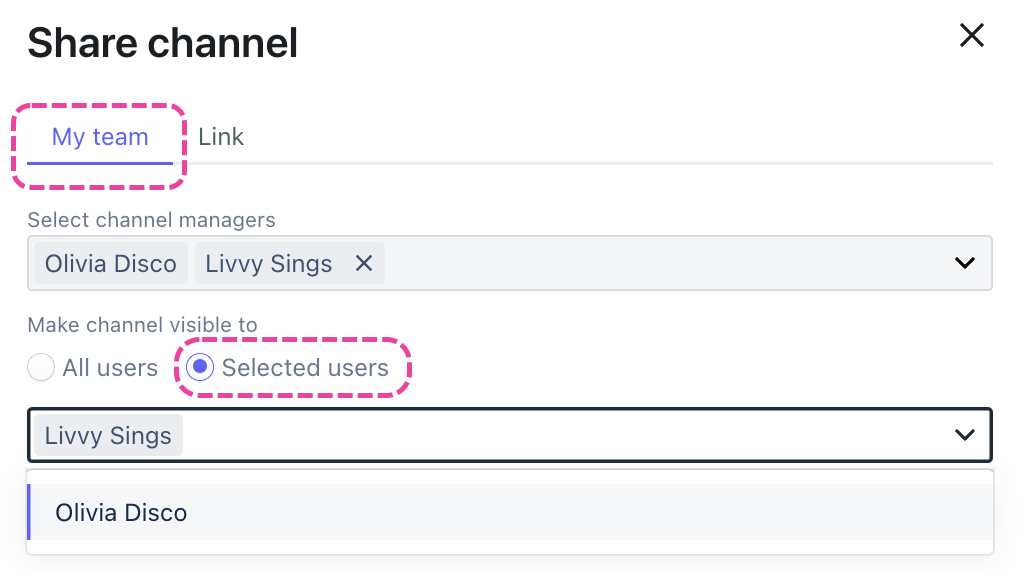
- Click the Save button.

You can share larger amounts of content, including your entire catalog, when you share a Channel, Folder, or Subfolder!
At a glance
The Shared Channels feature (formerly known as Shareable Channels) is available to users on our Pro and Enterprise plans. There are two options when sharing Channels:
- the Link option
- currently available to users on our Pro and Enterprise plans
- generates a Channel Share page where recipients can view and download all or some of your Channel content
- the invite Other DISCOs option
- currently in a limited beta release to users across all plans, but will only be available to users on our Artist, Pro, and Enterprise plans upon full release
- once the invite is accepted, the recipient (or Partner DISCO) will have access to the Channel from within their own DISCO and they can: manage Channel access for Users within their own DISCO, stream and download Tracks and Playlists, view Track Metadata, and add content from the Channel to their DISCO
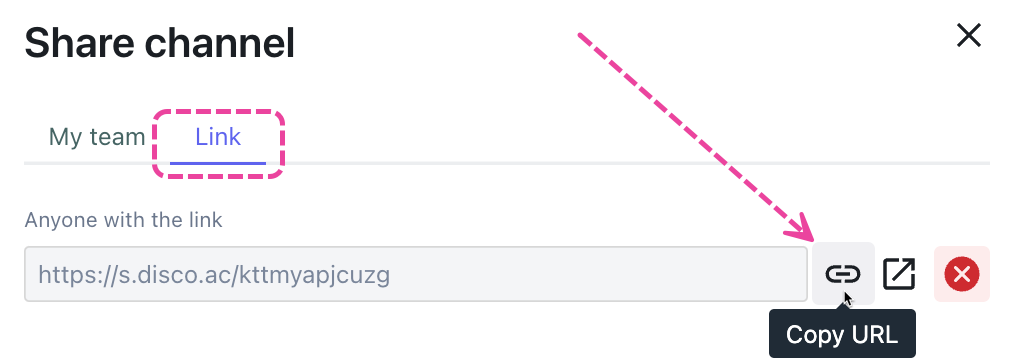
Sharing Channels using the Link option
Note: This option is available to users on our Pro and Enterprise plans.
The below also applies to Folders and Subfolders:
- In the left sidebar of your DISCO, under Channels, hover over the desired Channel or Folder and open the Channel menu (⋮).
- Select Share.

- In the Share channel menu, from the Link tab, copy the link and share it with your recipient(s).
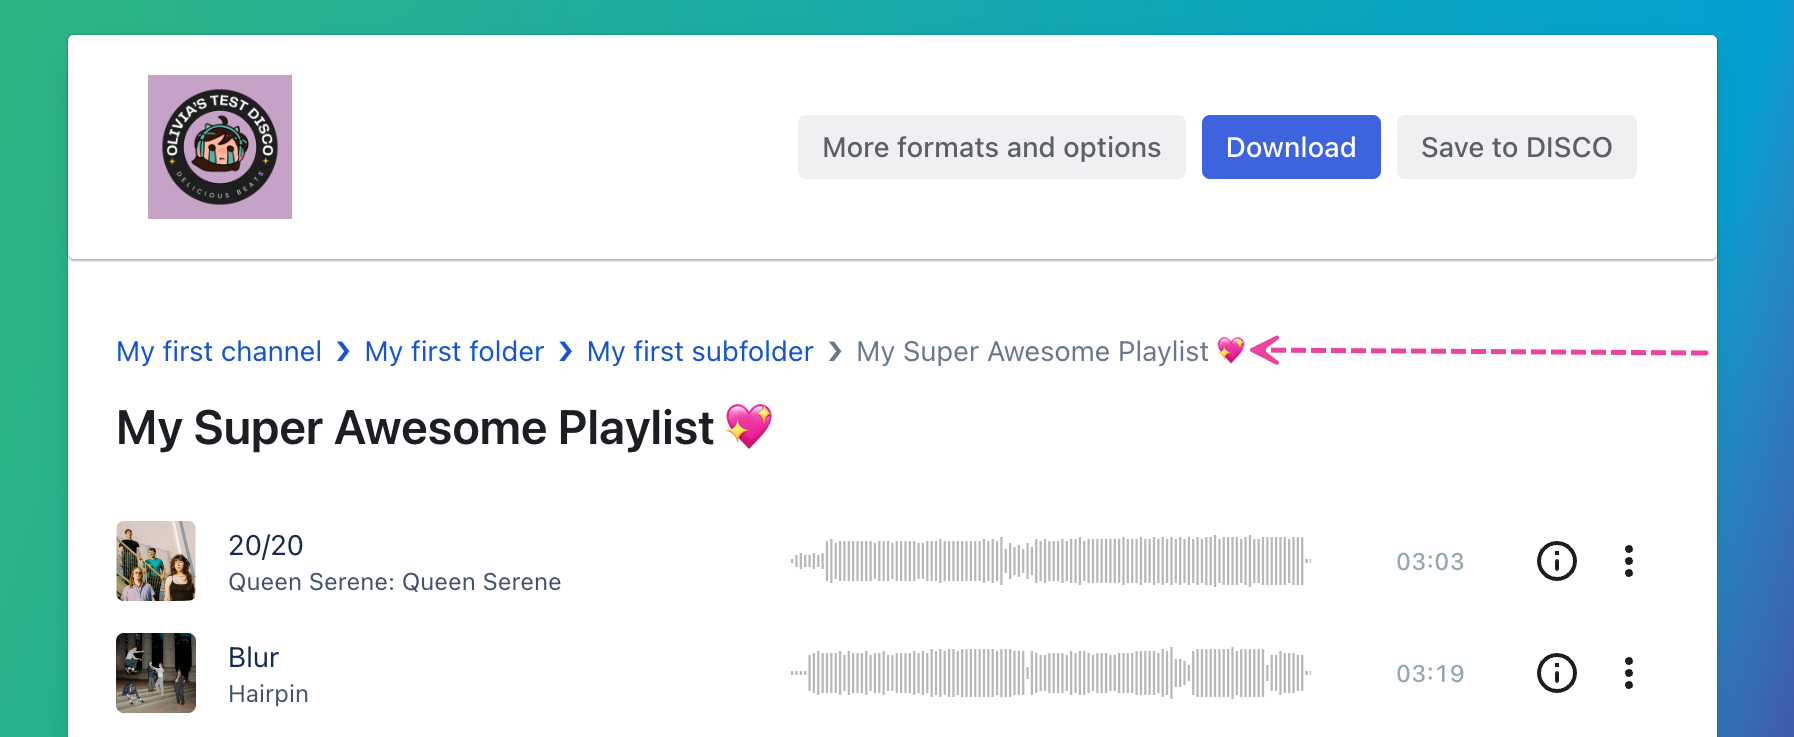
- From a Shared Channel link, Playlists display and work the same as they do via Playlist share links –– Themes and other settings like Alias Metadata and download Formats will apply. The main difference is they'll have the breadcrumb trail leading back to their parent Folder(s) or Channel:


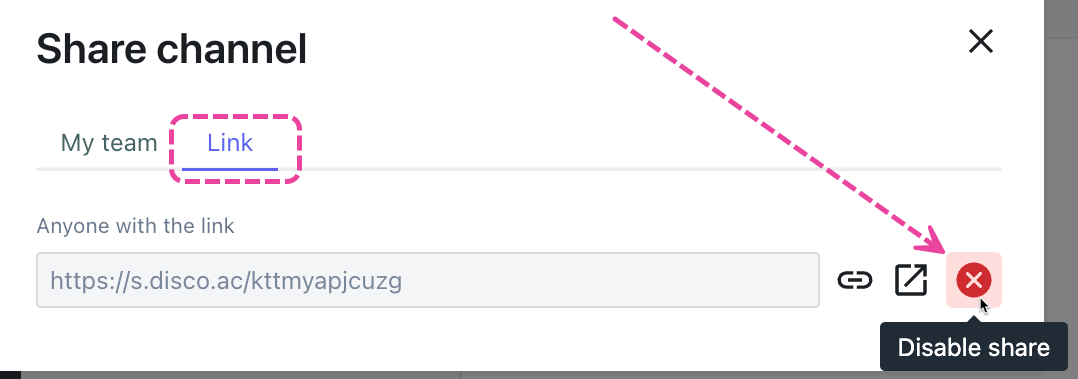
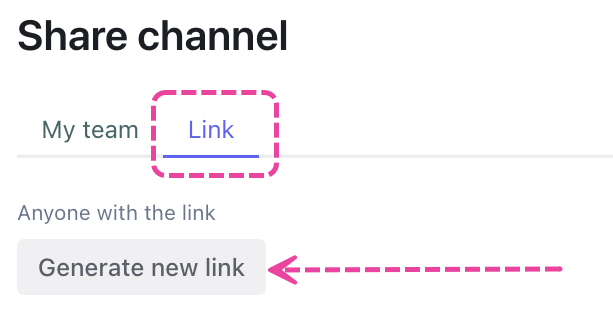
Disabling Channel share links
The below also applies to Folders and Subfolders:
- In the left sidebar of your DISCO, under Channels, hover over the desired Channel or Folder and open the Channel menu (⋮).

- Select Share.

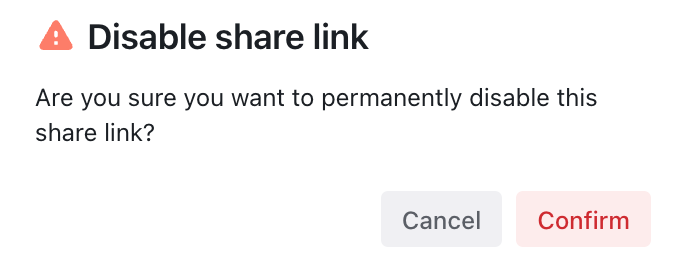
- In the Share channel menu, from the Link tab, click the X to permanently disable the share link. This means that anyone with it will no longer be able to access it.
- If you're sure, click the Confirm button.
- After confirming, you'll have an option to Generate new link.


Downloading shared Channels
When your recipients open the link to the shared Channel, Folder, or Subfolder, there will be a Download channel or Download folder button in the top-right corner (only if the whole Channel or Folder is under 5GB).
Folders within Channels will have a Download option in the menu (…) to the right:
Playlists and Tracks will also have a Download option on the menu (…) to the right, just like a regular Playlist or Track share page:
Playlists will also have a Save to DISCO option in this menu (Tracks will not).
When you download the Channel, all of its contents will be included (Folders, Subfolders, Tracks, and Playlists). When you download a Folder within a Channel, everything within that specific Folder will be included (Subfolders, Tracks, and Playlists). When you download a Sub-folder, everything within that specific Subfolder will be downloaded (Tracks and Playlists):
Browsing and searching through shared Channel links
From a Shared Channel link, when you click into a Folder or Subfolder, you will see the breadcrumb trail appear above the Folder or Subfolder name:
You can also search within Channels, Folders, or Subfolders from the Share pages. The search is limited to what is on that specific page, so if you are looking to search within a Folder or Subfolder, you will need to click into it first.
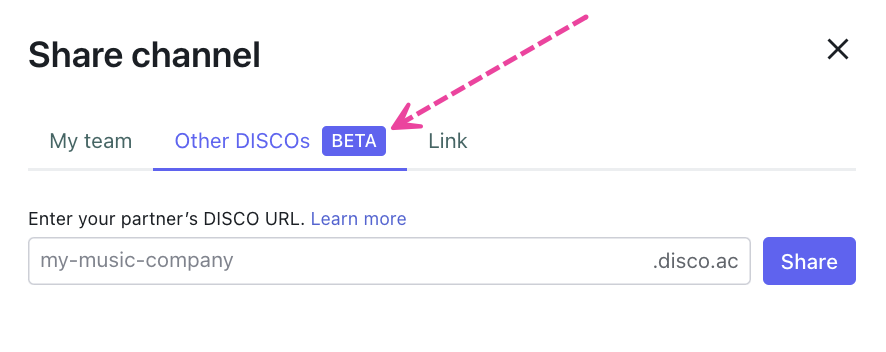
Sharing Channels using the invite Other DISCOs option
Note: This option is currently in a limited beta release and select users across all plans may now have access to it. If you don't currently have access, you can gain access by accepting an invite to a Channel from another DISCO. Upon full release, it will only be available to users on our Artist, Pro, and Enterprise plans. So if you're on the Plus plan and currently have access to this feature, please note that upon full release you'll no longer have access unless you upgrade your plan.
The below only applies to Channels:
- In the left sidebar of your DISCO, under Channels, hover over the desired Channel or Folder and open the Channel menu (⋮).

- Select Share.

- In the Share channel menu, from the Other DISCOs tab, type in a DISCO URL to invite Partner DISCOs (referred to as 'Partners') to the Channel:
- Click the Share button.
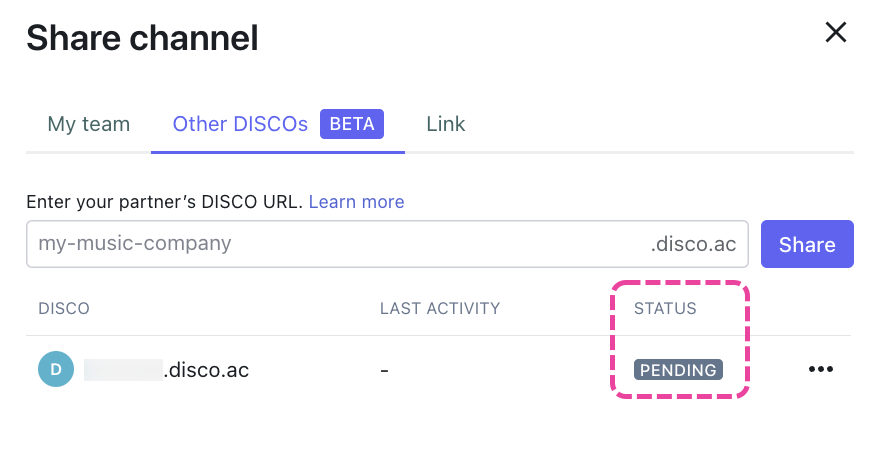
- You'll see a list of the Partners you've shared with and their status (meaning whether or not they've accepted the invite to the Channel):


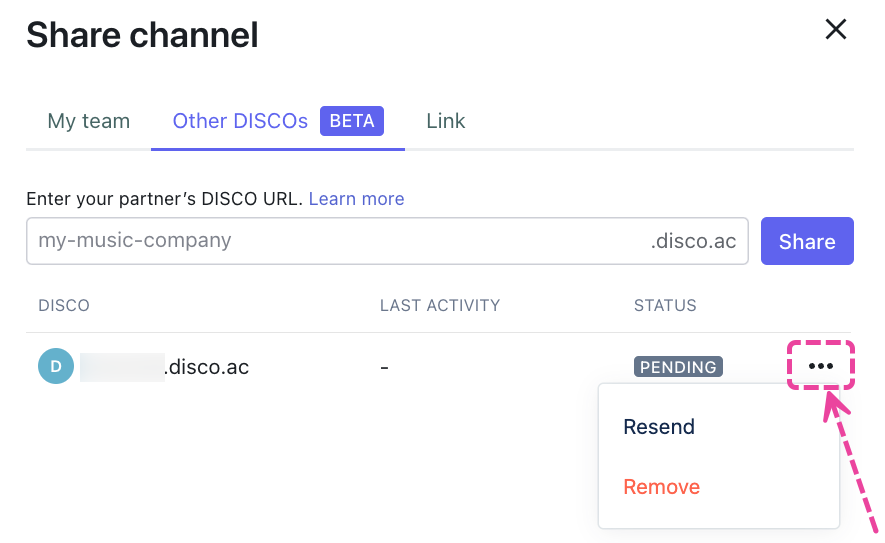
Revoke access to a Shared Channel
- In the left sidebar of your DISCO, under Channels, hover over the desired Channel or Folder and open the Channel menu (⋮).

- Select Share.

- In the Share channel menu, from the Other DISCOs tab, open the ellipses (...) menu to the right of the partner DISCO and select Remove:


Receiving a Shared Channel
Admin(s) of the Partner DISCO (the DISCO receiving the Shared Channel) will receive an in-app bell notification and can click Add to my DISCO. They'll also receive an email notification.
Once added, the Channel will appear on the Partner's left sidebar with a shared folder icon. They'll also be able to see the Owner (which DISCO shared the Channel) when they click inside of it.
The Channel in the Owner's DISCO will also have a shared folder icon, and they'll be able to see the Partners they shared the Channel with:
The Owner can see who accessed the Channel in their Other DISCOs tab:
Leaving a Shared Channel
Admins of the Partner DISCO can leave the Channel by opening the Channel menu (⋮) and selecting Leave channel. This means the entire Partner DISCO will leave.
Q: How do I sort or re-order my Channels?
- On the left sidebar of your DISCO, scroll down to Channels.
- Click the sort icon and choose an option from the menu, or select Custom to click and drag to re-order the Channels.


Q: How do I sort or re-order Folders within Channels?
- On the left sidebar of your DISCO, scroll down to Channels.
- Locate the Channel containing the Folders you wish to sort, and click on the Channel name to open it.
- Inside the Channel, open the menu () and select Sorting.
- Choose an option from the list.


