With the DISCO Email Creator, you can send emails and share music with your DISCO Contacts and Mailing Lists of any size, much like you would with tools like Mailchimp, Campaign Monitor, or Constant Contact.
Why should I use DISCO's Email Creator instead of Mailchimp or another product?
The advantage of using DISCO's Email Creator to email people and share music is that DISCO offers an extra level of stats that other services don't. With DISCO, you can see exactly how each recipient interacted with the music and files you send, including which tracks they streamed and downloaded.
At a glance
In just a few steps, you can build a great-looking email with no coding required!
Creating a new email
Tip: Before getting started, we recommend importing an existing mailing list if you have one.
- On the left sidebar of your DISCO, under Tools, select Email Creator.
- In the upper-right corner of the Email Creator page, click the New email button.
- Enter an Email name (this is just for internal reference; you'll add a Subject Line and other details later on) and click the Begin button.
- Follow the step-by-step guide in the Building and sending section of this article to build and send your email.
Duplicating an existing email
On the Email Creator page, open the Actions menu (…) to the right of the email and select Duplicate.

Step-by-step: Building and sending emails
Step 01: Choose Recipients
- Choose a filter.
- In a moment we will add rules, but first, use the radio buttons under the Users who match filter to select an option to govern how the rules will work.
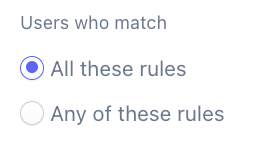
- All these rules - means that regardless of how many rules you add, recipients must satisfy all of them to receive the email.
- Any of these rules - means that regardless of how many rules you add, recipients can satisfy any of them to receive the email.
- In a moment we will add rules, but first, use the radio buttons under the Users who match filter to select an option to govern how the rules will work.
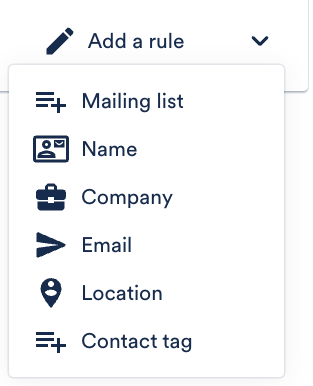
- Add rules.
- Select from the pre-set rules in the Add a rule drop-down to identify which recipient(s) the email should be sent to.
- Mailing list - allows you to select from a drop-down. Appears by default, click the X to remove if needed.
- Name, Company, Email, Location - allows you to type a partial or full value, and filter by is, is not, contains, or does not contain.
- Contact tag - allows you to type a partial or full value, and filter by is, or is not.
- Each rule supports a single value. You can add multiple different rules or multiples of the same rule.
- Click the Next button.


Example:
We used the All these rules filter and added a Company and a Contact tag rule to send this email to contacts who both work at Dunder Mifflin Paper Co. and have a Supervisor tag.

Step 02: Email Details
Note: If you added a Mailing list rule in the previous step, some of this information may be pre-filled, but you can overwrite it if needed.
- Fill in the fields:
- Email name - for internal reference.
- Email subject - the subject line that your contacts will see.
- Sender from address* - the email address that any replies will be sent to.
*Emails will show as partly from the email address you input in this field, but the domain will be @disco-mailer.net. Example: If you would like to send emails from your own domain, additional setup is required.
 - Sender display name - the name the email will show as coming from.
- Business address - your physical business location (required per anti-spam laws).
- Click the Next button.
Example: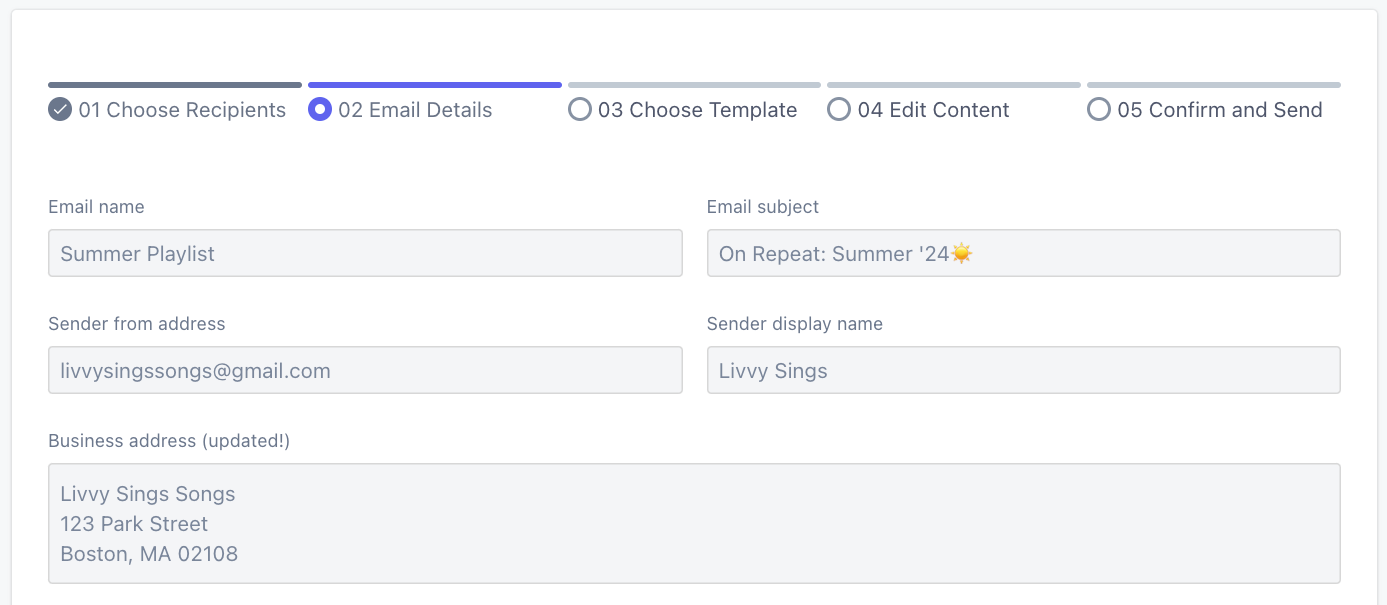
 If you would like to
Step 03: Choose Template
Note: If you're duplicating an email, this step will be skipped.
- Choose either a 1 Column or 2 Column email template. In the next step, you can customize the content.
- Click the Next button.
Example: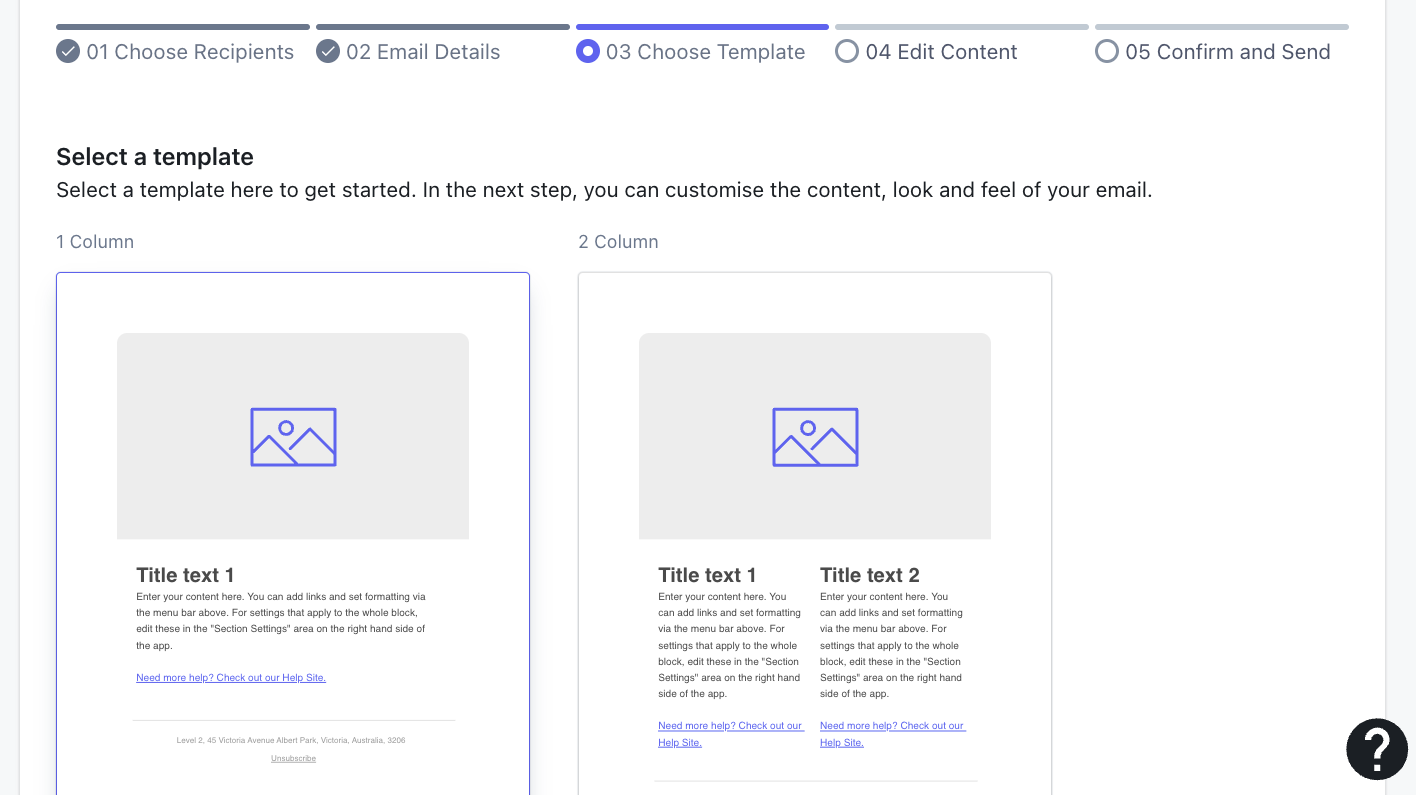

Step 04: Edit Content
Tip: To go back to a previous step, click on the name of the step.
- Under Edit & create, from the Blocks tab, drag and drop content blocks into your template. A yellow + Insert here tab will appear when you hover over a spot where it can be dropped.
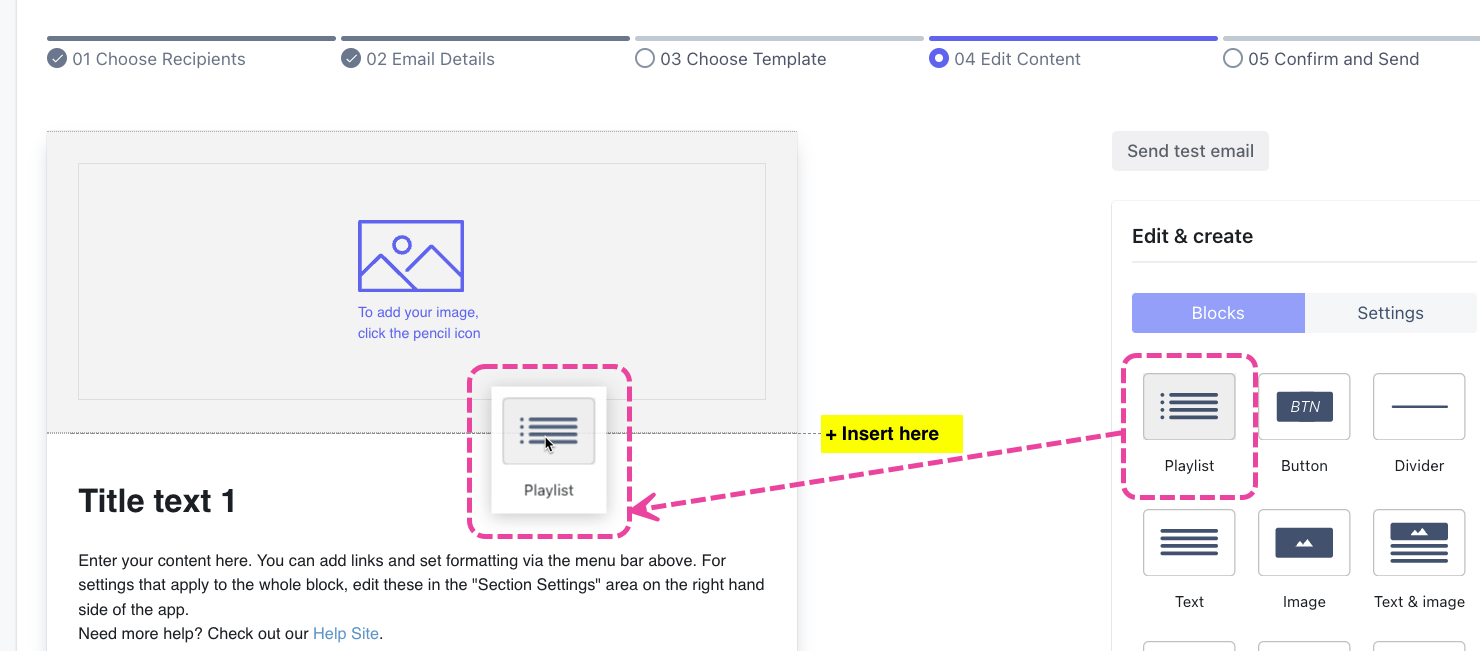
- To edit the content, or duplicate or delete the block, hover over the block.
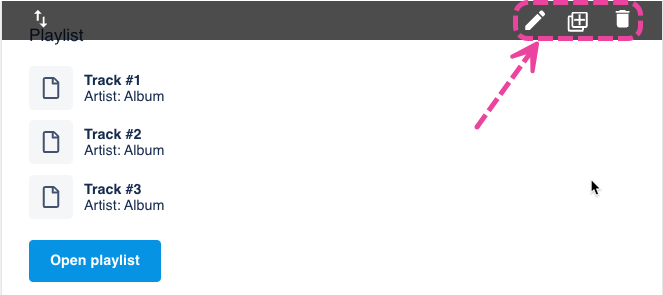
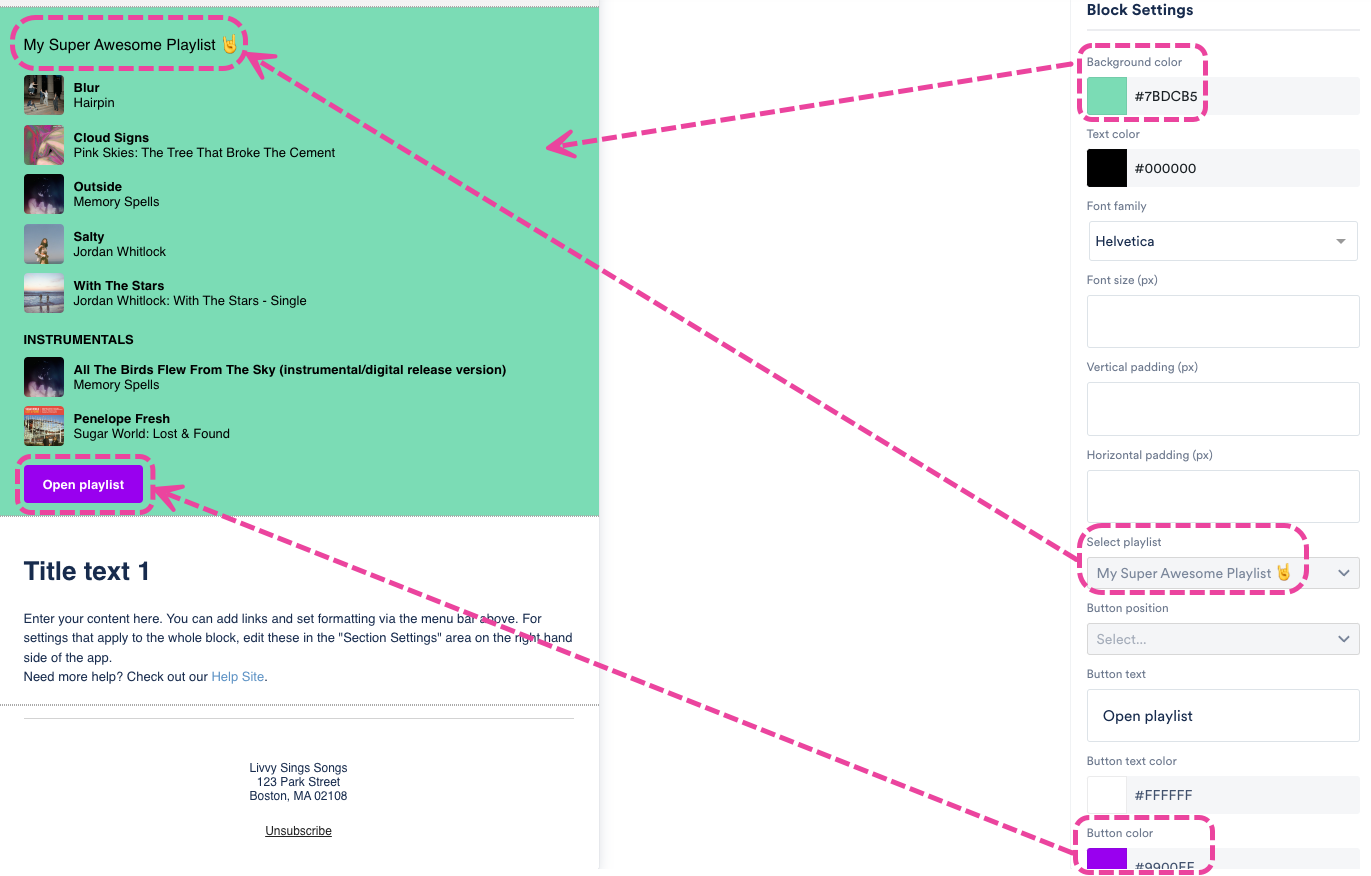
- The edit pencil will open the Block Settings. Here you can customize the block however you like, and you will see the changes reflected in real time. Be sure to click the Save and Close button.
- Under Edit & create, from the Settings tab, you can edit settings for the entire email (e.g. background color, font, etc).
- Click the Next button.


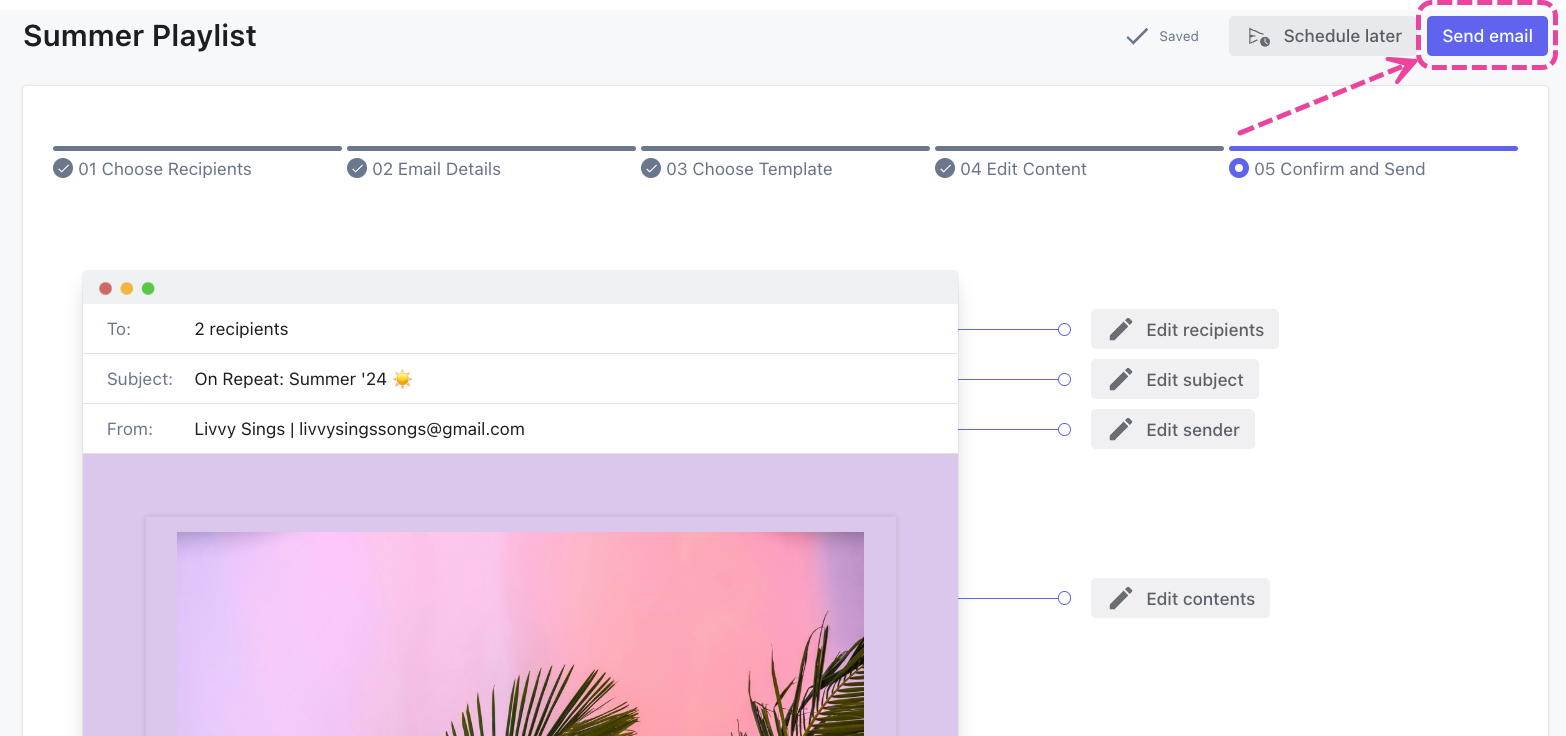
Step 05: Confirm and Send
Tip: Before sending, you can Send a test email from Step 04.
- Verify that all information is correct, and the email looks the way you want.
- To send the email right away, click the Send email button. A confirmation message will appear, and if you're ready, you can click Send. To schedule the email, click Schedule later.
- You're done! 🙌

Scheduling emails is a great way to reach your audience at a time or date that suits them best. It also increases your chance of landing at the top of their inbox 🙌
At a glance
You can use the Schedule later option in the DISCO Email Creator to send your email campaigns at a specific date and time!

Scheduling an email
- On the left sidebar of your DISCO, under Tools, select Email Creator.
- Select New Email, or open a Draft email.
- Complete the on-screen steps to build your email and add content.
- On the final step (05 Confirm and Send), click Schedule later.
- Choose a Date, Time, and Timezone. Then click the Schedule button.
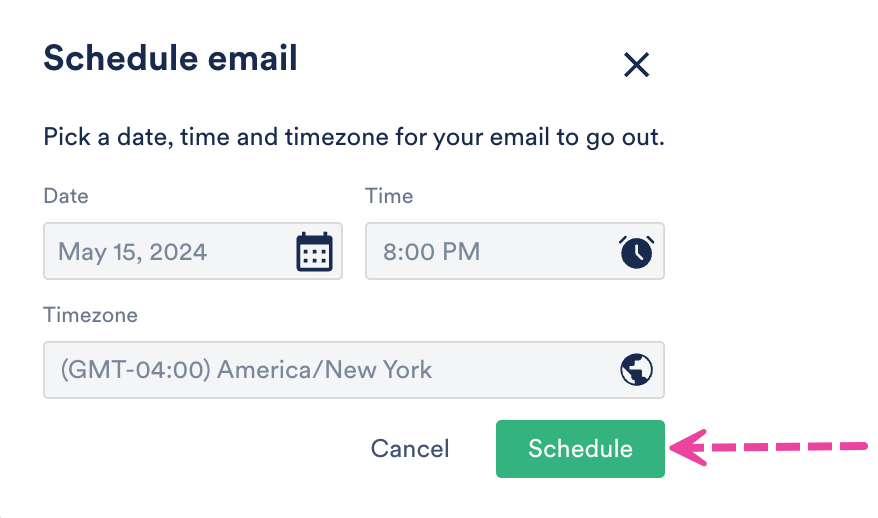
- A confirmation message will appear in the bottom left corner of your DISCO to confirm the scheduling was completed.
- The email will move to the Scheduled list on the Email Creator page until it is sent.

Viewing scheduled emails
You can view a list of your scheduled emails from the Email Creator page, under Scheduled.

To view the email content, click on the Name of the email.
Editing scheduled emails
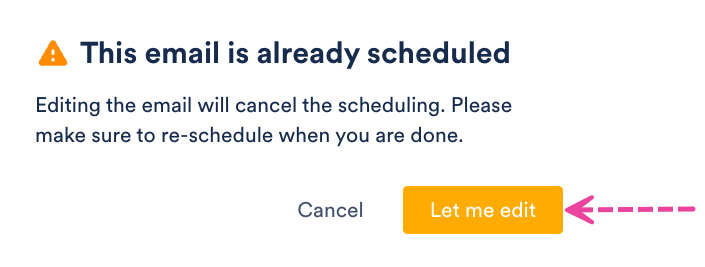
Note: Editing a scheduled email will cancel the scheduling. After editing, you can choose to reschedule the email.
- From the Email Creator page, under Scheduled, click on the Name of the email.
- The final step (05 Confirm and Send) will be pre-selected. Click on the step you would like to edit.
- A warning message will appear. Click the Let me edit button.
- A confirmation message will appear in the bottom left corner of your DISCO to confirm the scheduling was cancelled.
- Make the desired edits, and click the Next button until you get to the final step.
- Click Schedule later and follow the on-screen instructions to schedule the email once more.

Cancelling scheduled emails
- From the Email Creator page, open the Actions menu (…) to the right of the scheduled email.
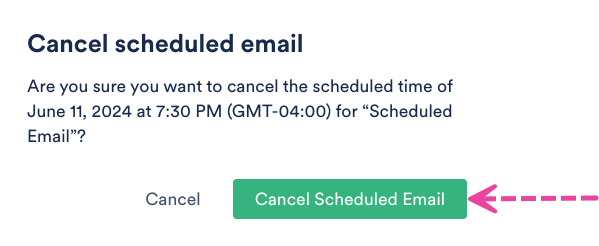
- Select Cancel Schedule.
- A message will appear asking you to confirm the cancellation. Click the Cancel Scheduled Email button.
- A confirmation message will appear in the bottom left corner of your DISCO to confirm the scheduling was cancelled.
- The email will move to the Draft list on the Email Creator page.

Rescheduling emails
- From the Email Creator page, open the Actions menu (…) to the right of the scheduled email.
- Select Reschedule.
- Click the Cancel Scheduled Email button.
- Choose a new Date, Time, and Timezone. Then click the Schedule button.
- A confirmation message will appear in the bottom left corner of your DISCO to confirm the email was successfully rescheduled.
- The email will stay on the Scheduled list on the Email Creator page until it is sent.
Once your email is sent from Email Creator, you can view in-depth stats showing how each recipient interacted with the email and its content.
Viewing email stats
To view the email stats, click on the Name of the email in your Sent list, or click the View stats icon under Stats to the right of the email.
Email stats include:
- Open Rate
- Click Rate
- Most Engaged Users and individual breakdowns of their Email Opens, Page Opens, Track Streams, Track Downloads, and Playlist Downloads
- Most Streamed Tracks
- Most Downloaded Tracks
- Playlist Downloads
- Total Streams
- Total Track Downloads
- Most Clicked Links

By default, when using the Email Creator, emails are sent from the @disco-mailer.net domain. However, if preferred, it is possible to change the sender email to your own custom domain.
At a glance
If you'd like to have the emails you send out from Email Creator be sent from a different email address (using your own custom domain, e.g. @yourbusiness.com) you will need to give our mail servers permission to use your email address by setting up custom domain authentication. This process can also help if you find that your emails are frequently delivered to your recipients' spam folders, or they are not being delivered at all.
Note: This process is quite technical and requires that you have access to your DNS (Domain Name Service) provider's control panel. Your DNS provider may be your webhost or it may be a third party.
If you're unsure, we suggest reaching out to your webhost directly. If you don't have access to your DNS provider's control panel or you're not sure if you have access, contact your webmaster or a member of your IT team.
If you have any questions about this process, don't hesitate to contact our Support team.
Step-by-step: Authenticating your custom domain
Step 1: Adding CNAME Records
The process for adding CNAME records varies depending on which DNS provider you use. We suggest checking your DNS provider's documentation or contacting their support team for specific instructions. You can also find links to the relevant documentation for a few common DNS providers at the bottom of this page.
- Log into your DNS provider's control panel.
- Locate the area of where you update DNS records. The name of the area varies by provider; it may be called DNS Manager, Zone Editor, Domain Manager, or something similar.
- Add the following CNAME records, replacing YOUR-DOMAIN.COM with your own actual domain:CNAME host recorddestination
s1._domainkey.YOUR-DOMAIN.COMs1.domainkey.u5958710.wl211.sendgrid.nets2._domainkey.YOUR-DOMAIN.COMs2.domainkey.u5958710.wl211.sendgrid.netdsc-mailer.YOUR-DOMAIN.COMu5958710.wl211.sendgrid.net
Look at existing host records on your control panel. If they don’t include your domain URL, then you only need to enter everything to the left of “.YOUR-DOMAIN.COM” (e.g., "s1._domainkey" instead of "s1._domainkey.cooltunes.com").
Note for Cloudflare users: When adding CNAME records, make sure that you turn off the "Cloudflare Proxy" setting for the CNAME records that you're adding. Refer to their documentation for more information.
Step 2: Verifying CNAME Records
Once you've added your CNAME records, it can take up to 8 hours for the new records to propagate (or take effect), though most often they propagate in less than an hour. Unfortunately, there is no way to speed up this process and nothing can be done on our end until it has been completed.
You can confirm that your new records have propagated using this tool:
- In the Domain field, enter
s1._domainkey.YOUR-DOMAIN.com(replacingYOUR-DOMAINwith your actual domain). You do not need to change the other fields. - Click the Look it up button.
- If the ANSWER section includes the text
s1.domainkey.u5958710.wl211.sendgrid.net.then congratulations your CNAME records have propagated!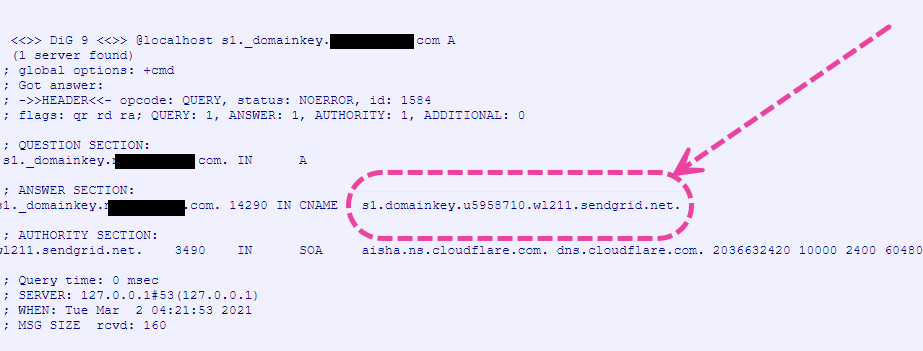

Step 3: Contact DISCO Support
Once you've verified that your CNAME records have propagated, contact our Support team so that we can take the final steps in setting up your DISCO to send emails using your own domain.
You can also reach out if you have any questions along the way, we are always happy to help! 😊
DNS Provider-Specific Documentation
Here is a list of documentation on adding DNS records for a few of the more popular DNS providers:
Q: Why do I sometimes not get Out of Office replies when I send an Email Creator campaign?
The lack of delivery of bounce-back or auto-reply emails, such as an out-of-office message, is a limitation of the email service provider. DISCO doesn't filter these out, but email providers frequently don't send these replies to mass email campaigns.
Q: What happens after an email is scheduled?
Immediately after scheduling, you will see a confirmation message in the bottom left corner of your DISCO, and the email will move to the Scheduled list on the Email Creator page.
If the email was scheduled to be sent within 24 hours or more, you will receive an email reminder from support@disco.ac letting you know the email will be sent in the next 24 hours.
Q: Will I receive confirmation that a scheduled email was sent successfully?
Yes, you will receive an email confirmation from support@disco.ac, and the email will move to the Sent list on the Email Creator page.
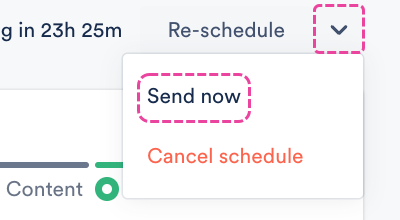
Q: What if I change my mind about a scheduled email and want to send it right away instead?
You can bypass scheduling and send the email right away:
- From the Email Creator page, click on the Name of the scheduled email.
- On the final step (05 Confirm and Send), click the arrow to the right of the Re-schedule option.
- Click Send now.

Q: Can I edit the content of a scheduled email?
Yes, the content can be edited, but the scheduling will be cancelled, and you will have to reschedule it after editing.
Q: Can I see stats on a scheduled email?
Yes, stats are available on scheduled emails after they are sent. You will receive an email confirmation from support@disco.ac with a purple button and a link to access the email stats:

Q: Why is the default domain @disco-mailer.net when I send an Email Creator campaign?
This has to do with email authentication. Every time an email is sent, the recipient's email server attempts to authenticate the sender's message before passing it along to the recipient's inbox. If the sender's message fails authentication, the server may send it to spam or not deliver it at all.
Authentication failure is often caused by a discrepancy between the sender's email domain (in our case @disco-mailer.net) and the domain of the email address entered in the "From" field. This is called domain authentication failure.
To avoid domain authentication failure, we send emails from the @disco-mailer.net domain rather than your actual email address. This is because if we were to use your actual email address without permission, it is very unlikely that your emails would be delivered to the recipients.
Q: When adding CNAME records for my custom domain in Email Creator, do I also need to manually add an SPF TXT record?
You do not. By adding CNAME records to your DNS configuration, you are pointing your domain to one of our email system's domains. Your domain will automatically inherit the correct SPF records.
