Playlists are a great way to organize and share your music!
At a glance
Playlists are like customizable one-page websites with unique URLs that can be shared with recipients for streaming and/or downloading your Tracks. You can create Playlists from existing Tracks in your DISCO, or right after uploading new Tracks to your DISCO.
Creating new Playlists from existing Tracks
When browsing through your DISCO, you can drag and drop existing Tracks into the Playlist Creator at any time to start building a Playlist.
You can also use the search bar at the top of your DISCO to perform a search and then drag Tracks from the Search Results into the Playlist Creator.
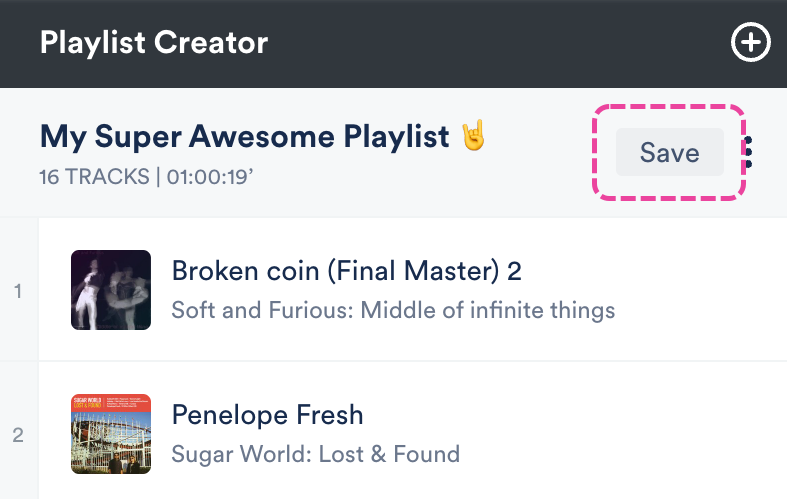
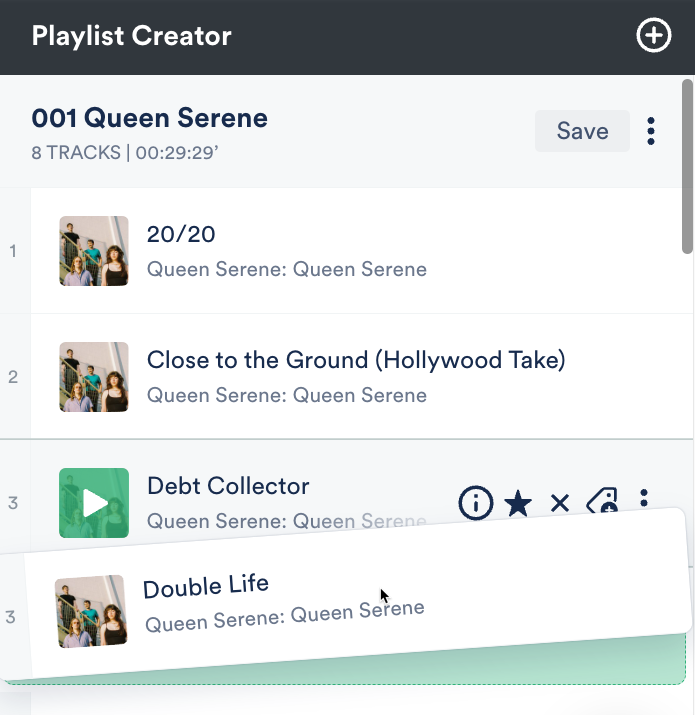
In the Playlist Creator, you have the option to add a Name for your Playlist, drag to reorder the Tracks, and add Sections to your Playlist.
When you're ready to create the Playlist, click the Save button.
Creating new Playlists after uploading Tracks
After uploading Tracks to your DISCO, click the Save button in the Playlist Creator.
Updating Playlist Settings and saving your Playlist
After clicking the Save button in the Playlist Creator, the Save Playlist window will open: From the Playlist Info tab, you can give your Playlist a Name and enable any of the desired Playlist Settings (including Content Settings, Security Settings, or Browse Settings) by switching the toggles to ON. You can also add Playlist tags, or add your Playlist to a Channel.
From the Presentation tab, you can choose a design for an Artist Page or Album Page, add a Playlist Theme, and update some additional Settings, such as to Show lyrics on your Playlist.
If you are on a Plus or a Pro plan, you can add Alias Metadata as well.
Note: Some settings are specific to specific plans and may not be available in your DISCO.
When you're done, click the Save Playlist button. Now you can preview or share your new Playlist!
Creating multiple Playlists at once
You can create multiple Playlists at the same time in the Playlist Creator! If you already have Tracks in the Playlist Creator and want to create another Playlist, click the + plus button. You can then upload or drag Tracks into the new Playlist, and give each Playlist a name.
If needed, you can minimize any of the Playlists by selecting Minimise in the Playlist Creator menu (⋮).
You can also click the Expand option to view the Playlist Tracklist again.

After saving one of the Playlists, it will disappear from the Playlist Creator:
Once your Playlist is saved, it will be removed from the Playlist Creator, but it will be available in your Browse section under Playlists.
Previewing your Playlist
To access the public view of your Playlist (to see how it looks outside of DISCO):
- Open the Playlist Menu (⋮).
- Select Share.

- From the Share Playlist menu, under the Copy URL tab, click the Open in new tab icon to the right of the Public playlist URL.
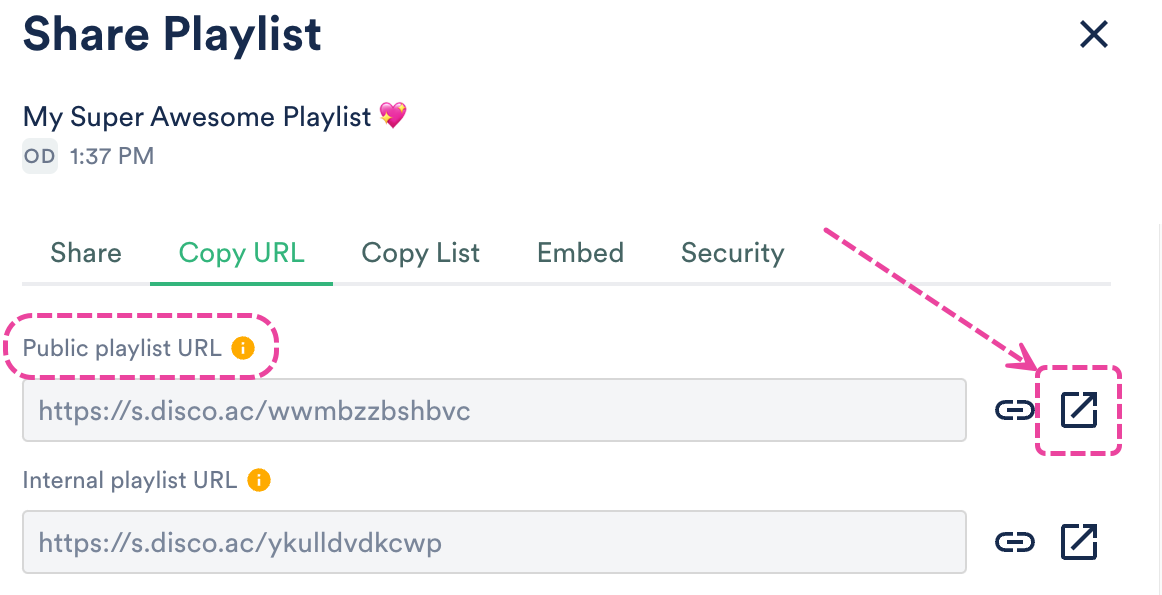
- The public view of your Playlist will open in a new tab.


You can categorize and showcase Albums in your DISCO and on your DISCO Catalog.
At a glance
Albums on DISCO are still technically Playlists. With the addition of Release dates, you can showcase your newest releases to your clients.
Converting a Playlist into an Album
There are two ways to convert an existing Playlist into an Album:
- from Playlist Settings
- when editing your Playlist
From Playlist Settings
Open the Playlist menu (⋮) and select Playlist Settings.
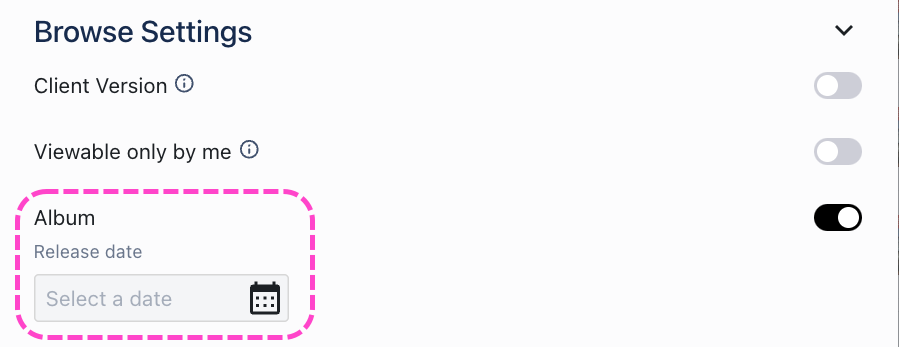
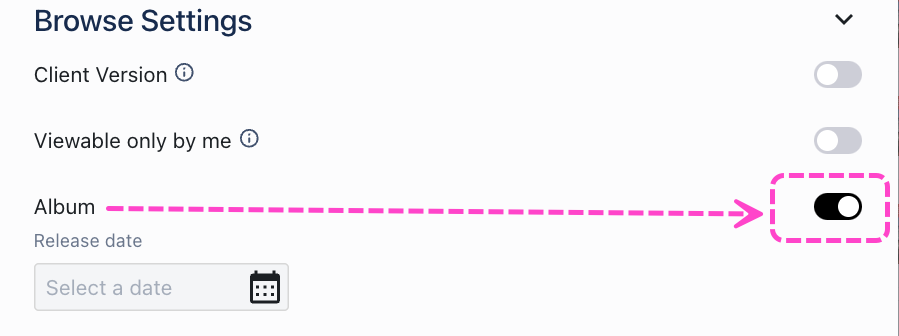
From the Playlist Info tab, under Browse Settings, set the Album toggle to ON.
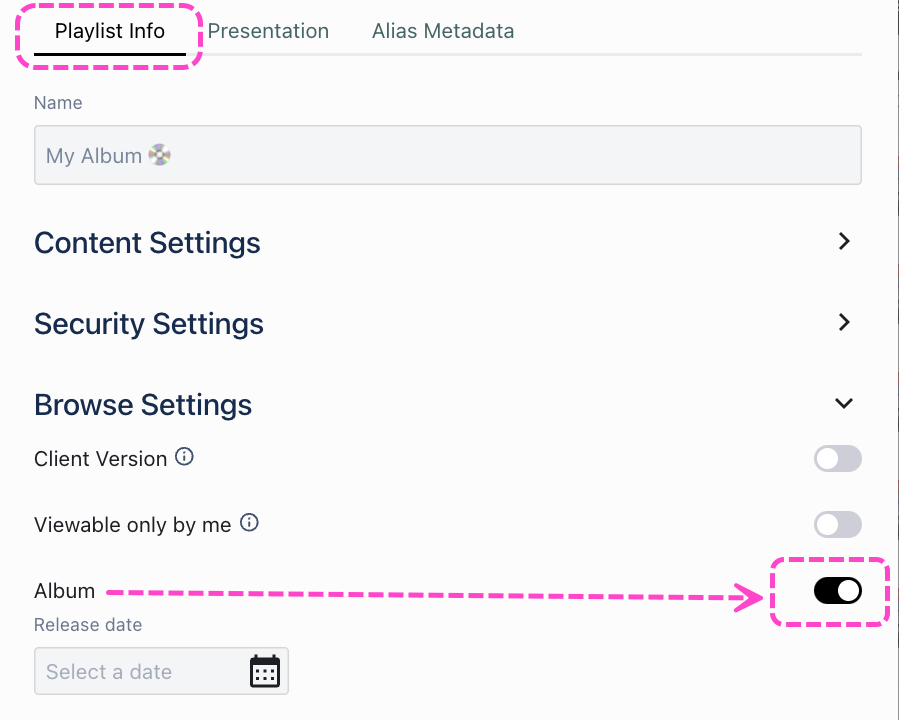
Optional: Enter a Release date if you'd like your clients to see your newest releases in your DISCO Catalogs.
Click the Save Playlist button.

When editing your Playlist
Open the Playlist menu (⋮) and select Edit playlist.
This will open your Playlist in the Playlist Creator. From the Playlist Creator, click Save.
In the Save Playlist menu, from the Playlist Info tab, under Browse Settings, set the Album toggle to ON.
Optional: Enter a Release date if you'd like your clients to see your newest releases in your DISCO Catalogs.
Click the Save Playlist button.


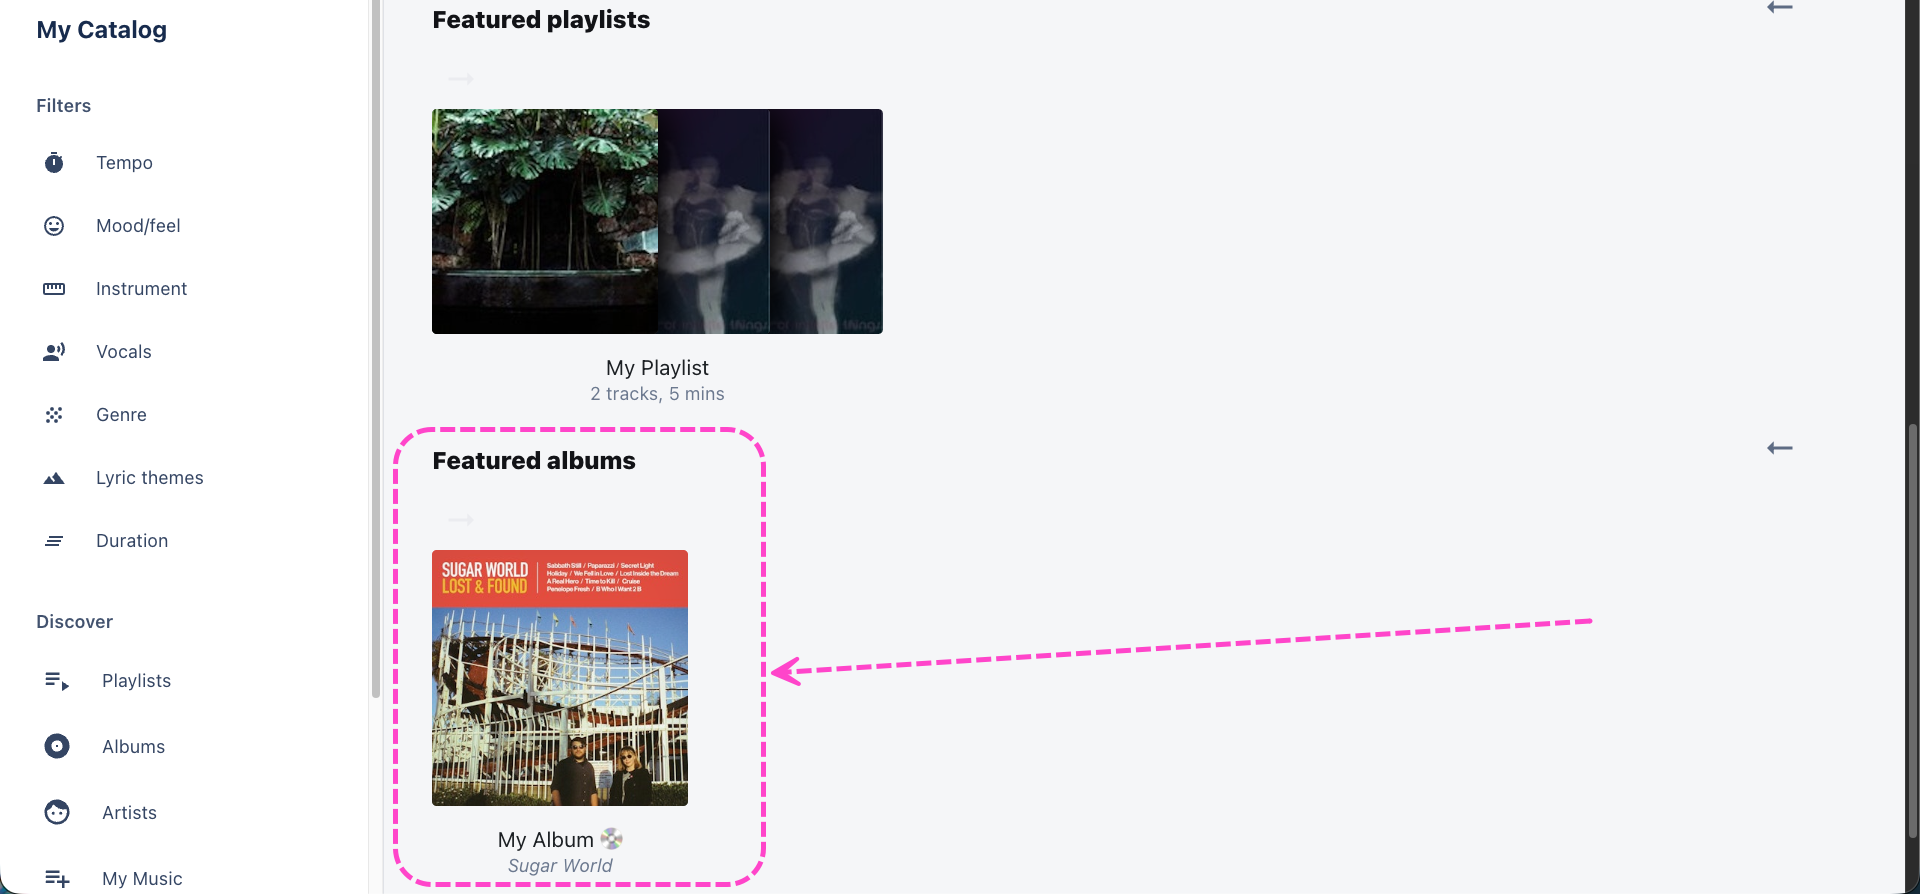
Featuring Albums on Catalogs
- Open the Catalog Settings.
- Under Content, select Manage albums.
- From the Published albums tab, hover over the desired album and open the menu (⋯).
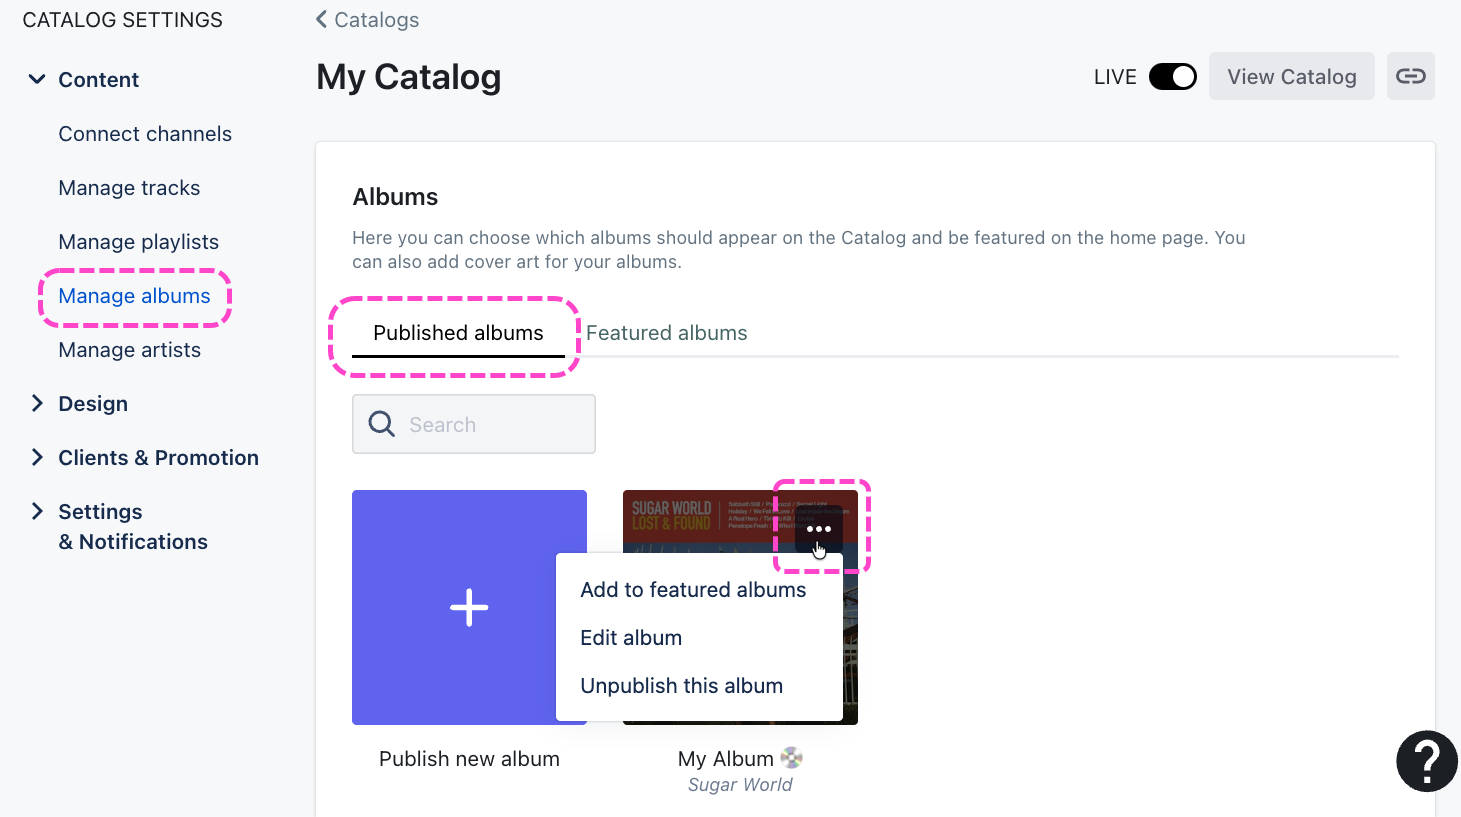
- Select Add to featured albums.
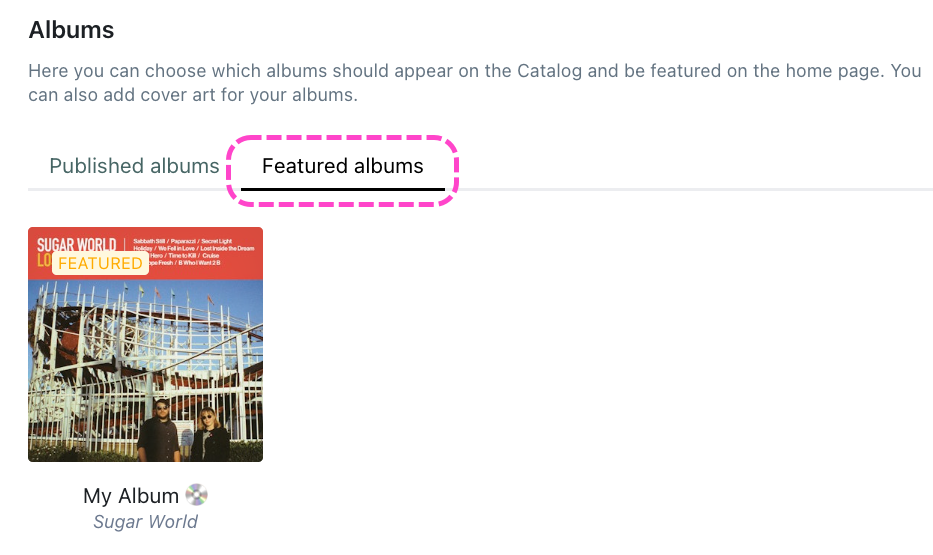
- The album will now have a FEATURED label and show in the Featured albums tab in your Catalog Settings and on the homepage of your Catalog.


Editing Albums
You can also edit the design, artwork, and Release date for your Album:
- Open the Catalog Settings.
- Under Content, select Manage albums.
- From the Published albums tab, hover over the desired album and open the menu (⋯).
- Select Edit album.
- In the Album options window, you can choose a design view (Default, Choose a color, Choose an image), add or update the Release date, and add or remove an album cover (recommended size: 750 x 750px).
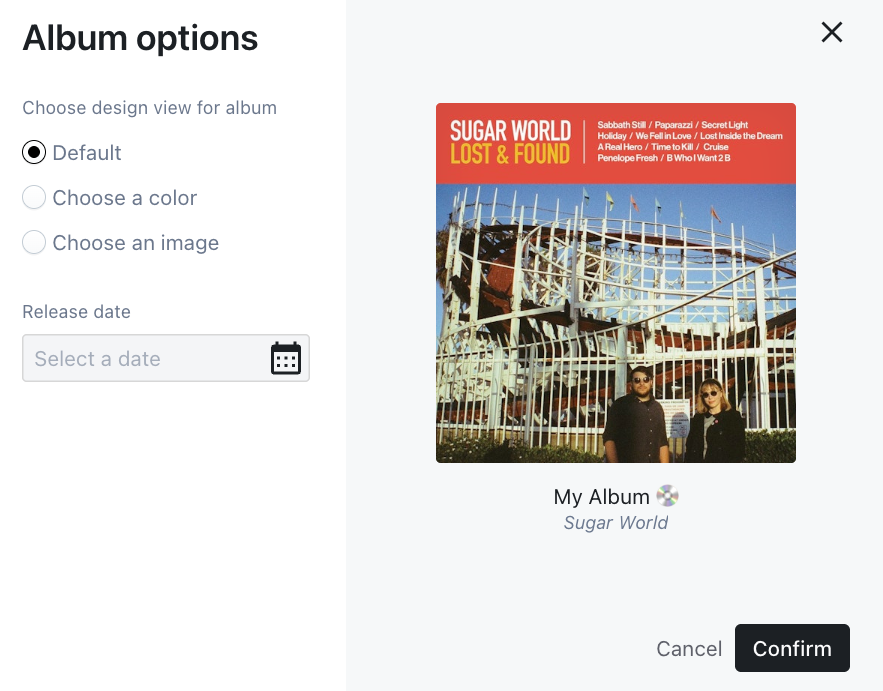
- Click the Confirm button.

Viewing Albums on your Catalog
Featured albums appear on the homepage of your Catalog. Look at this beautiful wall of albums for your clients to browse through!😍
You can also access them from the left sidebar of your Catalog by selecting Albums.
By default, we'll show the Newest albums first, but clients can also choose to sort them by: Featured albums, Newest, Oldest, A-Z, and Z-A.
After creating a Playlist, you can easily edit it at any time.
At a glance
There are two ways to open a Playlist for editing:
- Go to Browse > Playlists and hover your cursor over the Playlist. Then click the pencil icon to Edit playlist.
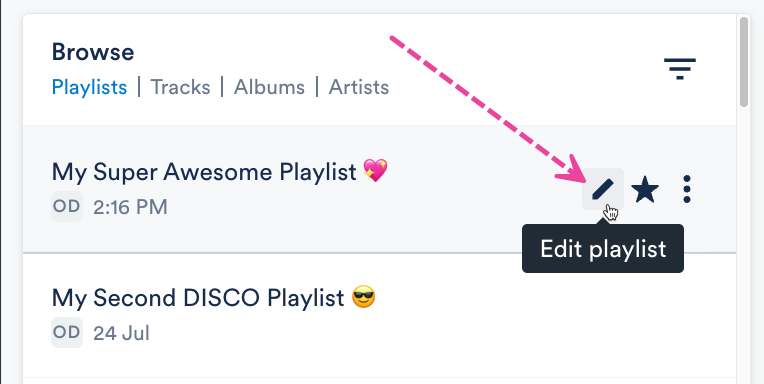
- Alternatively, you can open the Playlist Menu (⋮) and select Edit playlist.


The Playlist will open in the Playlist Creator where you can start editing.
Adding and removing Tracks
Add Tracks
Drag and drop Tracks from your Browse section to the Playlist Creator.
Remove Tracks
Hover your cursor over the Track. Then click the X icon to Remove from shortlist.
Changing the Playlist Name
Click to the right of the Playlist name so your cursor appears.
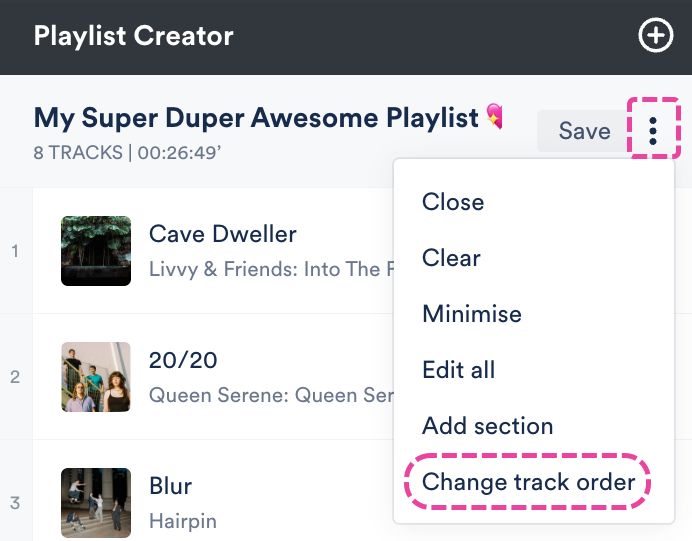
Changing the Track order
There are two ways to do this:
- Click and drag the Tracks up or down in the Playlist Creator.

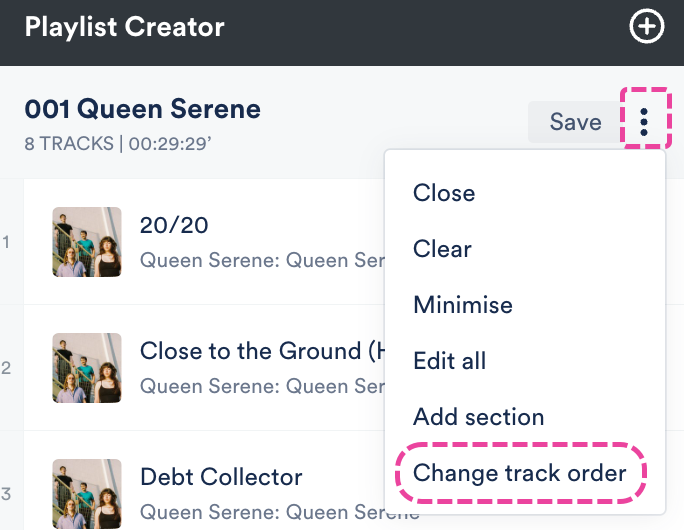
- Open the Playlist Creator Menu (⋮) and select Change track order.
 Select one of the sorting options from the drop-down and click the Update button.
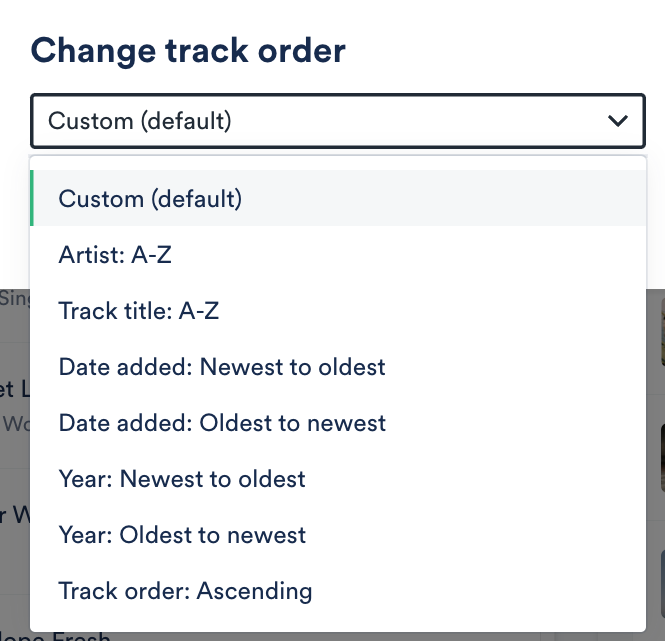


Check out this article for more information on changing Track order.
Adding, editing, and removing Sections
Check out this article for more details!
Saving the Playlist
After making changes, click the Save button in the Playlist Creator.
Even if you have already shared the Playlist, the latest version will always be displayed for the recipient!
Updating Playlist Settings
If you prefer to just update some of the Playlist Settings, open the Playlist Menu (⋮) and select Playlist Settings.
In the Playlist Settings menu, from the Playlist Info tab, you can give your Playlist a Name and enable any of the desired Playlist Settings (including Content Settings, Security Settings, or Browse Settings) by switching the toggles to ON. You can also add Playlist tags, or add your Playlist to a Channel. From the Presentation tab, you can choose a design for an Artist Page or Album Page, add a Playlist Theme, and update some additional Settings, such as to Show lyrics on your Playlist.
If you are on a Plus or a Pro plan, you can add Alias Metadata as well.
Note: Some settings are specific to specific plans and may not be available in your DISCO.
When you're done, click the Save Playlist button. Now you can preview or share your new Playlist!
- Open the Playlist menu (⋮) and select Rename.

- Enter a new name and click the Rename Playlist button.


Save time by duplicating Playlists!
At a glance
Duplicate Playlists contain all the same Tracks, Sections, Playlist Settings (including Playlist Messages), Themes, Track formats, and Alias metadata as the originals.
Duplicating Playlists
- Open the Playlist menu (⋮) and select Duplicate playlist.

- The duplicate copy will open in the Playlist Creator, with “copy” added to the title in parenthesis.

- Optional: Make any edits to your new Playlist.
- Click the Save button in the Playlist Creator.
- In the Save Playlist menu, click the Save Playlist button.


Alternative options
If you just want to copy the Tracks from the original Playlist to a new Playlist, and you don't need to maintain its original settings, you can drag and drop the original Playlist into the Playlist Creator.
This will create a new Untitled Playlist with all the same Tracks.
You can easily change the Track order in any Playlist.
At a glance
There's an option in the Playlist Menu (⋮) or you can do this from within the Playlist Creator when you edit your Playlist.
From the Playlist Menu
- Open the Playlist Menu (⋮) and select Change track order.

- Select one of the following presets from the drop-down:

- Custom (default) - this reflects the order the Tracks are currently in
- Artist: A-Z
- Track title: A-Z
- Date added (Newest to oldest)
- Date added (Oldest to newest)
- Year (Newest to oldest)
- Year (Oldest to newest)
- Track order (Ascending) - this will order Tracks by their Track order in the metadata
- Click the Update button.


From the Playlist Creator
- Open the Playlist Menu (⋮) and select Edit playlist.
- In the Playlist Creator, you can either:
- Drag to reorder the tracks:
- Open the Playlist Creator Menu (⋮) and select Change track order and select from one of the available presets:
- Drag to reorder the tracks:
- Click Save in the Playlist Creator.
- In the Save Playlist menu, click the Save Playlist button.


Deleting Playlists in DISCO is quick and easy.
At a glance
The process differs slightly depending on how many Playlists you are deleting at once.
Important: Deleting a Playlist can't be undone.
Deleting a single Playlist
- Open the Playlist menu (⋮) and select Delete playlist.
- In the Delete playlist window, choose an option:
- All Versions - This will completely remove the Playlist from your DISCO.
- Latest Version - Every time you make a change to a Playlist and save it, it creates a new version of the Playlist. This option will just delete the most recently saved version of the Playlist. Once deleted, the Playlist will revert to the version that was saved before the most recent version. Think of it like an "Undo" button.
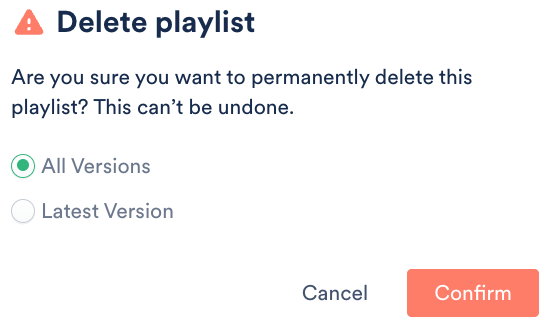
- Click the Confirm button.

Deleting multiple Playlists
- Use multi-select to select the Playlists you'd like to delete.
- An Edit menu will appear at the bottom of your DISCO. Click the trash can icon to Delete.

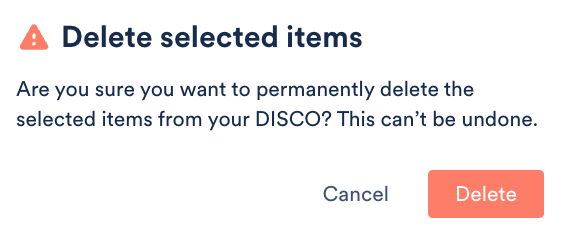
- In the Delete selected items window, if you are sure, click the Delete button.


Frequently asked questions
Does deleting a Playlist also delete its Tracks from DISCO?
No. Deleting a Playlist only deletes the Playlist; the Tracks will remain in your DISCO.
DISCO used to have a feature where Playlists could be auto-created based on your Track metadata. This feature has been deprecated, but some older accounts may still see auto-created Playlists in their DISCO.
At a glance
When this feature was enabled, a Playlist was created automatically when you uploaded two or more tracks with the same Artist and Album metadata.

Because these Playlists weren't created by a user in your DISCO, they look a bit different (there's no user listed under the title):

But otherwise, they work just the same as any other Playlist: you can edit, share, and delete them.
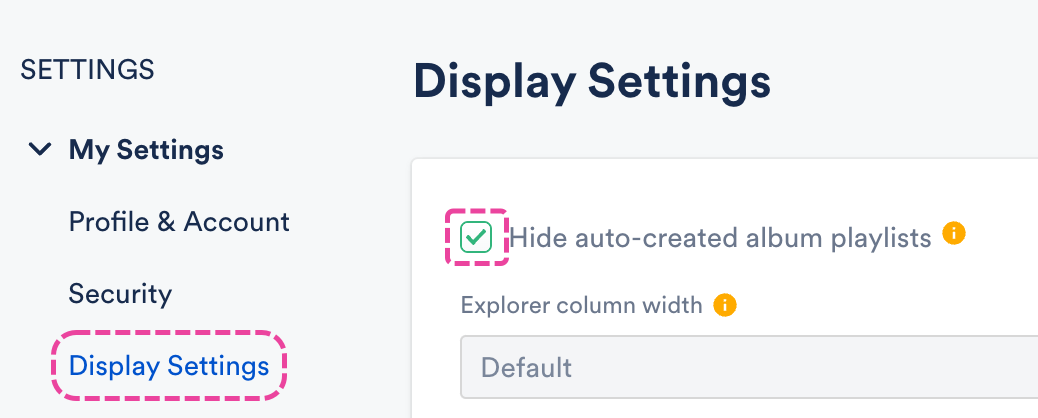
Hiding auto-created playlists
If this feature was enabled on your DISCO at one point, but you'd prefer not to see these Playlists, you can hide them:
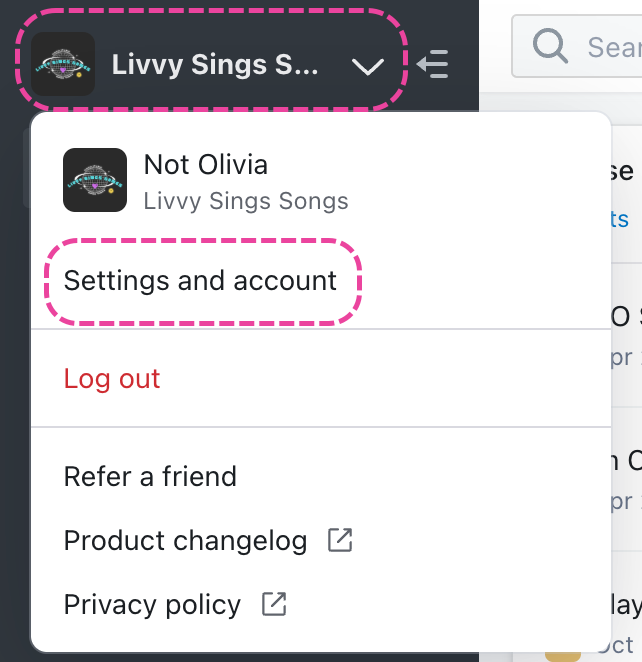
- In the top-left corner of your DISCO, click on your DISCO Business Name to open the menu.
- Select Settings and Account.
- Under My Settings select Display Settings and check the box to Hide auto-created album playlists.