DISCO is a great place to upload your music collection or files and manage your content. In DISCO, files are referred to as Tracks regardless of their format (e.g. audio, video, document, image, etc).
At a glance
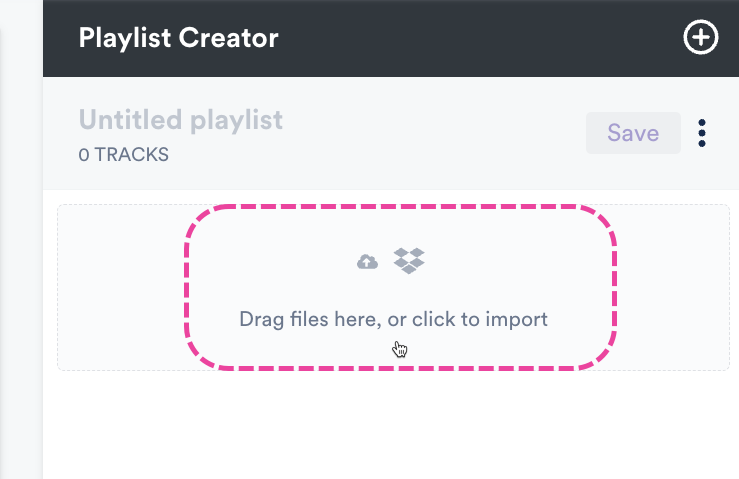
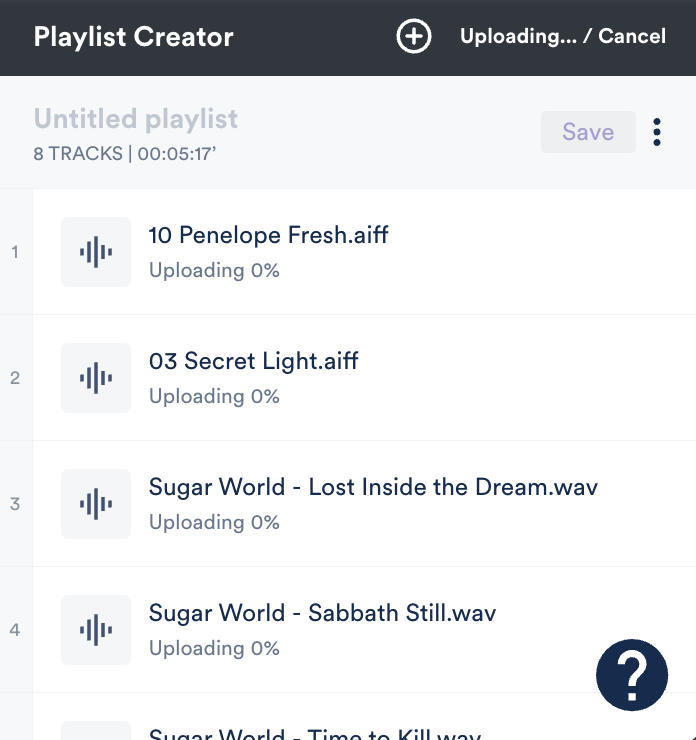
You can upload music to your DISCO using the Playlist Creator or the Bulk Uploader Tool (recommended if you're uploading 100+ files). Jump to this section if you need to import music from another system.
When using the Playlist Creator, there are a few different options:
- importing files or folders from your computer
- importing from iTunes or Apple Music
- importing from Dropbox
- importing from Box
Also, when you upload files locally (from your computer), we will de-duplicate files if you attempt to upload duplicates.
Note: Clicking Save in the Playlist Creator after uploading will create a Playlist for the uploaded Tracks. However, this is not required, as anything you upload in the Playlist Creator will be automatically added to your DISCO regardless. But we do recommend getting in the habit of creating Playlists to keep your music organized.
Importing files or folders from your computer
Drag and drop
Note: At this time, the drag and drop option is only supported for file uploads, not folder uploads.
- Select file(s) on your computer.
- Drag and drop them into the Playlist Creator.
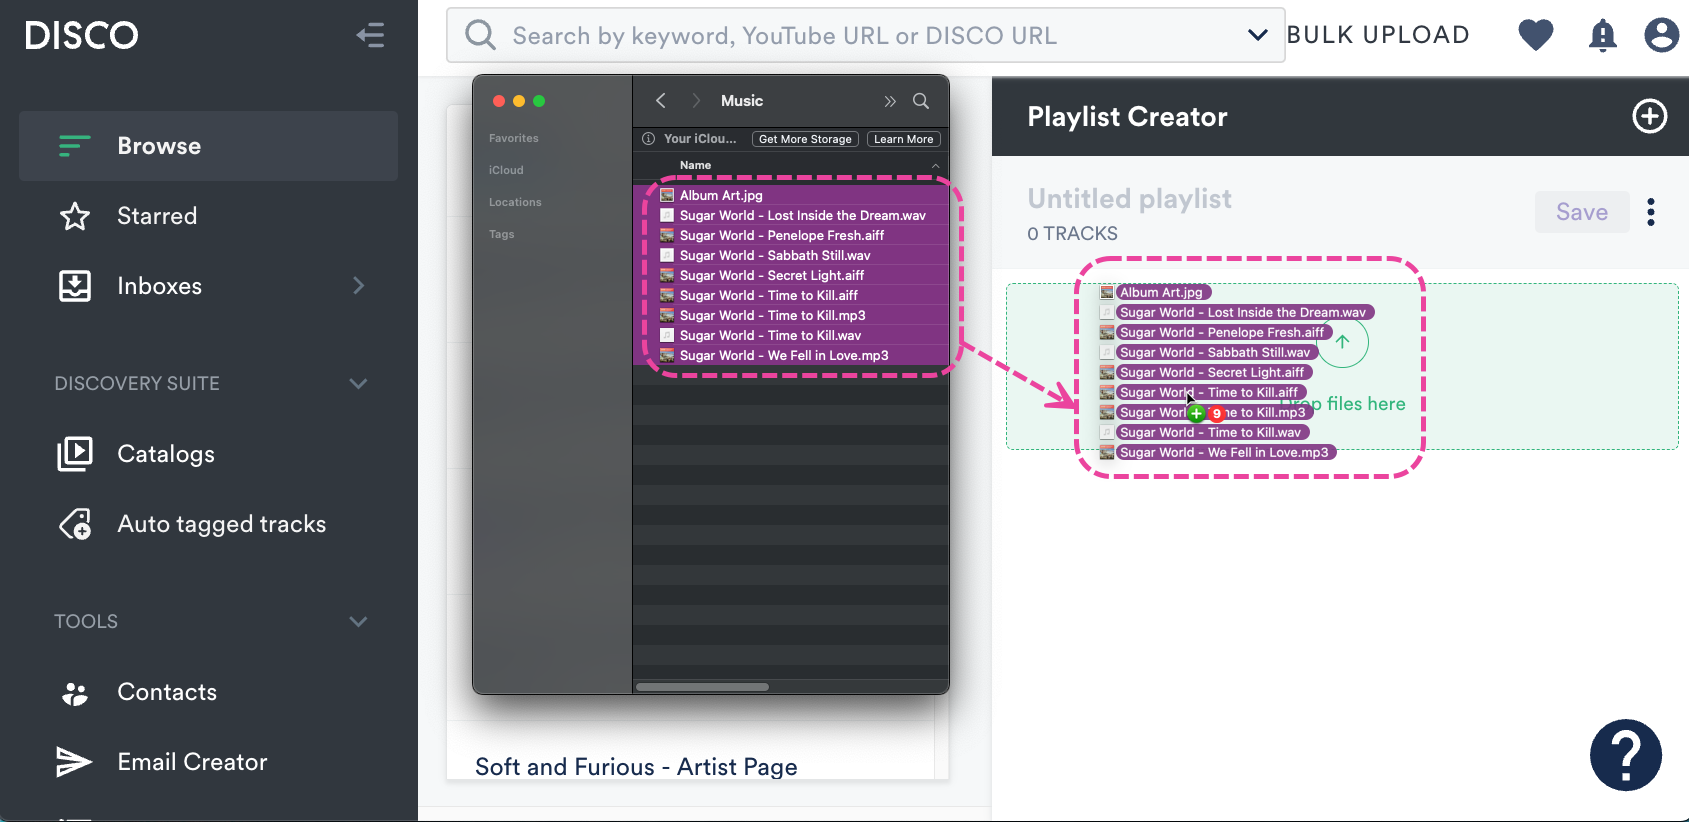
- Your files will be uploaded to the Playlist Creator.

- Optional: Click the Save button in the Playlist Creator to save these files as a Playlist in your DISCO.


Browse your computer
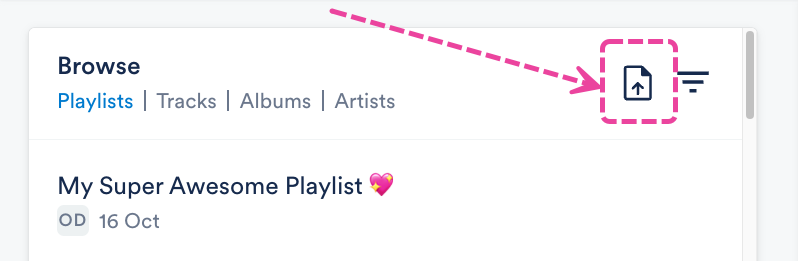
- Click the box in the Playlist Creator, or click the upload button in your Browse section.


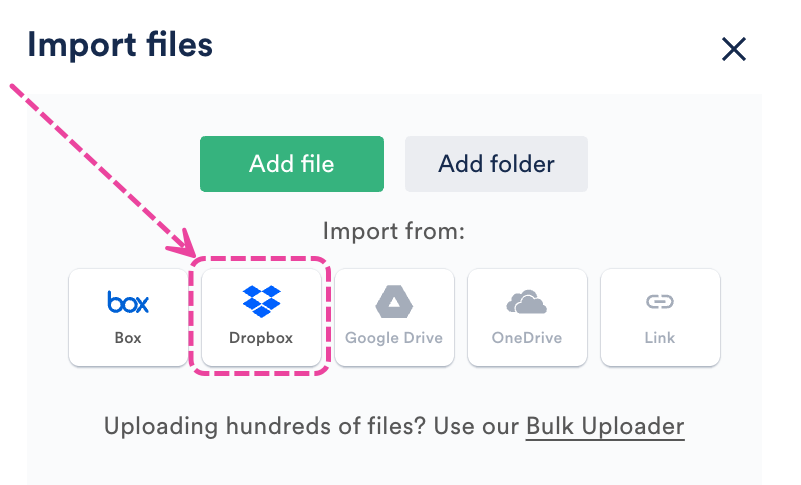
- Click either the gray Add file or Add folder* button.
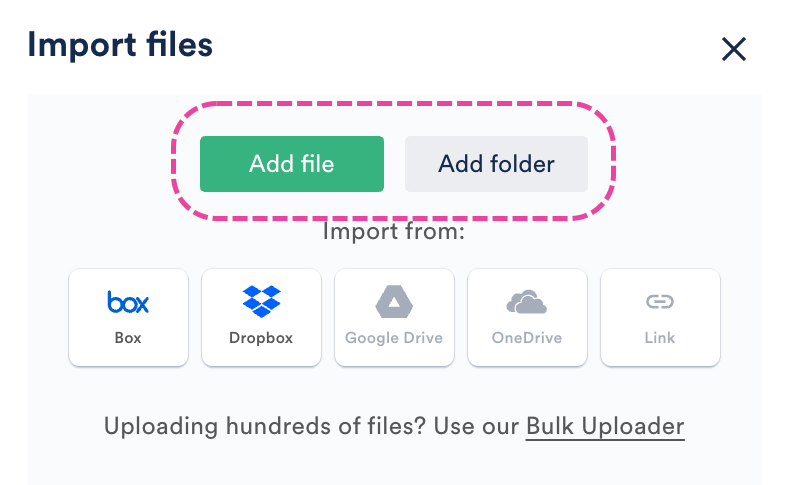 *With this option you can only select one folder, but files from any subfolders within the folder will also be uploaded.
 - When prompted, select the file(s) or folder from your computer.
- Your files will be uploaded to the Playlist Creator.

- Optional: Click the Save button in the Playlist Creator to save these files as a Playlist in your DISCO.


 *With this option you can only select one folder, but files from any subfolders within the folder will also be uploaded.
Importing your files from iTunes or Apple Music
Note: Files imported from iTunes or Apple Music will not be de-duplicated against existing files the same way local uploads would be.
The below applies to individual Songs in iTunes/Apple Music. To import entire Playlists from iTunes/Apple Music, refer to this article.
- Select files in your iTunes or Apple Music account.
- Drag and drop them into the Playlist Creator.
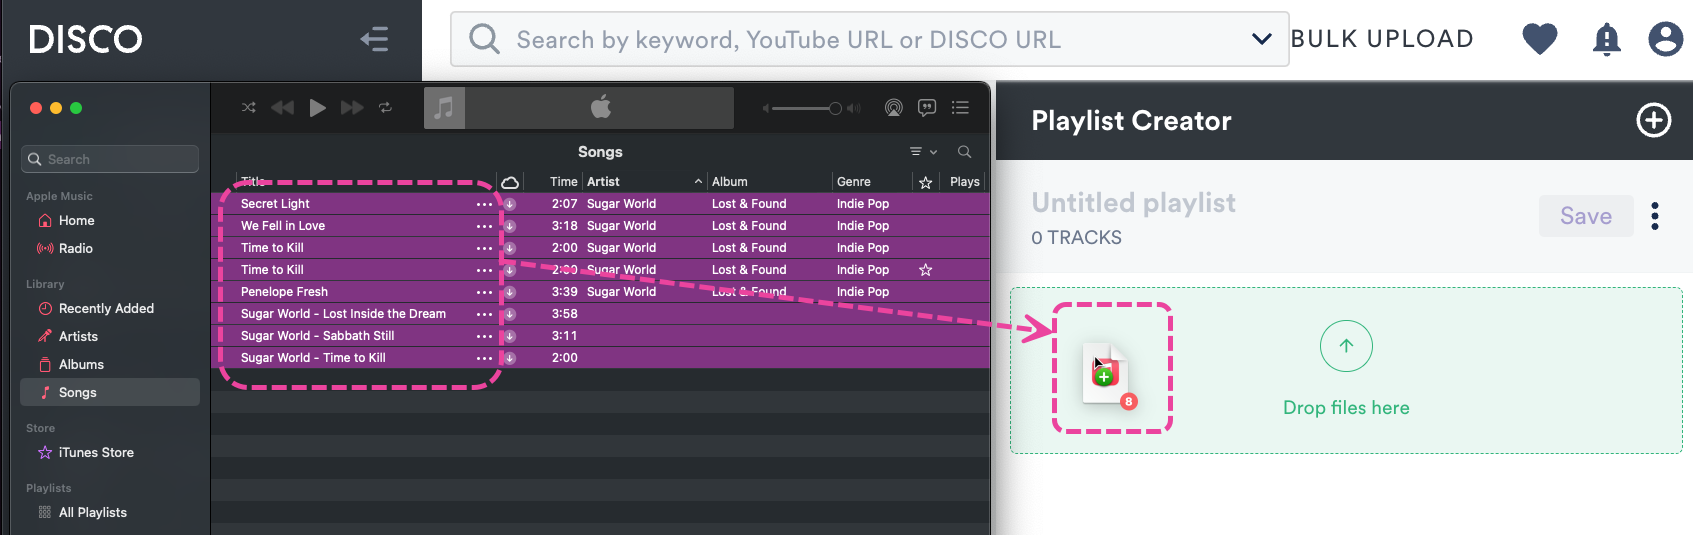
- Your files will be uploaded to the Playlist Creator.

- Optional: Click the Save button in the Playlist Creator to save these files as a Playlist in your DISCO.
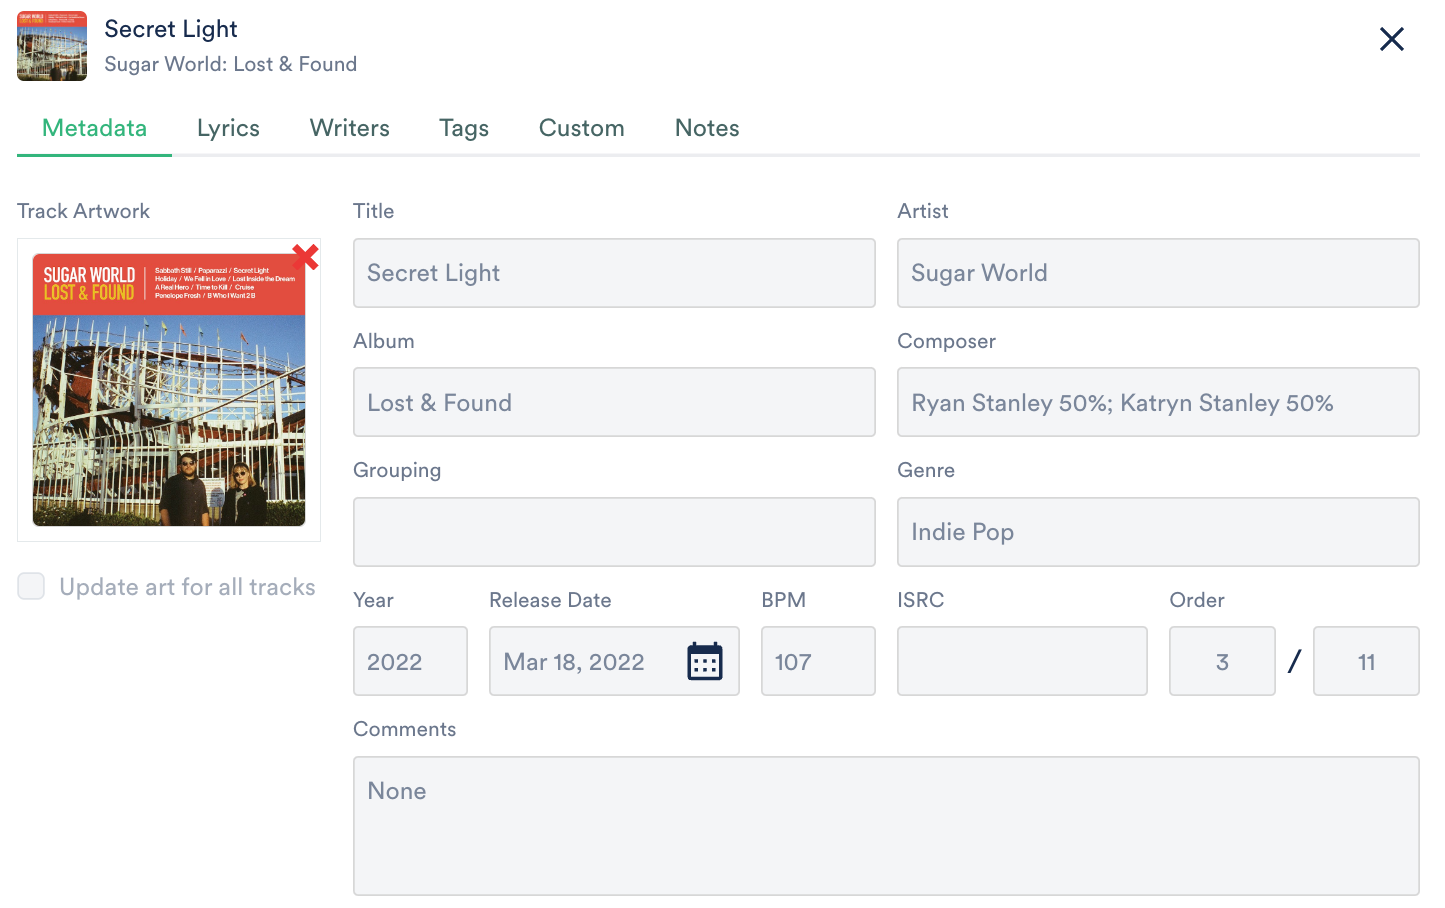
- As long as the file type supports it, the metadata for the Tracks will also be carried into DISCO.


Importing your files from Dropbox
We recommend using this option when uploading up to 100 Tracks. For larger amounts of Tracks, we suggest using the DISCO Bulk Uploader.
Note: Files imported from Dropbox will not be de-duplicated against existing files the same way local uploads would be.
- Click the box in the Playlist Creator, or click the upload button in your Browse section.

- Click the Import from Dropbox button.
- A Dropbox window will appear. Log in to your Dropbox account.

- In the Dropbox window, select the files you want to import and click Choose.
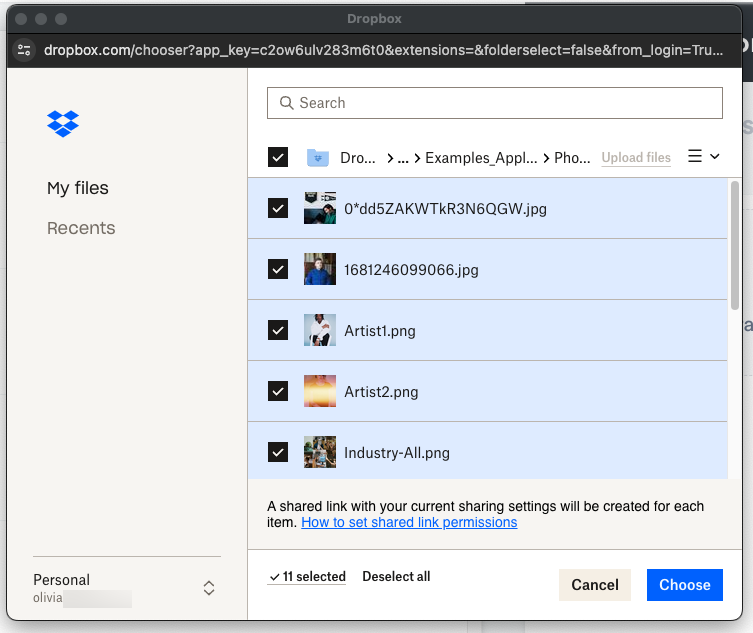
- Your files will be uploaded to the Playlist Creator.

- Optional: Click the Save button in the Playlist Creator to save these files as a Playlist in your DISCO.


Importing your files from Box
We recommend using this option when uploading up to 100 Tracks. For larger amounts of Tracks, we suggest using the DISCO Bulk Uploader.
Note: Files imported from Box will not be de-duplicated against existing files the same way local uploads would be.
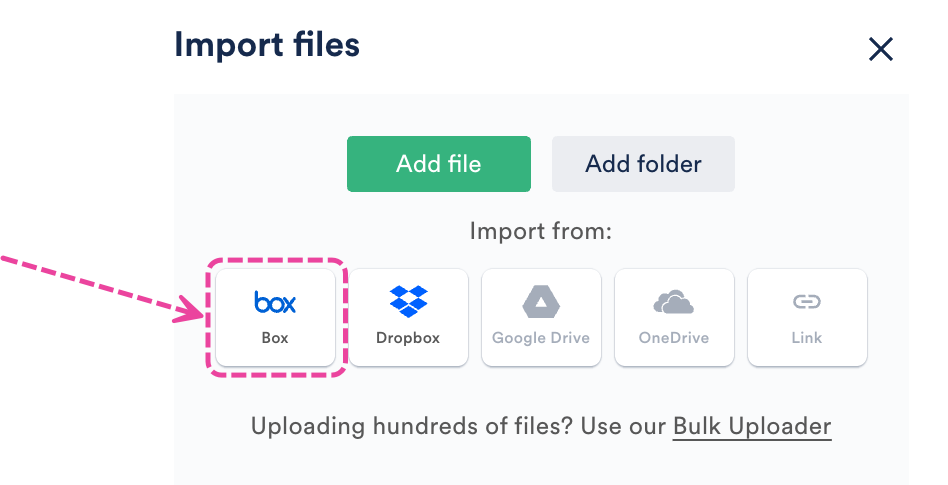
- Click the box in the Playlist Creator, or click the upload button in your Browse section.

- Click the Import from Box button.
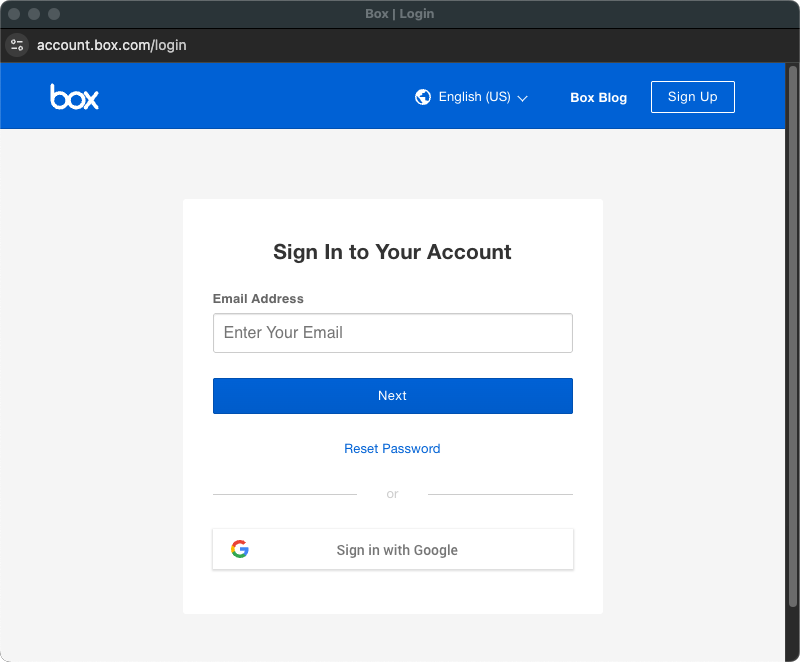
- A Box window will appear. Log in to your Box account.
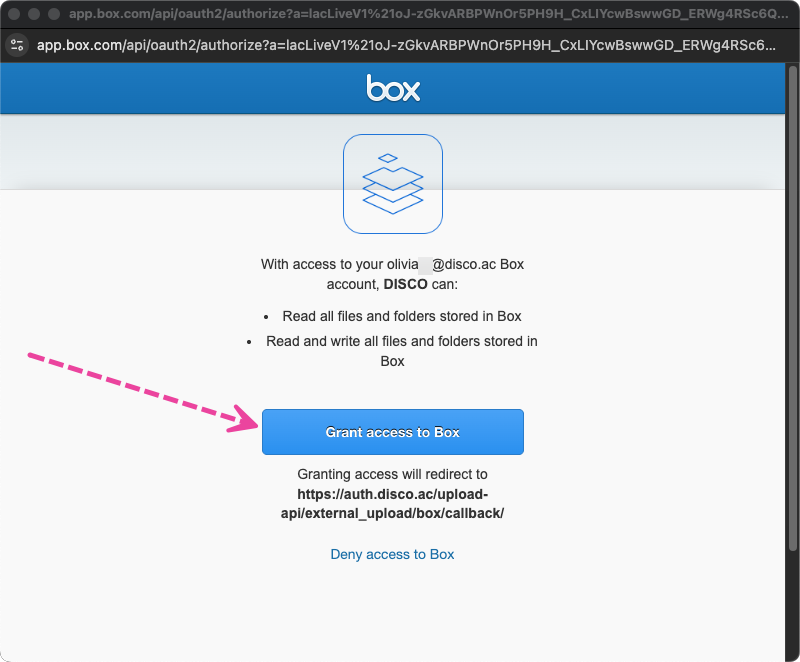
- In the Box window, if prompted, click the button to Grant access to Box.
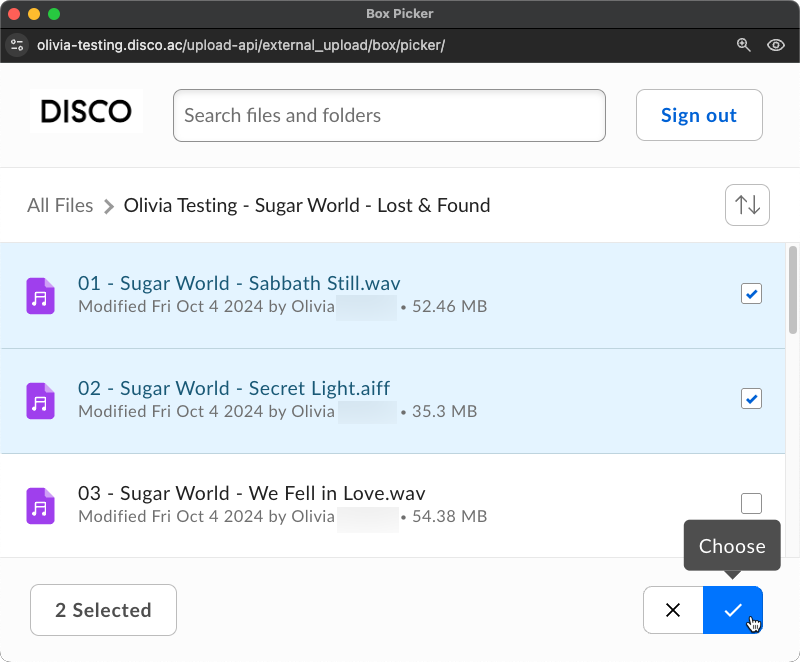
- In the Box Picker window, select the files you want to import and click the checkmark to Choose.
- Your files will be uploaded to the Playlist Creator.
- Optional: Click the Save button in the Playlist Creator to save these files as a Playlist in your DISCO.


Using the DISCO Bulk Uploader
This option is recommended for larger uploads (over 100 Tracks). Check out this article for detailed information and instructions on using the DISCO Bulk Uploader.
Importing music from another system
Looking to import music from another system? Contact our Support Team so we can help!
DISCO supports multiple non-media files in addition to audio and video files!
At a glance
You can upload these files just like any other by dragging them into the Playlist Creator or importing them. Once uploaded, they will have different icons indicating their type, or a preview in the case of images:![]()
Supported file types
You can upload other files you use regularly, such as:
- spreadsheets
- text documents
- images
- PDFs
You can also add any combination of file types to a Playlist, and they'll be clearly labeled:
Files that generate previews
You can upload almost any file type, but we'll only generate previews for the following:
- spreadsheets (.csv, .xls, .xlsx)
- text documents (.rtf, .doc, .docx. txt)
- PDFs*
*A preview will not be generated if the PDF file is over 5MB or contains more than 15 pages. - images (.png, .jpeg, .bmp, .gif)
To preview a file, hover over the icon and click the eyeball: Please note some larger files may not generate previews.
We offer an AIFF to WAV / WAV to AIFF converter for users on select plans (Pro, Artist, Music Supervisor, and Enterprise).
At a glance
This feature gives you more flexibility with your content and saves everyone time when downloading multiple formats. It also makes it easy to deliver AIFFs, which are great, because, unlike WAVs, they carry metadata 🙌
How it works
When you upload a Track to your DISCO in one format (e.g. WAV), the converter will create a copy of that Track in the other format (e.g. AIFF), and vice versa.
The two formats (AIFF and WAV) would then be available for you and your recipients to download.
Example
We uploaded a Track in AIFF format.
 When we look at the download options for the Track, there is now a WAV version available.


Saving and downloading Tracks in other formats
There are three ways to do this:
From within your DISCO
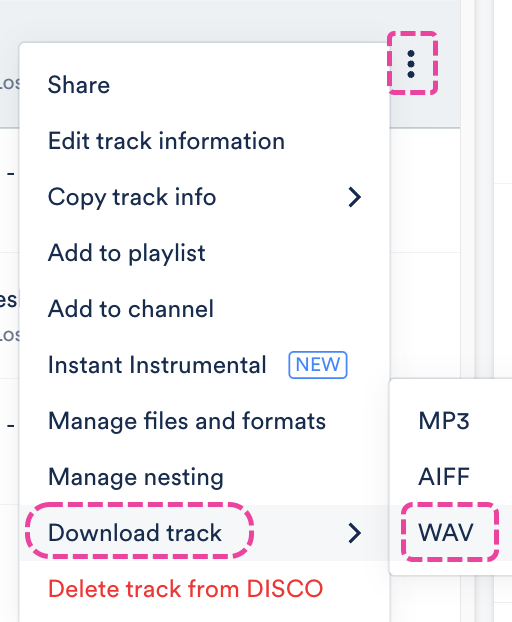
- Open the Track menu (⋮) and select Download track.
- Select the format from the list.

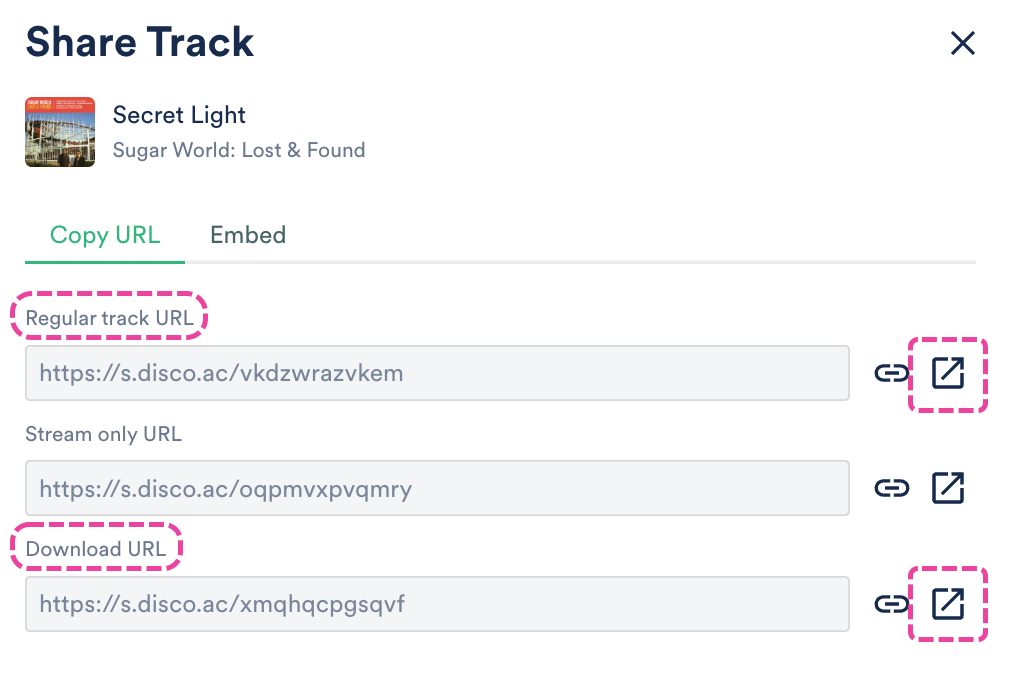
From Track Share pages
- Open either the Regular track URL or the Download track URL.
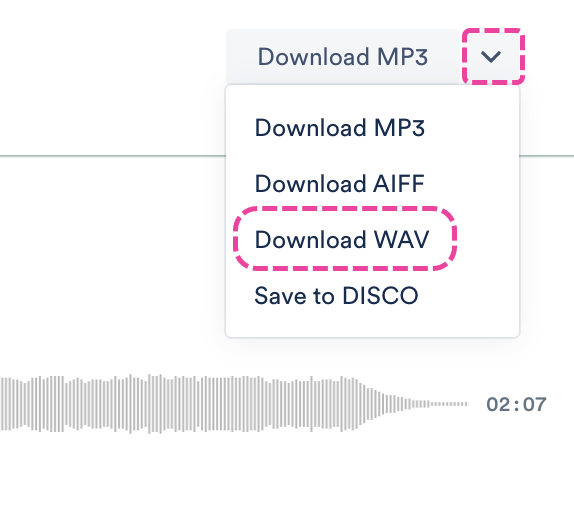
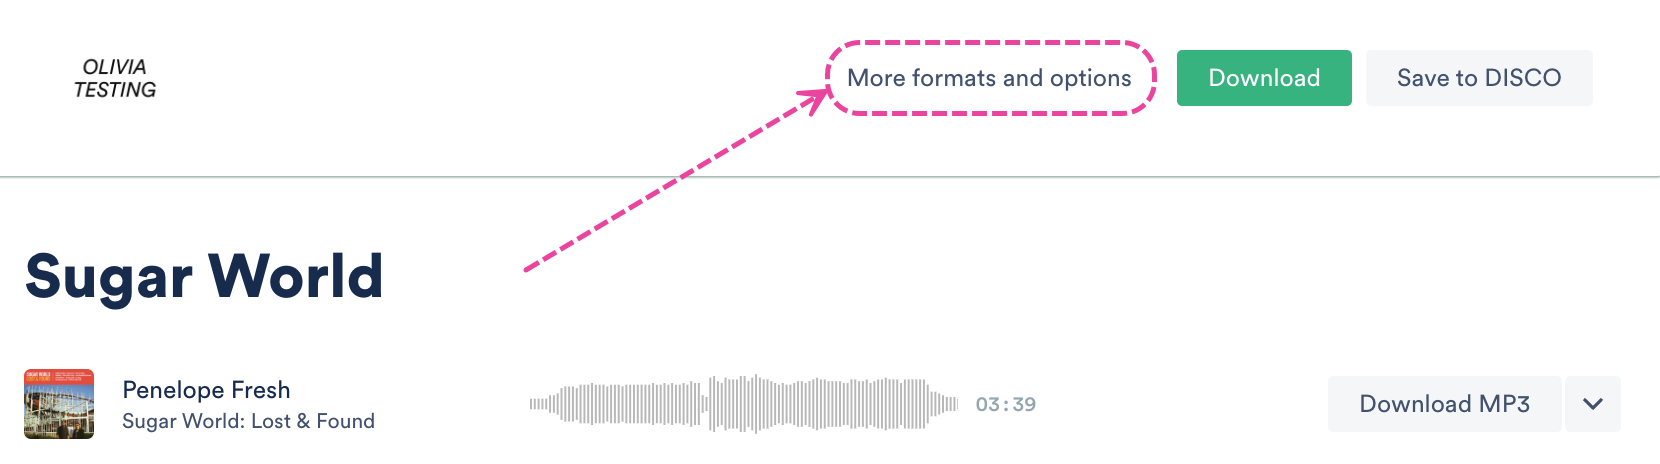
- From the Track Share page, in the top-right corner, click the arrow next to the Download button.
- Select an option from the drop-down to either Download or Save to DISCO.


From Playlist Share pages
- Open the Public Playlist URL.
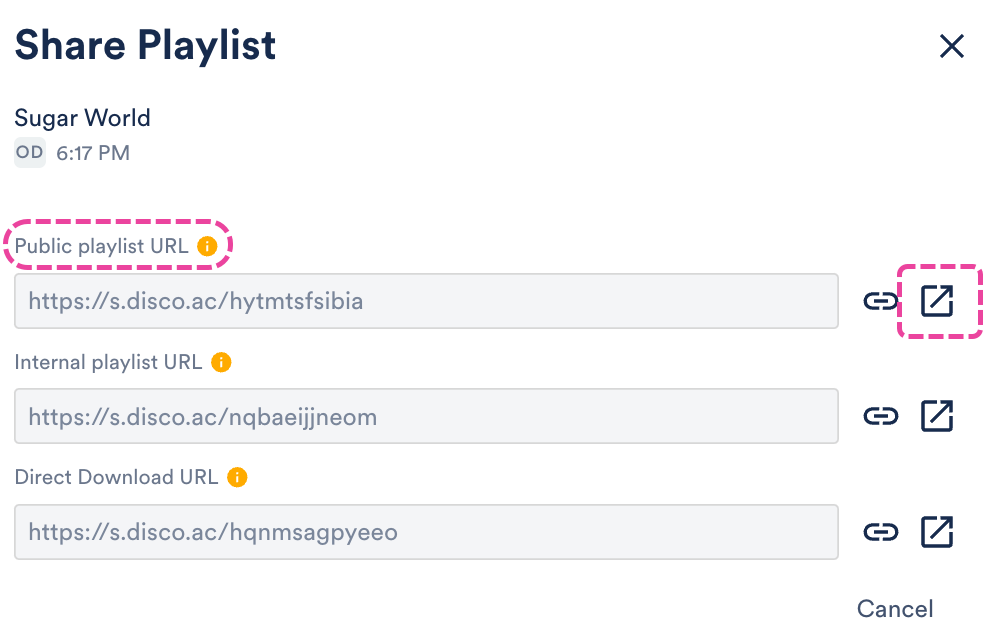
- In the top right corner, select More formats and options.
- Select the desired format(s) for the desired Track(s).
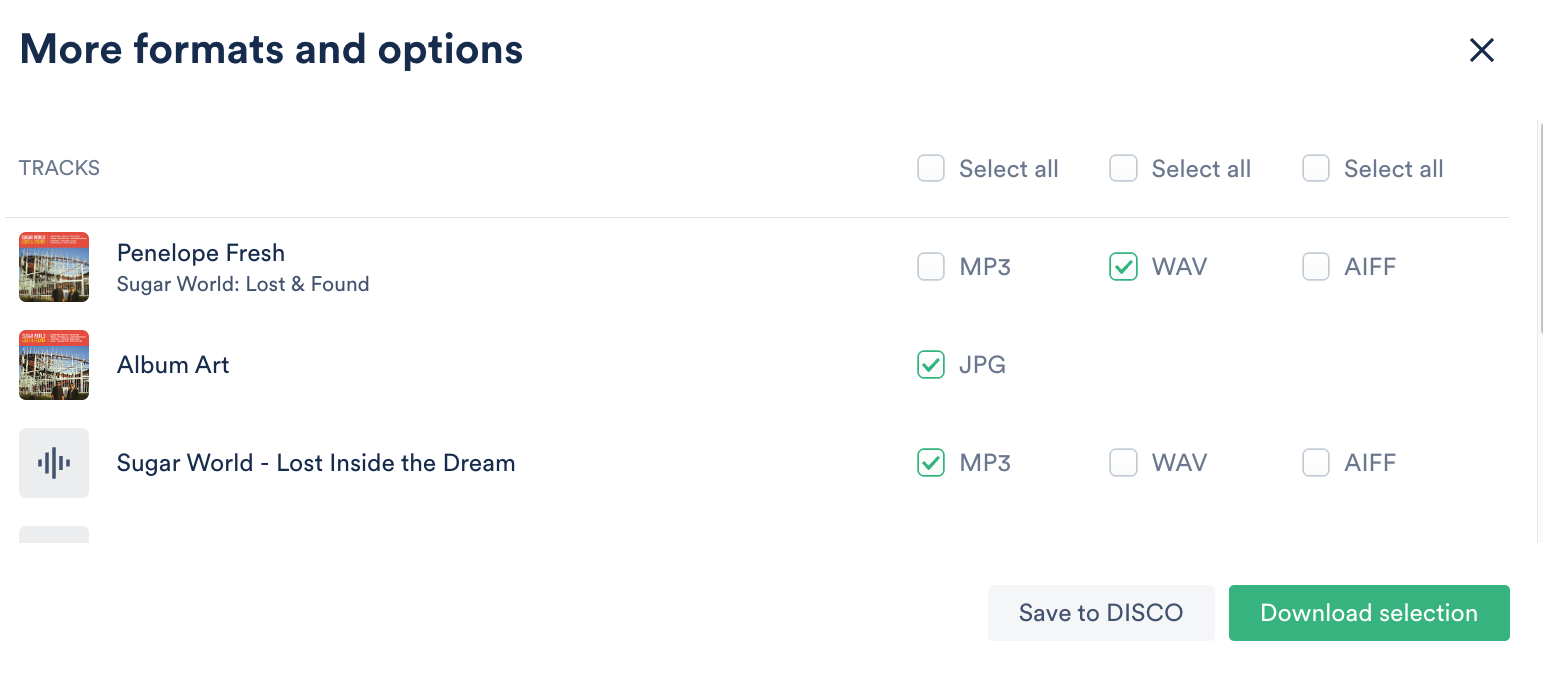
- Click either the gray Save to DISCO button or the Download selection button.


You can easily drag and drop individual Tracks from iTunes/Apple Music into your DISCO, but the process is a bit different when importing entire Playlists.
At a glance
There are a few steps to complete on your end, and we can help with the rest! You'll first want to upload all your music contained in your iTunes/Apple Music Playlists into your DISCO. The quickest way to do this is using our DISCO Bulk Uploader tool.
Exporting your Playlists from iTunes/Apple Music
After uploading your music into your DISCO, follow these steps in iTunes/Apple Music:
- Select File > Library > Export Library.

- Save the XML file.
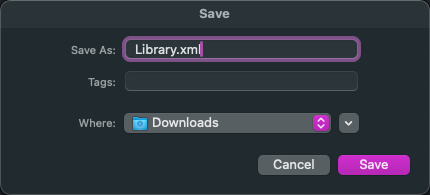
- Zip the XML file.
- On Mac, right-click the file and select Compress "library.xml".
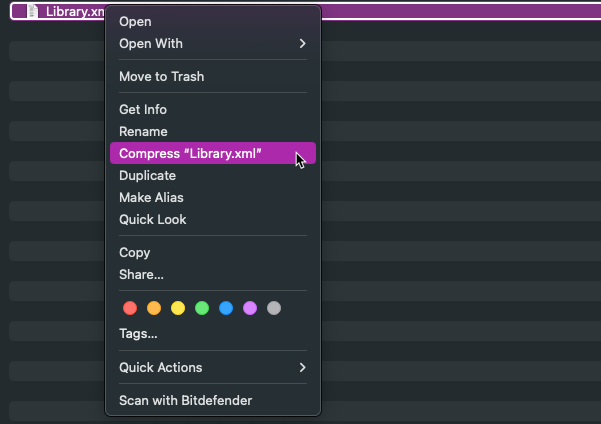
- On Windows, right-click the file and select Send To. Then select Compressed (zipped) folder.
- On Mac, right-click the file and select Compress "library.xml".
- Send the XML file to us at support@disco.ac. Be sure to provide us with the email address you use and the URL for the DISCO you'd like us to import the Playlists to.


Q: What is the maximum file size DISCO supports?
The maximum file size DISCO supports is 8GB. If you attempt to upload a file larger than 8GB, you'll see this Warning message:
Q: Which audio formats does DISCO support?
We offer full support for all of the major audio formats:
- MP3
- AIFF/AIF
- WAV
- M4A
- WMA
And partial support for these less common formats:
- FLAC
- AAC
- CAF
- ALAC
When you upload an audio file that's not an MP3 or an M4A, we automatically transcode an MP3 copy of your file for streaming purposes, but you can still access and share the original. Click here to read more about how DISCO handles audio formats.
Q: How does DISCO handle duplicate files?
There are a couple of different ways, depending on the scenario:
Scenario 1 - You're trying to upload duplicate files
By default, when you upload files (specifically MP3 and MP4 formats) to DISCO, we'll check them against any existing files in your DISCO that have the exact same Artist, Album, and Title metadata. If we find a match, the duplicate file(s) won't be uploaded. The upload won't progress, and instead, the existing file will be populated in the Playlist Creator.

If you'd like to have the de-duplication feature switched off, please contact our Support team.
- you're uploading files directly, not when you're adding files to your DISCO from an Inbox
- you're uploading files locally (from your computer), not when importing them from another system (e.g. Dropbox, Apple Music, etc.)
Scenario 2 - You have discovered duplicate files in your DISCO
Some duplicate files will likely still find their way into your DISCO. The best way to clean them up is to merge them.
Q: Does DISCO support video as well as audio?
Yes! DISCO supports video as well as audio, both inside your DISCO and on the public Share pages you send to recipients. You can upload videos just like any other file by dragging them into the Playlist Creator or importing them.
Note: We do not currently support videos encoded in H.265 (also known as HEVC).

Users on our Pro and Enterprise plans have the option to transfer their content from Source Audio into their DISCO using the steps below:
Step 1: Contact us to initiate the transfer
- You can contact us via Chat (using the Support menu, which looks like a question mark in the bottom right corner of your DISCO), or by emailing onboarding@disco.ac.
- We will then set up the transfer on our end and provide you with the details you'll need to initiate the transfer (refer to Step 4).
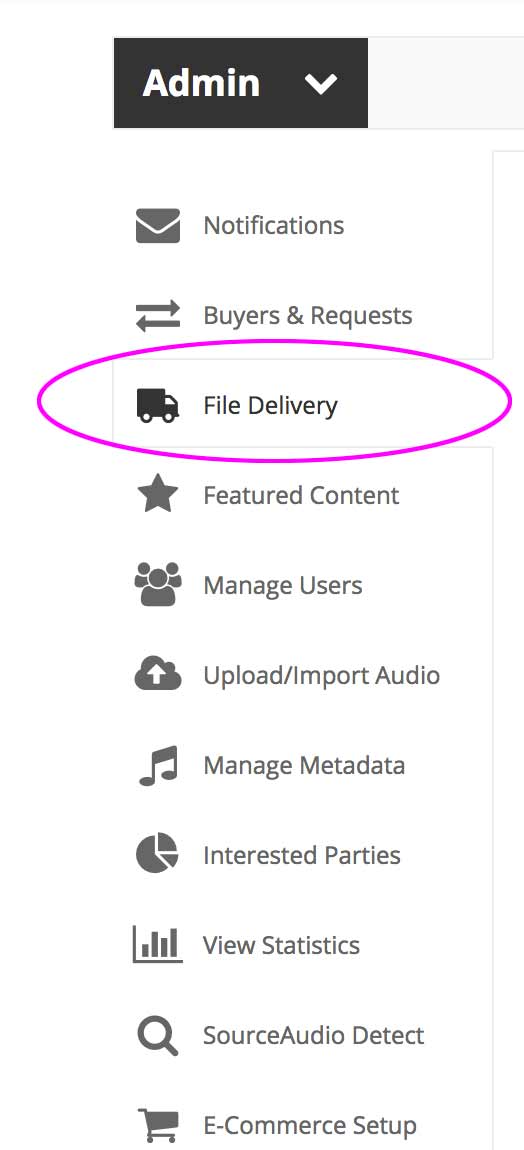
Step 2: Go to the Admin panel in your Source Audio
- Log in to your Source Audio account and go to the Admin panel. From the left sidebar menu, choose File delivery.

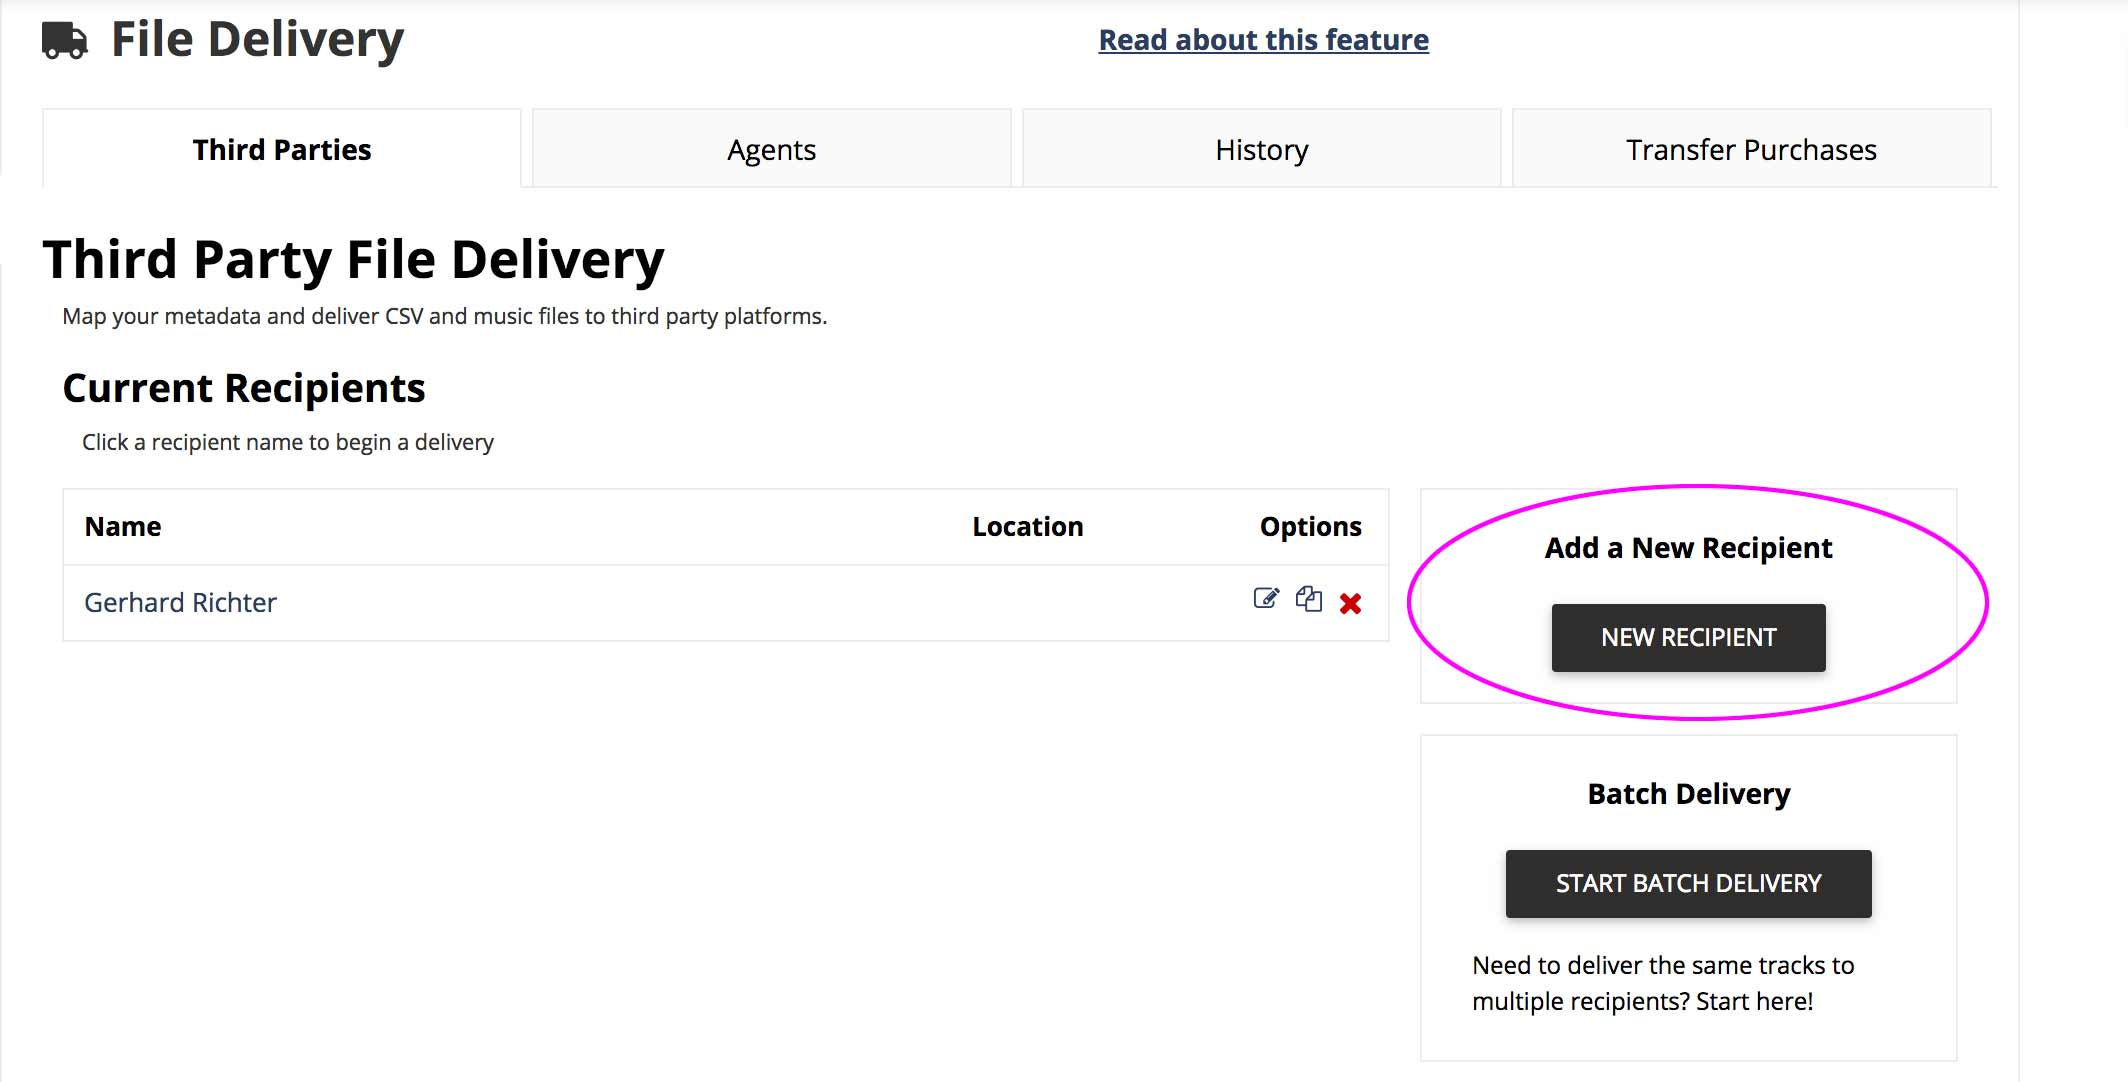
Step 3: Add a New Recipient
- From the File Delivery page, click the Add a New Recipient button on the right side.

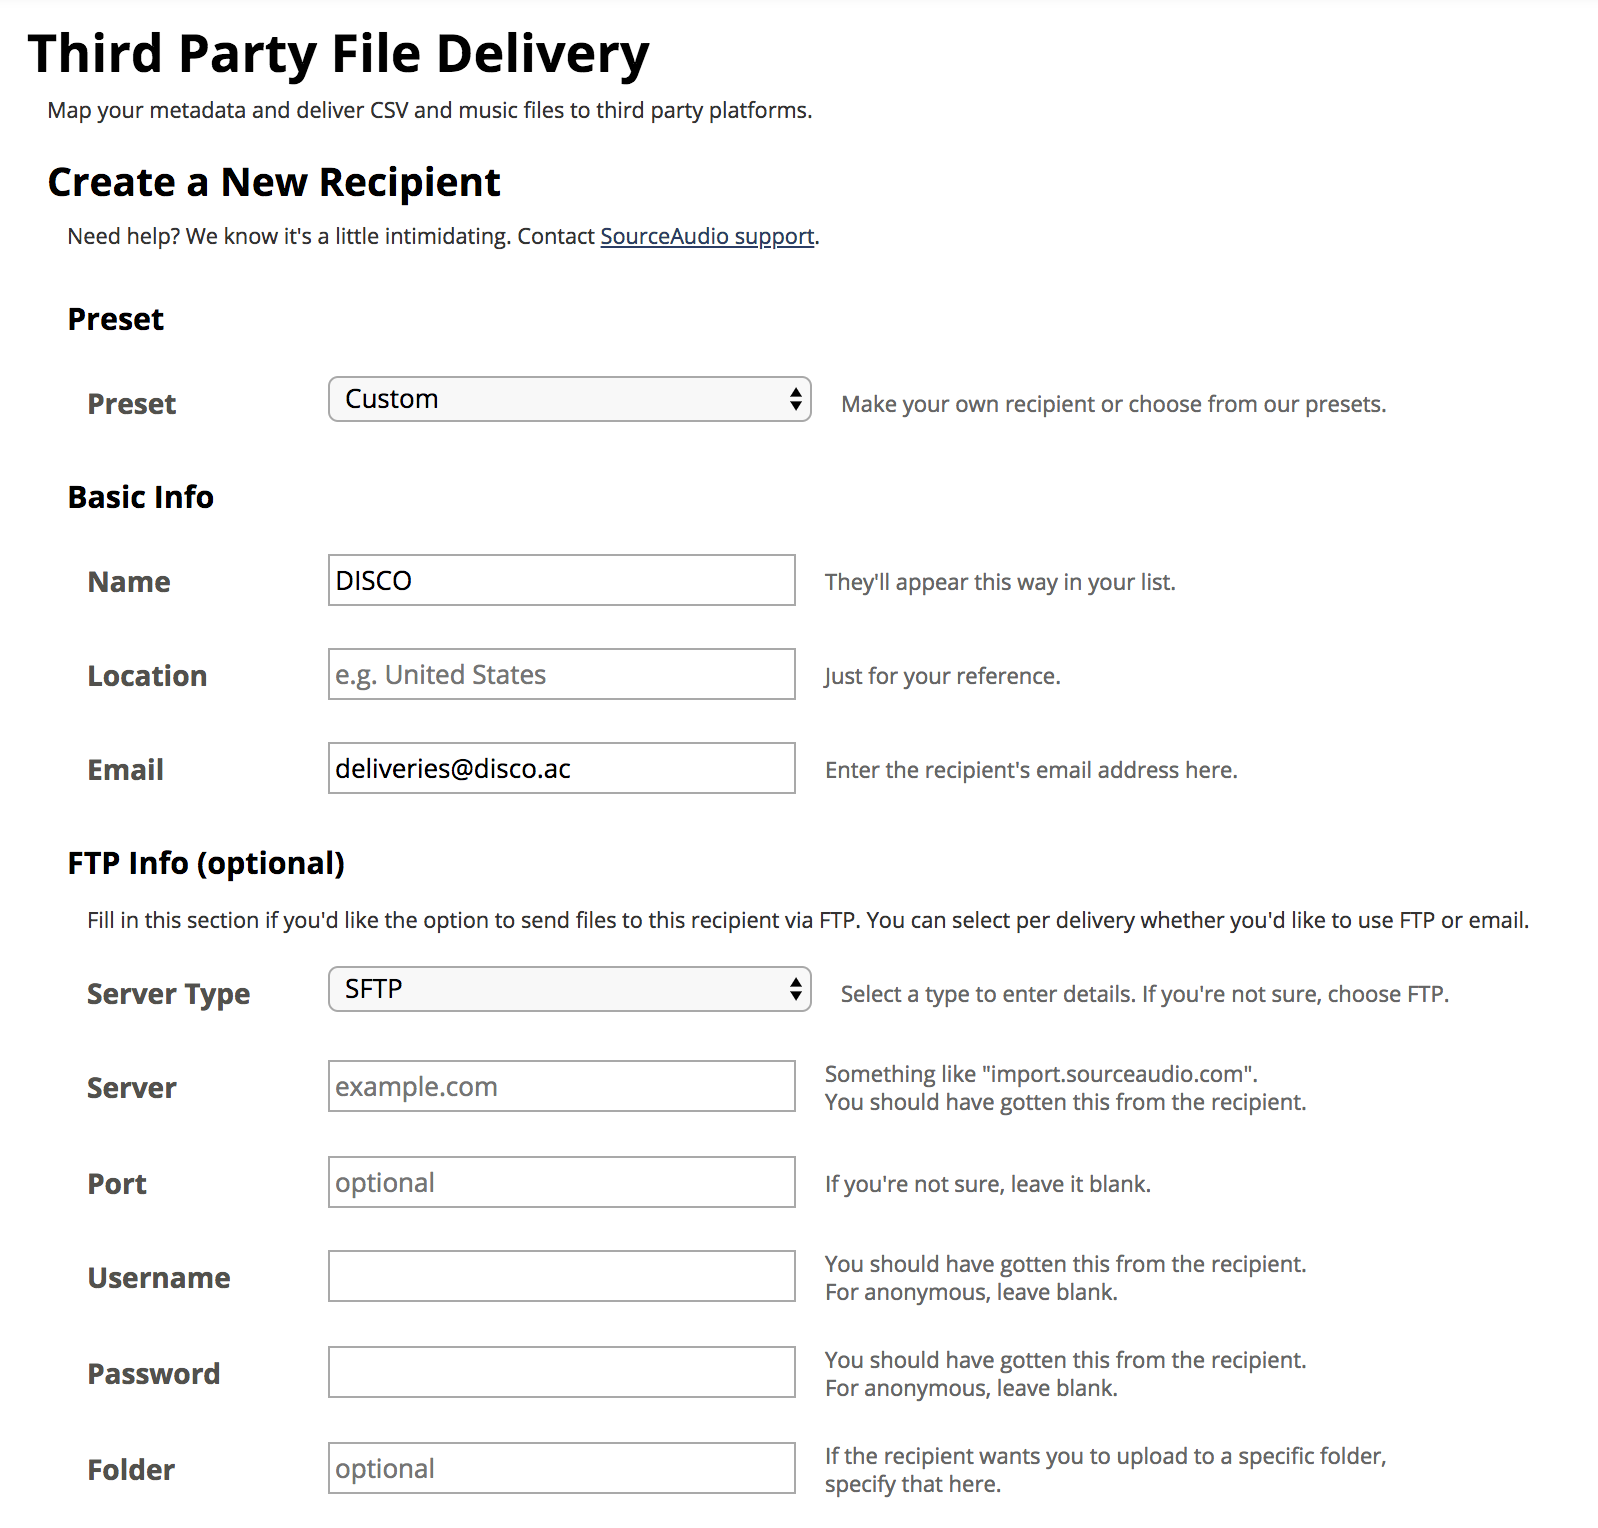
Step 4: Enter the transfer details
- From the Create a New Recipientpage, enter the following:
- Preset: Custom
- Name: DISCO
- Email: deliveries@disco.ac
- FTP info: SFTP
- All other SFTP details: Use the details we provided to you when you first contacted us to initiate the transfer (refer to Step 1).
- Once you've entered all the details, click Save and Configure Delivery.

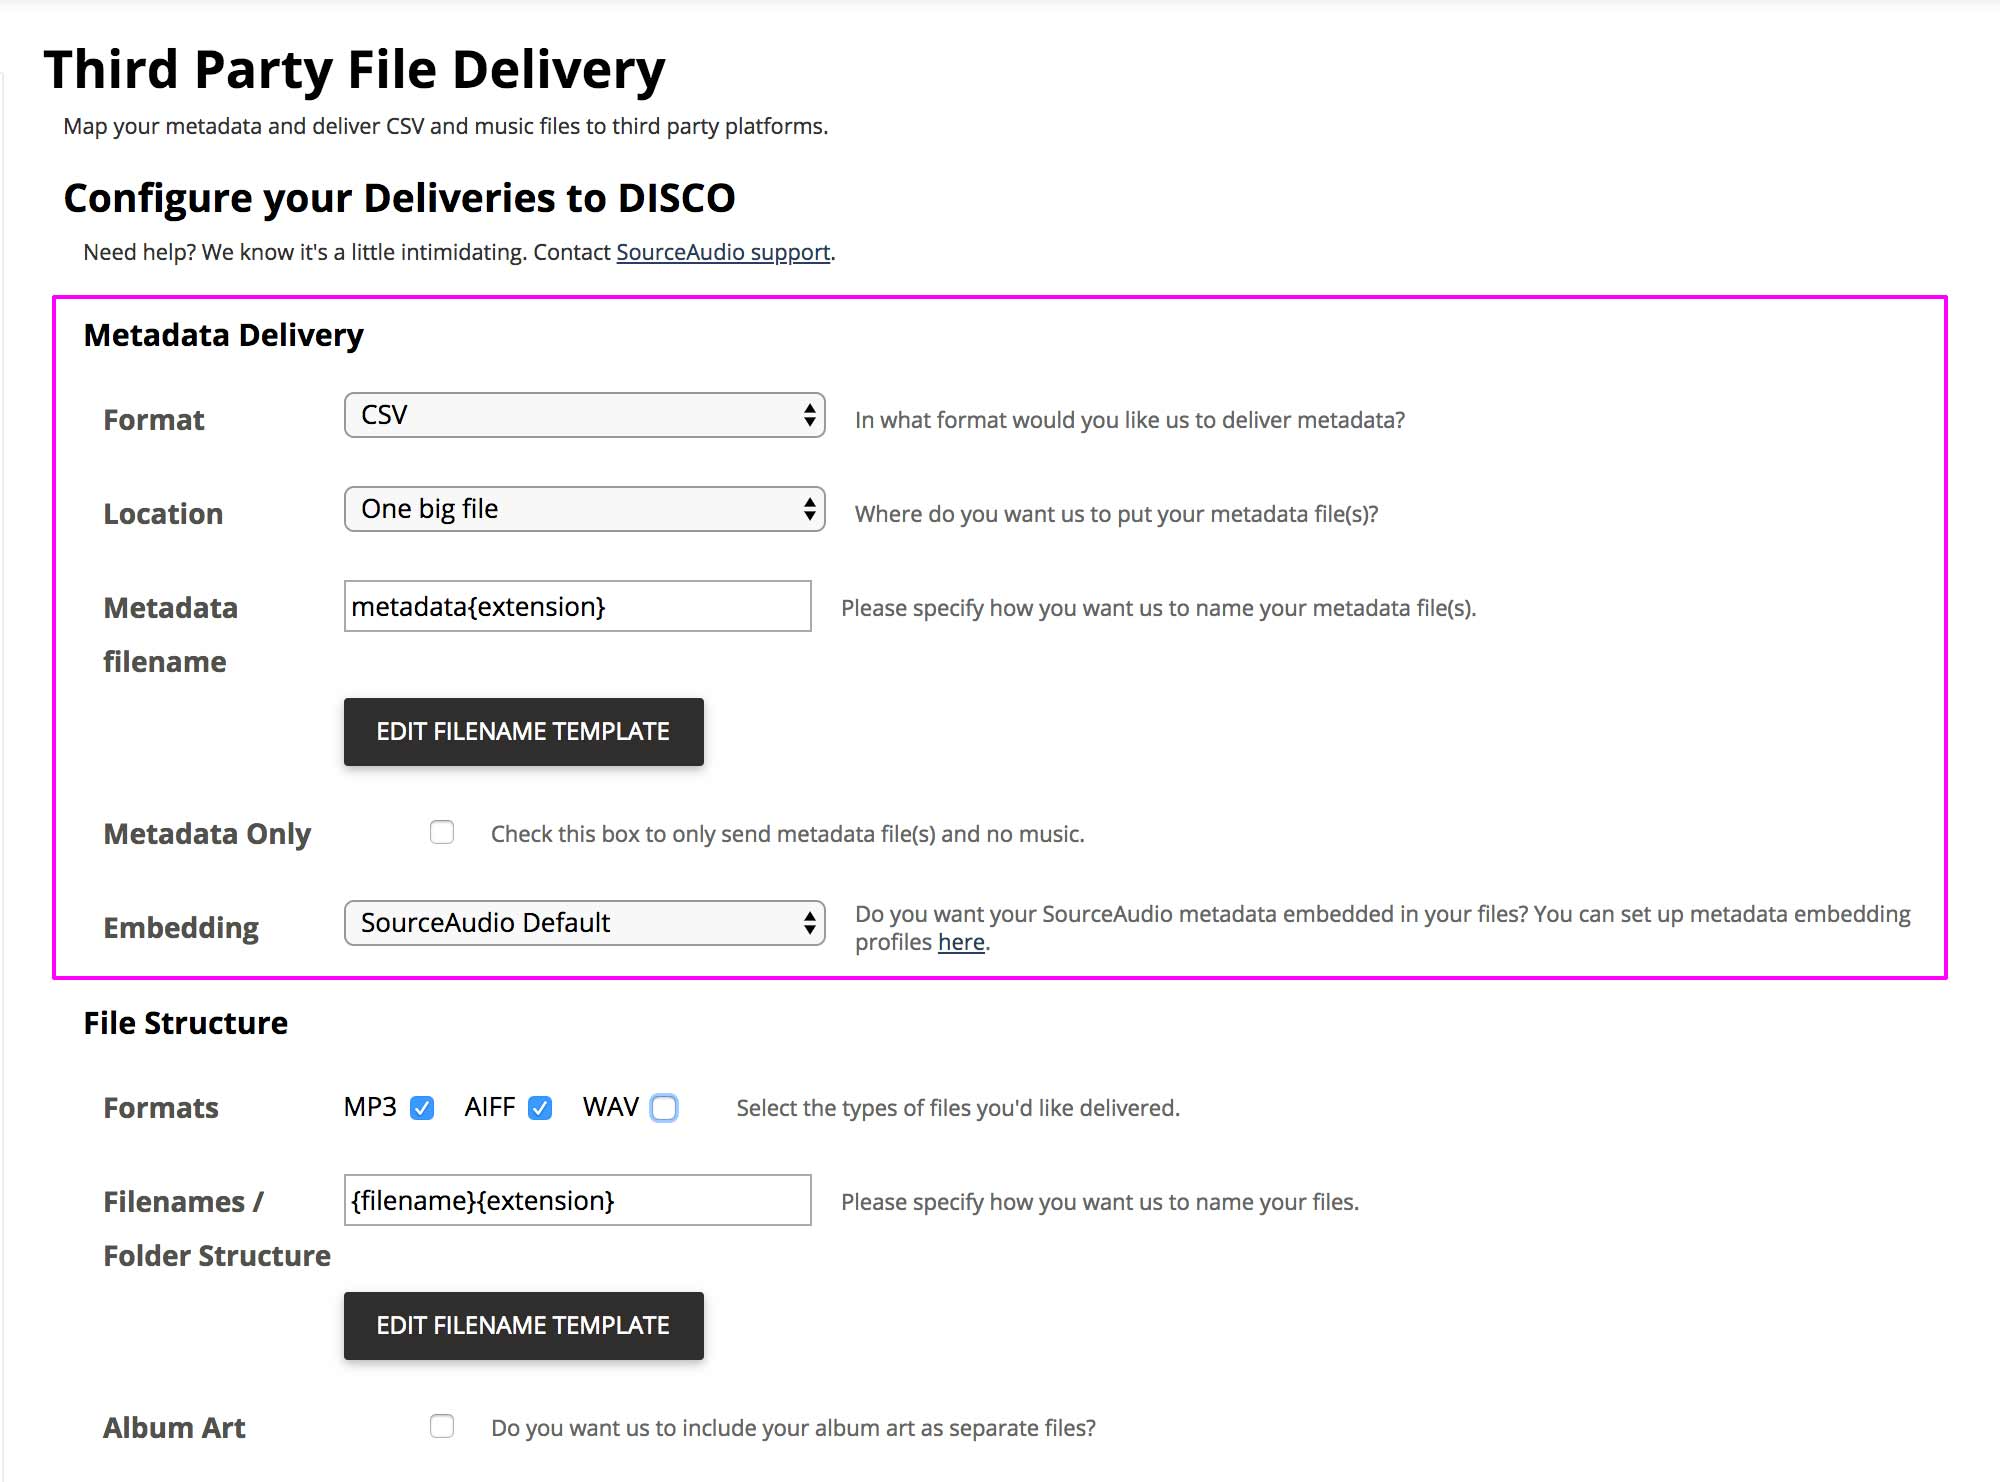
Step 5: Enter the Metadata Delivery details
- From the Configure your Deliveries to DISCO page, fill in the fields under Metadata Delivery. (Generally, the defaults can be used here.)

Step 6: Enter the File Structure details
- From the Configure your Deliveries to DISCO page, fill in the fields under File structure to select the formats you'd like delivered.
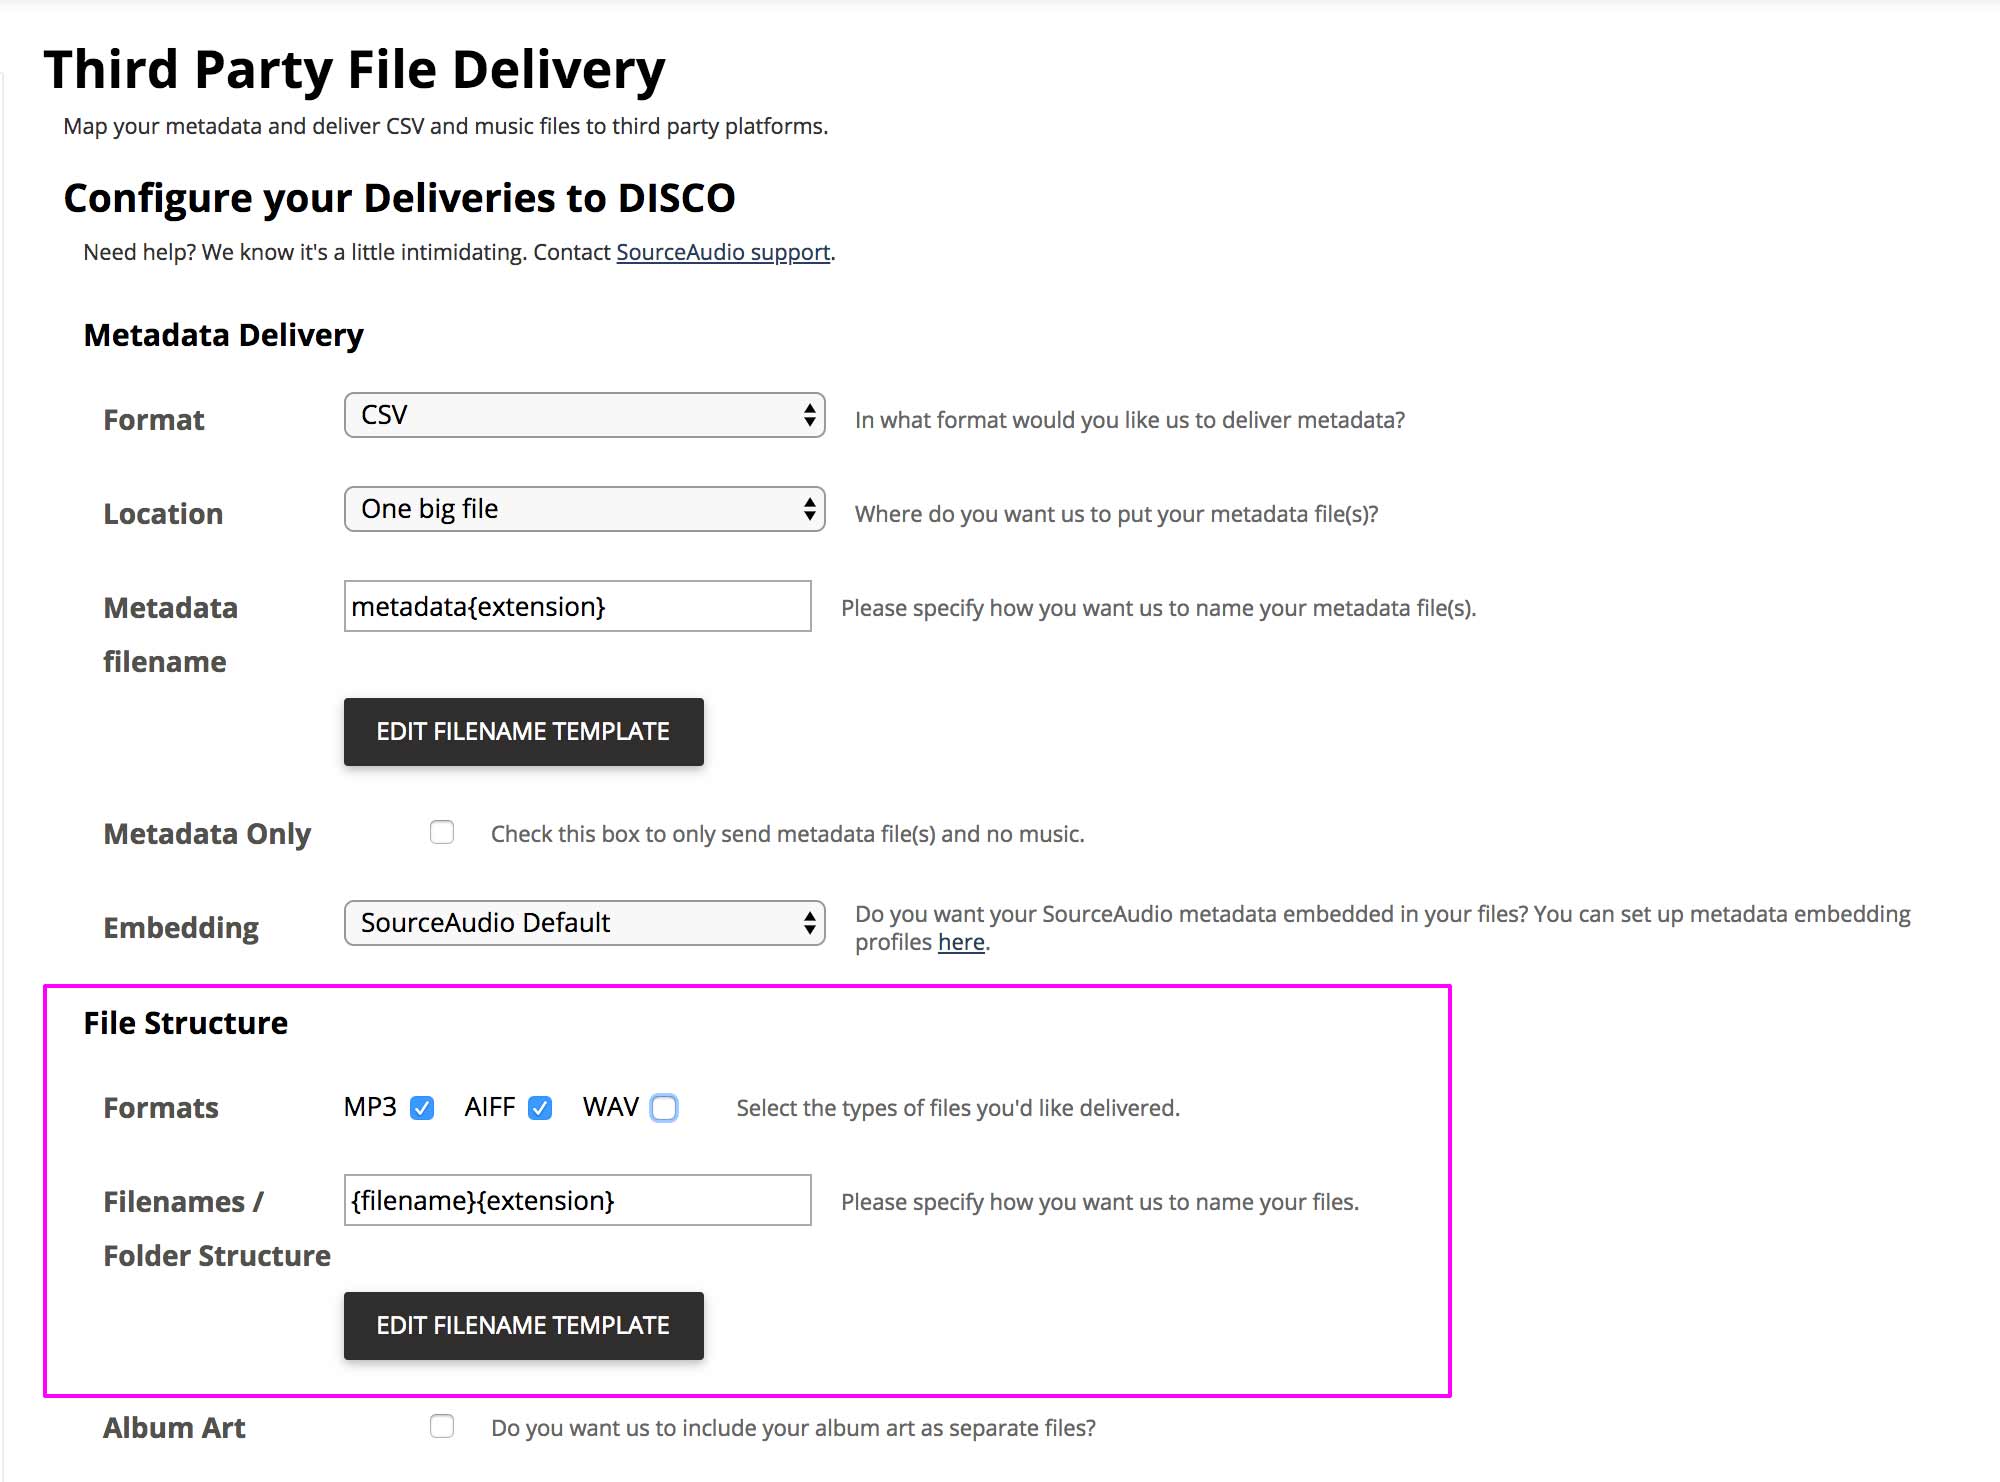
- Click Save and continue.
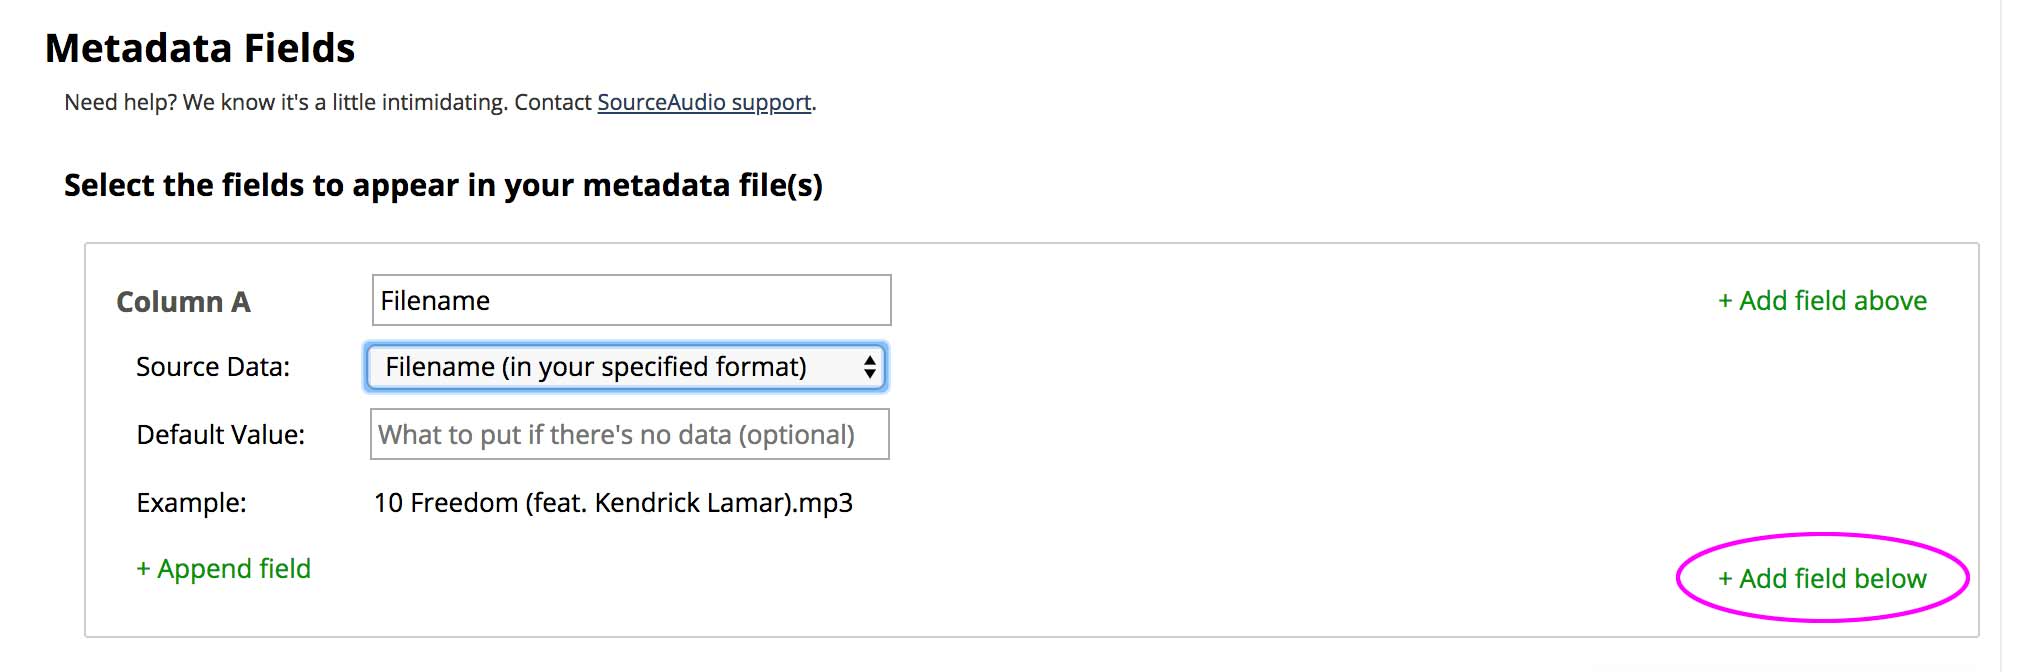
Step 7: Select the Metadata Fields
- From the Metadata Fields page, choose the metadata fields you want to send to DISCO.
- The first field to add is Filename. Select Filename in the Source data dropdown, and then click + Add field below, at the bottom right of the panel:
- Repeat this step for all the metadata you'd like to transfer to DISCO. The following fields in Source Audio have a direct match in DISCO:
- Artist
- Album
- Title
- Genre
- Track number
- Composer
- BPM
- ISRC
- Lyrics
- Include any other metadata you'd like to transfer to DISCO, and we'll work with you to import this metadata into other fields within DISCO.
- Click Save.

Step 8: Set up delivery
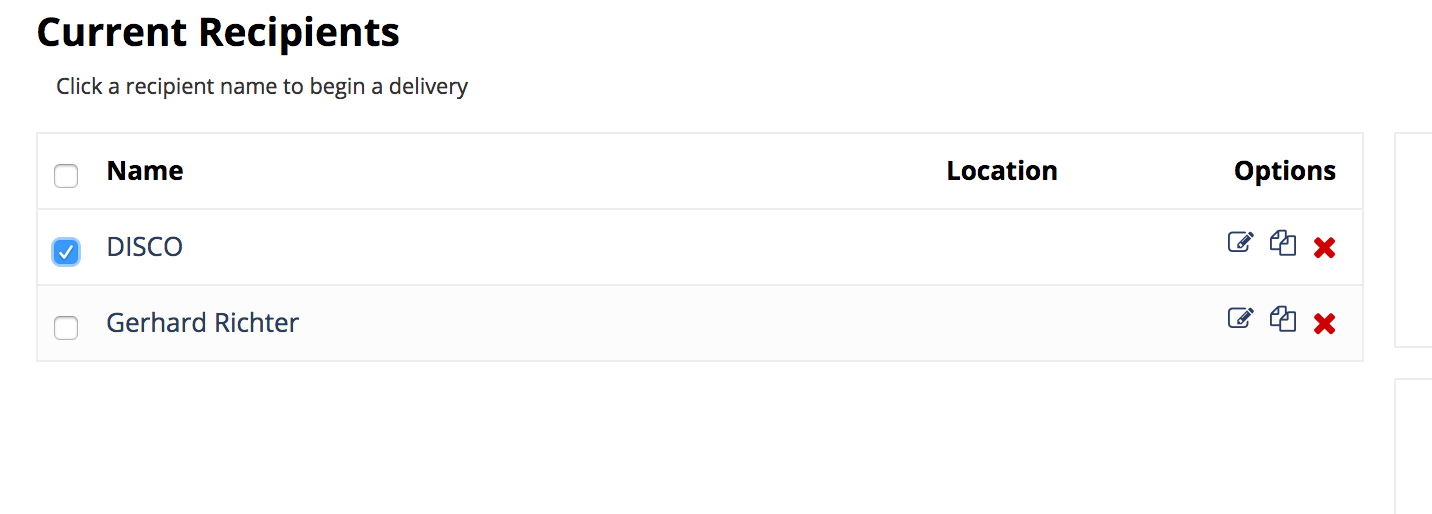
- After saving your transfer details in the previous step, you'll be taken to the File Delivery index page. From there, click the Start batch delivery button on the right.
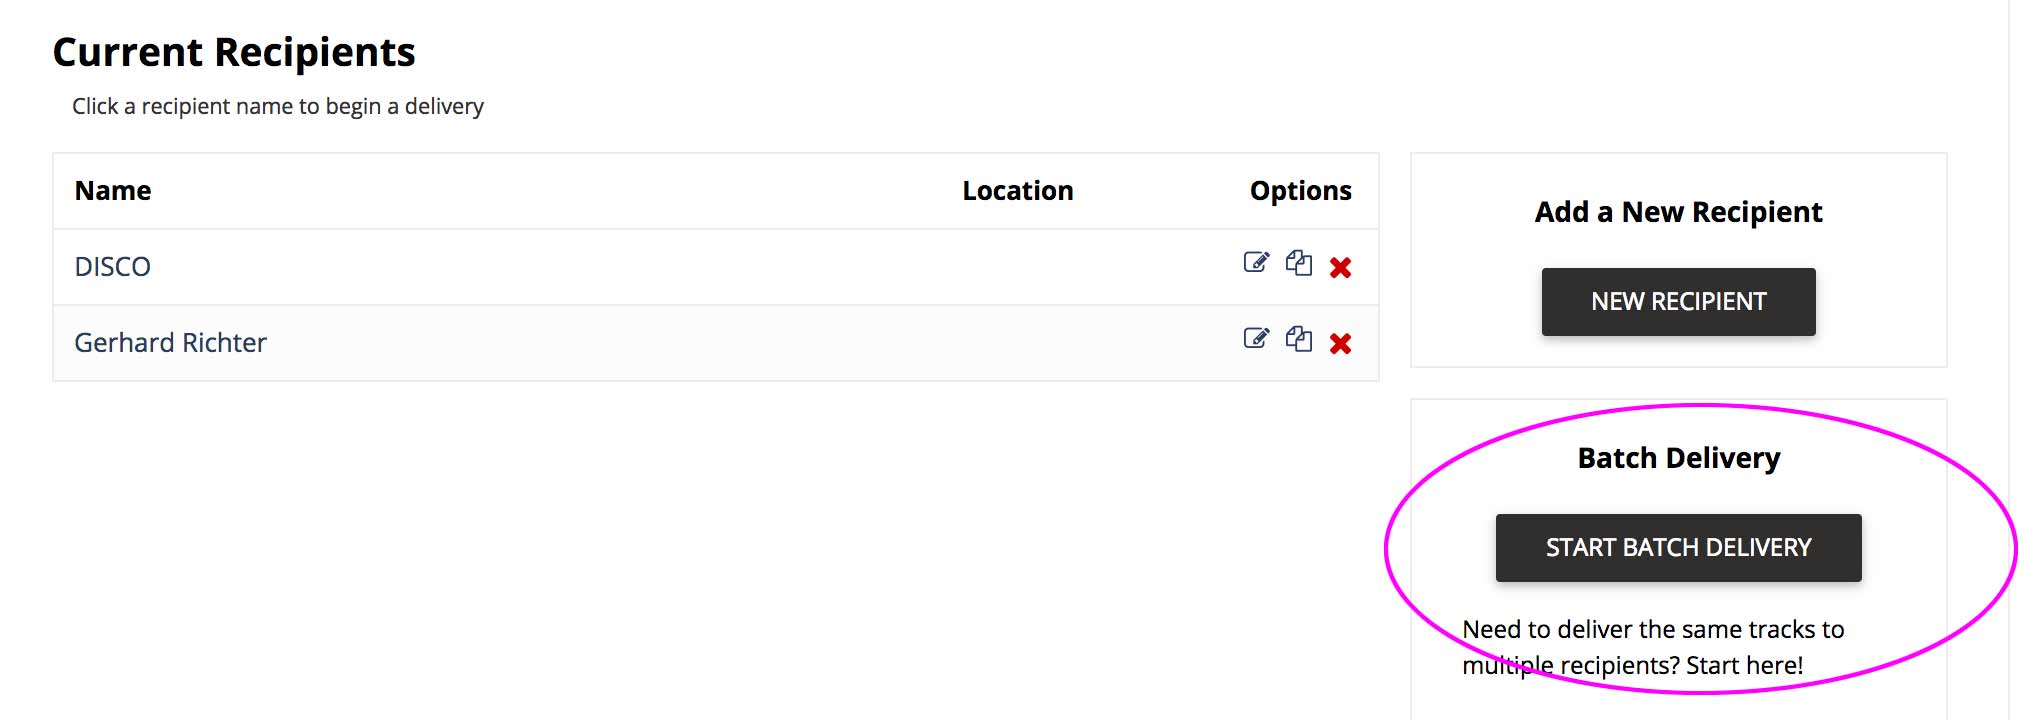
- Checkboxes will appear next to the recipients you've set up. Select the DISCO recipient you just set up and click Create Batch Delivery.


Step 9: Select Files
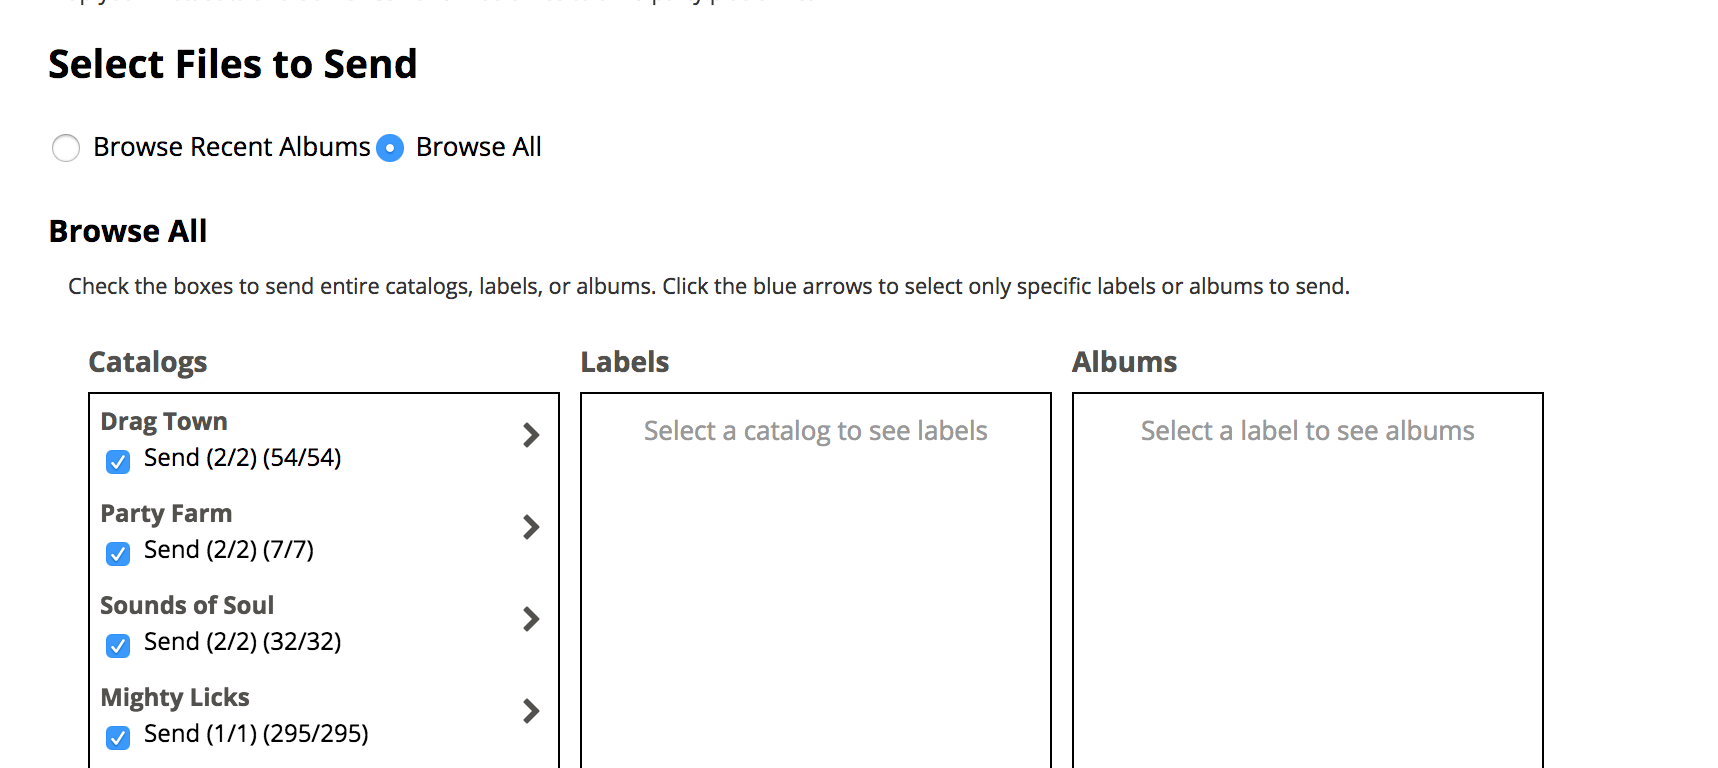
- From the Select Files to Send page, click Browse All at the top.
- Check the boxes next to the catalogs you want to send.

Step 10: Confirm and send
- You'll now see a confirmation screen, where you can confirm and start the transfer. It will show you a summary of everything you've set up so far.
- Under Total files, you'll see a summary of the total data being sent (Transfer for these deliveries), along with the amount of transfer data you have on your Source account (Transfer on your account).
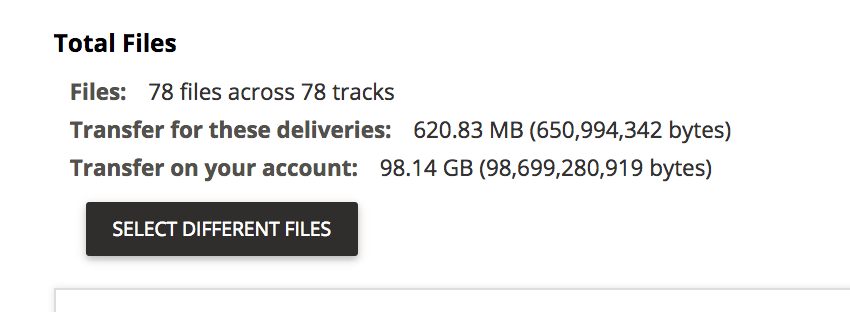
- Make sure the amount of data listed next to Transfer on your account is larger than the amount listed next to Transfer for these deliveries. If it's not, click the Transfer Purchases tab in the File Delivery admin section to purchase sufficient transfer data.
- Once you have enough data for the transfer, review the summary:
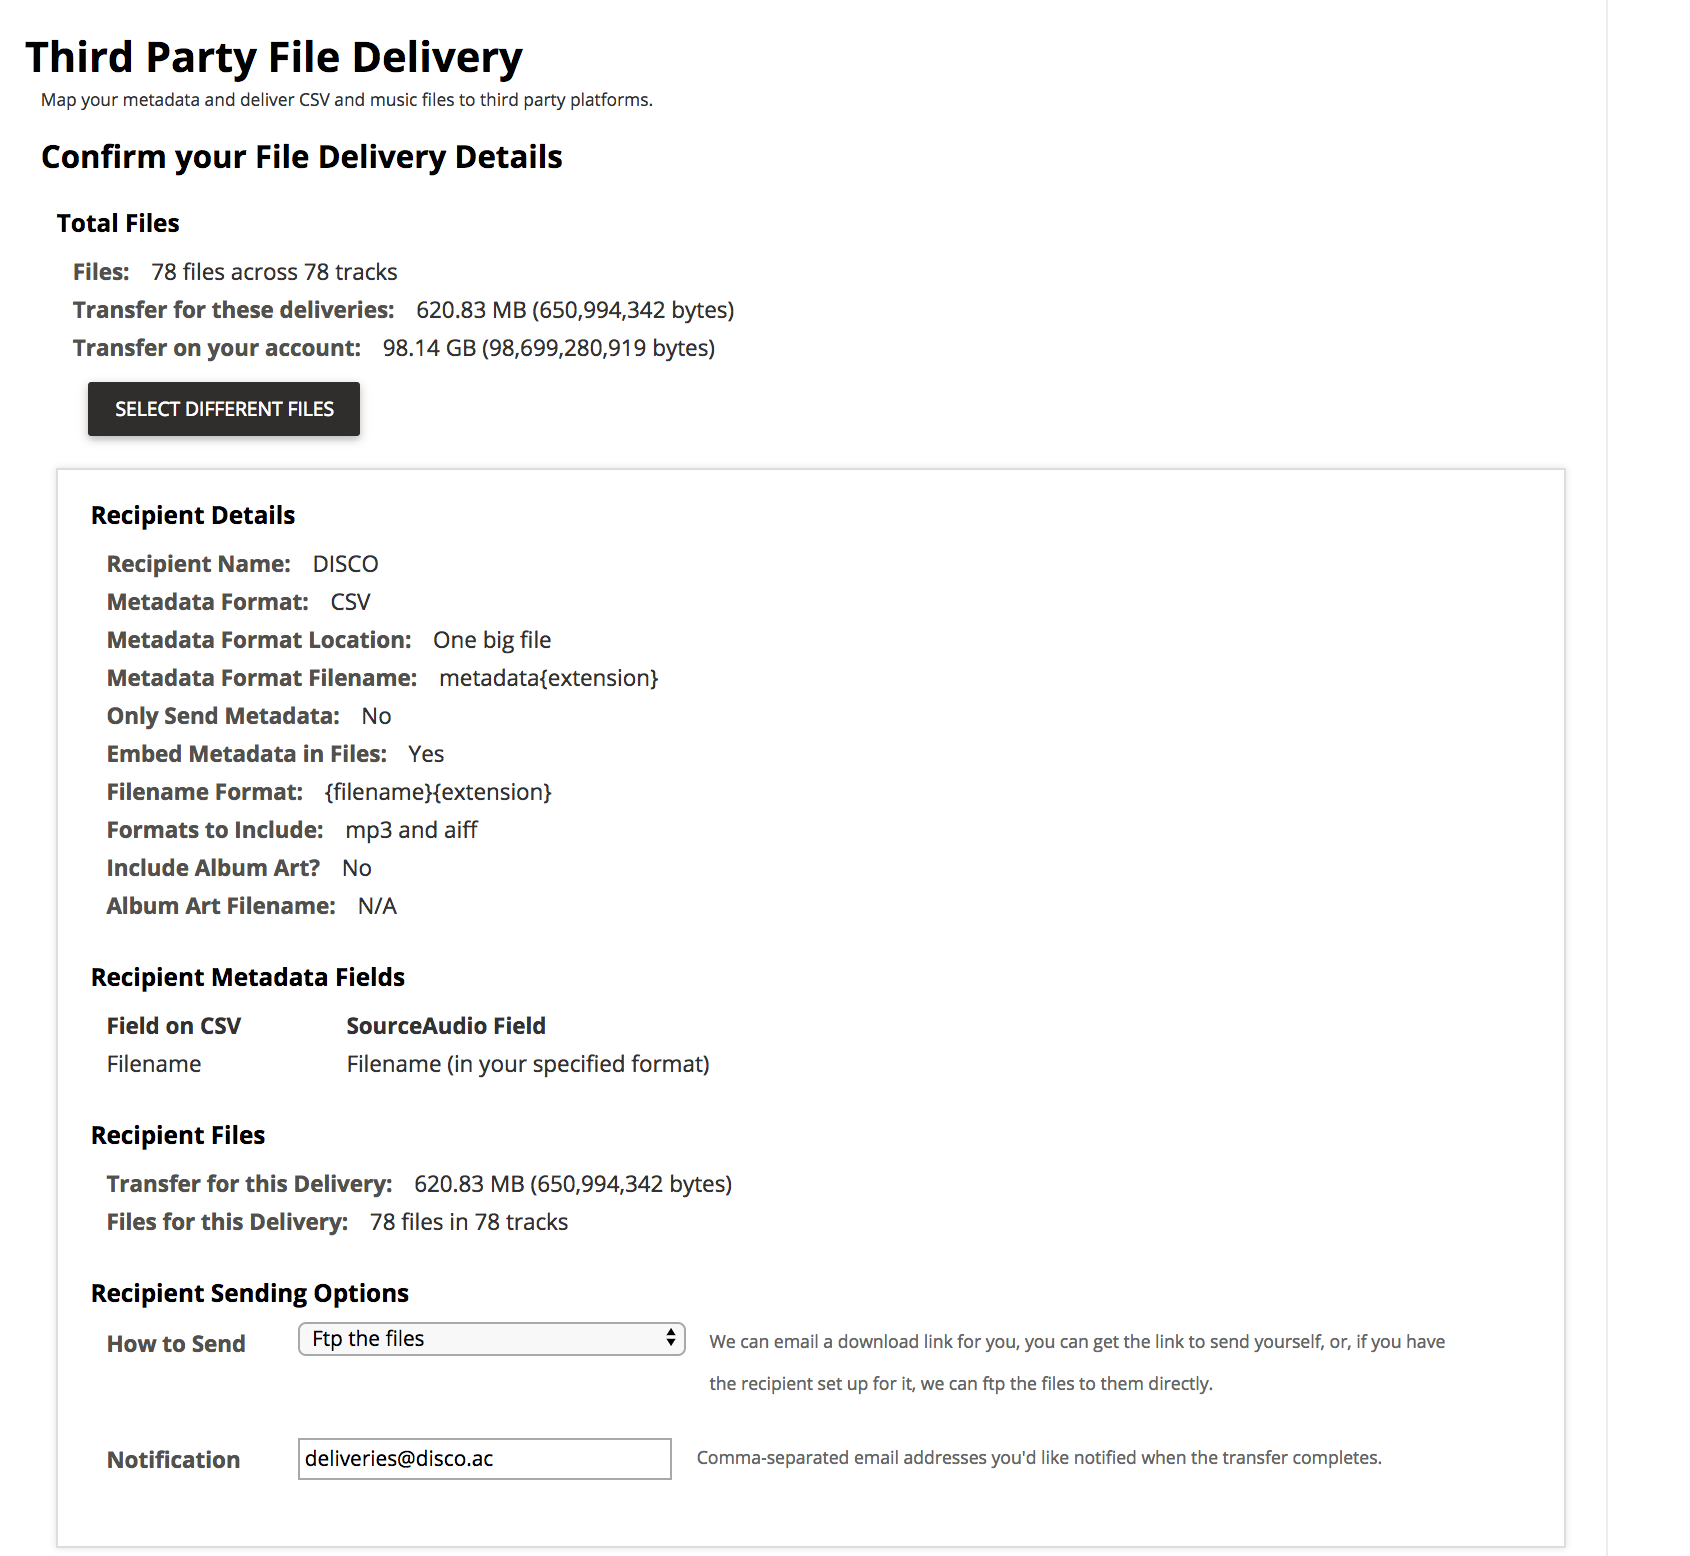
- In the last two fields, under Recipient Sending Options, select:
- How to send: FTP the files
- Notification: deliveries@disco.ac
- To begin the transfer, click Send Files.


Step 11: Contact us again to confirm the transfer is complete
- Email us at onboarding@disco.ac once you have completed the transfer. We'll complete the import and get in touch about the next steps.
In this article, we'll cover the next steps after completing the transfer of your Source Audio content to DISCO.
At a glance: Next steps
After you've contacted us at onboarding@disco.ac to confirm the transfer is complete, we will do the following on our end:
- Import your Source Audio Files into your DISCO.
- Merge your Source Audio files with identical Filenames into individual DISCO Tracks.
- Map the Track metadata from your Source Audio files to your DISCO Tracks.
- Organize Tracks with identical Album metadata into Playlists titled with that Album name so you can easily find them in your DISCO.
Merging your Source Audio files into individual DISCO Tracks
Individual Tracks in DISCO can support multiple audio file formats. To help streamline your DISCO, if any of your Source Audio files have identical original and optimized Filenames (WAV or AIFF + MP3), we will merge them into single Tracks for you. Both formats will be preserved and associated with the single Track.
Example:
In your Source Audio, you had two files with the Filename "Lost inside the Dream", one in WAV format and one in MP3 format. After we merge these in your DISCO, you will see one Track titled "Lost Inside the Dream" with two formats available: WAV and MP3.
When it comes time to share Tracks from your DISCO with others, you can control which formats are available for download.
Mapping your metadata from Source Audio to DISCO
Below is a list of the metadata fields we will map from Source Audio to your DISCO (if provided):
If you need additional fields not covered by the above, please reach out to us at onboarding@disco.ac.
Organizing Tracks with the same Album Name into Playlists
To help streamline your DISCO, if any of your Source Audio files have an identical Album name, we will organize them into a single Playlist with that same Album name.
Example:
In your Source Audio, you had six files with the Album "Lost & Found." In your DISCO, you will see a Playlist titled "Lost & Found" containing these six Tracks.
Additional resources and support
Along with our Support Center, we have lots of great content (including video courses) in our School of DISCO.
You're also welcome to contact us at onboarding@disco.ac with any questions or concerns. We're happy to help!
